

31 practical opening tips: Claim Notable Deeds, check Foresight, and return weekly for training
These 31 tips follow the video through rewards, routes, exploration, weekly activities, combat, and meals. Return weekly for temple service, training, and bonds.
Original video: Fortune's Weave: 31+ tips to know at the start | English-language gaming channel PhillyBeatzU
Claim your Notable Deeds rewards first, check the next battle's enemies, and plan exploration around weekly trips back for training. These tips for controls, travel, combat, and meals follow the video's order.
1. Update before starting
Check for a software update before you start and install 1.0.1. The update provides weapons from earlier games, including  Chosen Sword,
 Chosen Lance, and
 Royal Sword.
2. Claim Notable Deeds to unlock permanent bonuses
Visit the causality facilities first to claim Notable Deeds rewards. Goals such as defeating 10 or 20 enemies require you to claim Karma Shards manually, then spend them on Boons of Salvation. Note the next easy goal, too, so you can work toward it while exploring and fighting.
3. Claim Notable Deeds rewards at the Raven's Perch too
You can also access Notable Deeds and Boons of Salvation at the Raven's Perch. You do not need to return to the obelisk every time.
4. Going straight to the final story leaves allies missing
The Door of Destiny behind the obelisk takes you straight to the final campaign, but leaves you without companions from the past. On a first playthrough, experiencing the protagonists' stories first is a better fit.
5. Switch routes after meeting another protagonist
Follow one protagonist first, then switch after meeting another protagonist to see the encounter from the other side. This makes relationships and the weight of events easier to understand. It also avoids the feeling of having to start every other story from scratch after rushing through one route.
6. Check dungeon footprints for unexplored branches
Press ZR in a dungeon to see blue arrows on the ground. Check which directions you have already taken, then look for branches you have not explored.
7. Break dungeon objects and pick up glowing resources
Strike breakable objects and mineral deposits in dungeons, pick up glowing items on the ground, and use the rest points inside.
8. Search the corners of open areas
Open areas are not particularly large. An extra loop around their corners may reveal gold-glowing materials or items. Explore the edges rather than sticking only to the main path.
9. Control units in the close-up battlefield view
Place the cursor on a unit and press the right stick to enter a close-up battlefield view. You can inspect enemy positions, classes, and the map boundaries. In this mode, select an allied unit and press plus to walk within its blue movement range. Press B to return.
10. Four turns equal one day
Four turns equal one day, so each turn is a quarter of a day. Moving once on the world map costs one turn, and the displayed time of day changes accordingly.
11. Return weekly for regular activities
Return to Dagsion at least once a week for temple service, meals, and training before heading out again. Some protagonists also have their own weekly activities. Leave enough time for the return trip when planning your travels.
12. Plan the return journey before traveling far
Venturing farther from the capital can bring greater risks, but dungeons may hold weapons, upgrade materials, or Magic-boosting items. These resources can change your approach to combat. Plan the whole round trip before setting out.
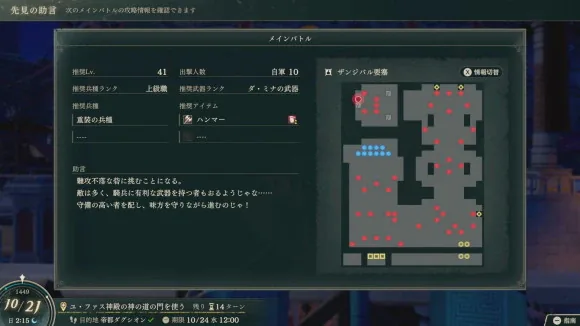
13. Check enemies in Foresight before planning training
Foresight at the Raven's Perch shows enemy units in the next main story battle. Use it to decide which answers you need to train this chapter. You can also press X to open the journal and switch to the rightmost tab, without making a special trip back to the Perch.
14. Deepen your Support relationship with Pale Raven
Deepening your relationship with Pale Raven unlocks Support-related salvation benefits. Choose appropriate responses to get the most from each interaction.
15. Gold names indicate new dialogue
A gold border above a character's name means new dialogue is available. The gold disappears after you talk, so you can tell who you have yet to speak with as you pass by.
16. Glowing circles mark city events
Faintly glowing, pulsing circles on the map mark city events. Walking over may trigger a story scene.
17. Accept new quests early and claim rewards afterward
New quest markers appear as the main story advances. Accept them early when you see them. Some only require talking to someone in the city. Others send you to a specific world map location to defeat enemies, then back to collect rewards.
18. Check restocks after story progress and visit outlying shops
City shops add stock as the main story advances. Shops around the world map also have their own weapons, items, and gifts. The gift you want for a character may be sold somewhere other than the capital.
19. Perform temple service on holy days for bonuses
Choose the blessing you want to develop first, then check the calendar for that deity's holy day. Take two characters along for service to gain blessing experience and improve their bond with each other.
20. Visiting deities adds Renown
When deities appear in their temples, visit and talk to them for extra Renown.
21. Fast-travel to people after the first conversation
Press ZR to fast-travel directly to temples, shops, and recruitable characters. Recruitable characters are orange dots on the map. Talk to them once, and you can travel directly to them afterward, saving trips across the city.
22. Check preferences before choosing gifts
Read a character's preferences in their information screen before giving a gift. Picking from the listed options is more likely to suit their tastes than handing over something at random.
23. Keep levels balanced for split deployments
Some maps divide your units between different positions. Giving all the experience to one character can leave other groups overwhelmed. Keep the units you plan to deploy at reasonably even levels so every group can fight.
24. Match weapons and roles to enemy classes
Use magical units against armored enemies, archers against fliers, and lance users against cavalry. Assigning targets by role is safer than rushing everyone in without checking enemy types.
25. Position your lines around counterattack range
Check enemy counterattack range before deciding who attacks. Put high-Defense or high-Avoid units where enemies must pass. Keep mages and healers behind them, where they can support the front line without taking concentrated attacks themselves.
26. Save Combat Art durability for key targets
Combat Arts consume weapon durability. Check how many uses remain before attacking and save them for targets worth spending them on.
27. Heal HP spent on Blaze Arts for experience
Have frontliners repeatedly use HP-consuming Blaze Arts, then let healers restore their HP. This builds healer levels within a single battle.
28. Give a gift, then invite unrecruited characters to meals
Give a recruitable character a gift first to unlock meal invitations. You can then build bonds before formally recruiting them. Guest icons in the meal roster distinguish them from your own team members.
29. Choose the right dishes for half-price Sunday meals
Meals cost half as much on Sundays, and Renown level 3 adds another dish. Choose three characters first, then check their expressions and evaluations for each dish. Try to pick something everyone likes. Meals cost money but no preparation turns; a poor dish still means less bond gain.
| Meal condition | Change |
|---|---|
| Sunday | Meal cost halved |
| Renown level 3 | Adds one dish |
30. Replayed chapter meals retain bond progress
Replay a completed chapter and invite the characters whose relationship you want to build to meals. Use Auto-activity to skip to the next week, then host more meals. When the chapter's time runs out, restart it and repeat. The bond progress you have built is retained.
31. Rest at the inn, then automate the remaining turns
HP and spell uses do not recover naturally during free time. Rest at the inn to restore them. Save Auto-activity for when your plans are finished and there is not enough time left for more exploration. Choose training, combat, or gathering to spend the remaining turns until the next main story battle begins.