
Kalla's Blessing
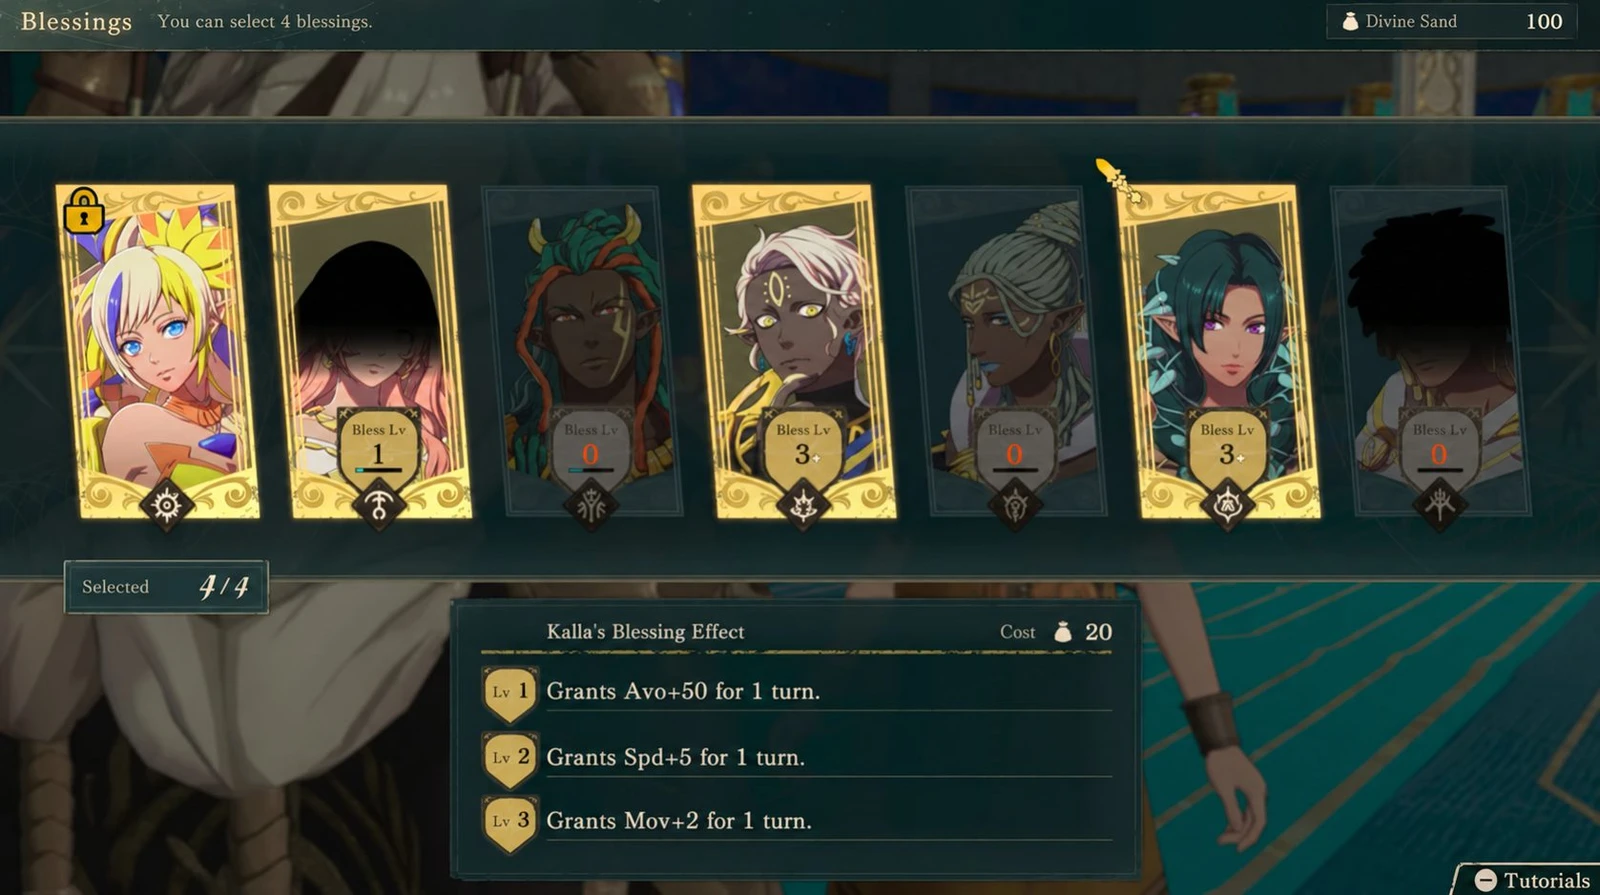
Lv. 1 adds Avoid, Lv. 2 adds Speed, and Lv. 3 adds Movement. Prioritize Kalla for proactive advances, or patch damage reduction or vision first. Her base Hard cost is 40, so check your sand before repeated uses.

Kalla helps the whole army advance with Avoid, Speed, and Movement. Its base cost on Hard is 40 Divine Sand; calculate what remains before consecutive activations.
Kalla's three levels and costs
| Level | Effect |
|---|---|
| Lv. 1 | Avoid +50 for 1 turn |
| Lv. 2 | Speed +5 for 1 turn |
| Lv. 3 | Movement +2 for 1 turn |
- Effects: Level 1: Avoid +50; Level 2: Speed +5; Level 3: Movement +2. Army-wide, for 1 turn; unlocked level effects apply together.
- Training priority: Prioritize Kalla if advancing aggressively matters. Another approach stops at Level 1 and trains Aurora next; Aurora Level 1 can also stabilize damage taken in Part 1.
- Auspicious days: Friday and Sunday.
Kalla is the game's most expensive Boon. Starting at 100 with no cost reductions, using only Kalla and reserving nothing for rewinds allows at most 5 uses on Normal or 2 on Hard.

Kalla's advance benefits and training tradeoffs
Prioritize Kalla to advance proactively. Avoid +50 combines with existing Avoid to improve survival when engaging. Level 2's Speed +5 helps meet follow-up requirements, and Level 3's Movement +2 helps you break through. Consecutive Kalla uses can help in difficult fights; one team evaded attacks across several turns this way.
Why Speed and Movement matter: Army-wide Movement +2 extends your reach. Speed +5 helps follow-ups; check the Attack Speed gap after weight and the combat forecast before activating. Even Level 1 can help a nearly defeated unit evade, making it an emergency option too.
Aggressive advances also work on Hard. Fortuna's rewind repairs an overextension afterward; Kalla enables a deliberate push. Moving farther while avoiding attacks lets you play aggressively. Under this approach, rank Kalla first and Mars second, one for defense and one for offense.
Another approach ranks Kalla last. The reasoning is that it mainly suits low-turn play and players willing to gamble on probability, making it a poor recommendation for casual and ironman players.
Kalla's Avoid +50 substantially reduces engagement risk. To maintain Avoid without a Boon, combine Positioning with terrain. See the dodge-tank build.
Save Kalla for engagements and timed objectives
- Turns when you want to evade incoming attacks. Save it for the heaviest expected pressure. Check enemy Hit and combat forecasts first; compare Aurora's damage reduction against highly accurate enemies.
- Timed capture and escort maps. Army-wide Movement +2 requires Level 3. Measure the distance, then check whether the extra two tiles complete this turn's objective.
- Difficult fights while underleveled. Consecutive uses are an option. Advice to use it for two or three turns assumes 20 Divine Sand per use. On Hard, without reductions, even a full 100 with no other spending permits only two. For three uses, calculate discounts, remaining sand, and the rewind budget first.
- When just short of a follow-up. After Level 2's Speed +5, check the original Attack Speed gap, weapon/accessory weight, and forecast. You attack twice only if the buff reaches the follow-up threshold.
Saving on Hard: Without discounts, 100 Divine Sand and no other spending allows two uses at 40, leaving 20. If reserved entirely for rewinds, that allows at most 4 more. Purchase Kalla's blessing cost reduction under Boons of Salvation; the 50% tier reduces her Hard cost to 20.
Distinguish failing to reach the target from reaching it without enough damage. For low-turn strategies, use Kalla's movement and Avoid to close in, then assess damage before comparing offensive options such as Mars and Smyrnos. Calculate reachable tiles and kills first. If you already reach the target and only lack damage, choose an offensive Boon.
Activate combinations of gods across separate turns: only one ordinary Boon can be activated per turn. Credna does not directly increase Attack either.
SpoilersPlan the final battle's gate route before using Kalla
One final-battle record uses a team around levels 65–70. Mobile squads head for gates in the left and right corners, while barrier breakers, main attackers, and extra-action support stay central. Kalla supplies the movement needed to reach gates. Do not destroy every gate immediately: barriers regenerate after each HP bar, so using both gates can leave you waiting for the next refresh.
To adapt this approach, check the current gates, their next refresh, and your main team's damage budget first. If one gate lets you keep attacking this round, leave the other. That team estimated roughly four units to break the barrier and another two to four to remove HP.
Carrying Kalla's levels into another route
Kalla levels trained on previous routes carry into a new Theodora route. One record had maximum-level Kalla before performing any Temple Service on the new route, making progression much easier.

Kalla's portal and two different trials
- Divine Gate: Leda Chapter 4 unlocks travel between Kalla's branch and main temples.
- Two different Kalla trials: Leda Chapter 10 has the trial for Kalla's Bow, rewarding the bow. In Part 3, repairing Kalla's temple and completing “Kalla's Request” unlocks another trial, rewarding Kalla's Needle. Distinguish the two.
- Kalla's Part 3 trial is the hardest of the six: every enemy has Avoid +50 and Speed +5. Bring accurate units or use Mars for Hit. As usual, bring a mage for heavy armor.
- Audience: available only on Cai's, Dietrich's, and Theodora's routes.