

Beginner’s guide: Attack Speed, Range, class changes, and Blaze costs
Growth rates set your chances of gaining stats, and Weight affects Attack Speed. Class changes do not reset levels, and learned abilities still need checking in the equipment menu.
Original video: Fire Emblem: Fortune’s Weave beginner’s guide — spoiler-free; Bilibili creator Xianyun SS. Watch the original
Start by separating base Speed from Attack Speed, then check weapon Range, effectiveness icons, and exam conditions. Learned equipped abilities must still be placed manually in the five slots, and the Blaze Gauge needs room to spare. Understanding these gives you a firmer basis for positioning, weapon changes, and training.
Growth rates set the chance of gaining base stats
An HP growth of 60 means a 60% chance to gain 1 HP each time you level up. It does not give you 60 extra HP right now. Press ZR on the character screen to see growth rates, including both character and class contributions. Your choice of class affects which stats are likely to grow at later level-ups.
Attack, defense, and Attack Speed calculations
Base physical Attack is Strength plus weapon might. Base magical Attack is Magic plus weapon might. After changing equipment, check the final stats as well, including abilities and other equipment effects.
Build is Strength divided by 5, rounded down. For example, 28 Strength gives 5 Build.
Build = ⌊Strength / 5⌋
Attack Speed = Speed - max(0, weapon Weight - Build)
Weapon Weight above your Build reduces Attack Speed. If it does not exceed Build, there is no penalty. Even a character with high base Speed can lose follow-up attacks when carrying a heavy weapon, so do not compare only the Speed stat.
Physical Hit uses weapon Hit and Dexterity, while physical Avoid uses Attack Speed. Magic Hit also includes Luck; magic Avoid uses Speed and Luck rather than Attack Speed. Terrain Avoid does not transfer directly to magic combat either. The video gives these base formulas; add abilities and equipment in actual battles:
| Value | Base calculation | |
|---|---|---|
| Crit | (Dexterity + Luck) /2 + weapon Crit | |
| Physical Hit | Weapon Hit + Dexterity | |
| Physical Avoid | Attack Speed | |
| Magic Hit | Spell Hit + (Dexterity + Luck) /2 | |
| Magic Avoid | (Speed + Luck) /2 |
Range intervals and effectiveness multipliers
A Range of 2 only reaches targets at distance 2. A Range of 1–2 includes both adjacent targets and targets two tiles away. Long-range magic with 3–10 Range cannot hit nearby enemies. Before attacking, check whether the target is within reach. When positioning, check the distances at which enemies can counterattack too.
Then check weapon effectiveness icons. One triangle means 2× and two mean 3×. The multiplier applies to weapon Might, not Strength.
| Range notation | Distances you can attack |
|---|---|
| 2 | Only distance 2 |
| 1–2 | Distances 1 and 2 |
| 3–10 | Distances 3 through 10 |
For example, when a bow is effective against a flying unit, multiply its weapon might by 3, then add the character’s Strength. Do not multiply the entire physical Attack value by 3.
Swords have another trait to track separately: the second, follow-up hit deals 1.2× damage. Compare whether a weapon allows follow-ups and what those follow-ups add.
Class unlocks and exam requirements
Beginner, intermediate, and advanced classes unlock at Renown 1, 4, and 8 respectively in the current character’s story. Master classes require progress through chapter 1 of the Promised One’s story and the story that follows. Special classes have individual unlock requirements. For example,  Caladrius must be unlocked in
 Cai’s story.
Exams also consider character level and proficiency. Level 10 for beginner classes, 20 for intermediate, and 35 for advanced are key thresholds. Being below the relevant level noticeably affects your success rate. A class appearing in the menu does not mean a character can reliably pass its exam yet.
After passing an exam, you can change class and keep gaining levels. Changing classes does not send you back to level 1.


Put equipped abilities in the five slots
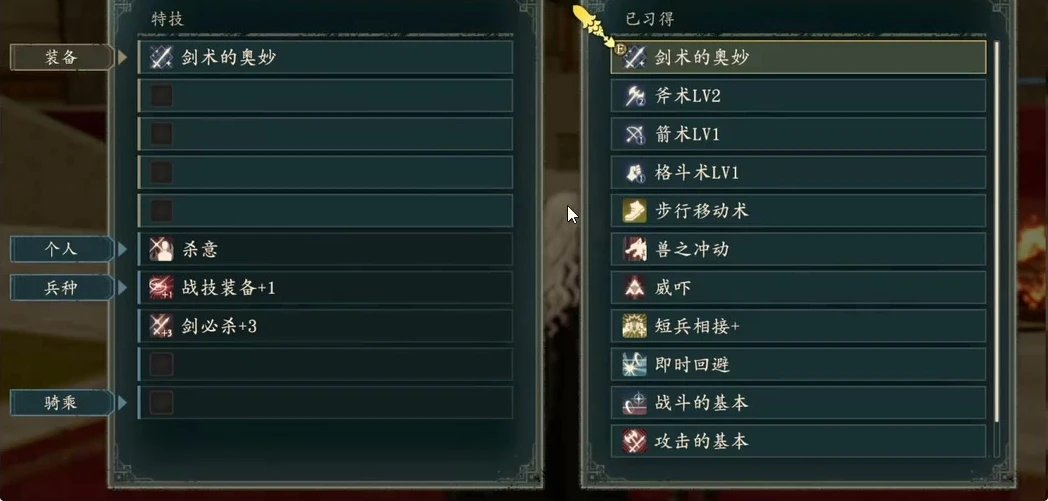
Personal abilities are innate to a character, such as  Dietrich’s
 Murderous Intent. Class abilities come from your current class and change when you change classes. Riding abilities come from the bond between a character and their personal mount.
 Io starts with a personal mount, and mounts captured in Cai’s story can also be developed. Ordinary mounts obtained only through class changes do not use this same relationship system.
Equippable abilities learned through proficiency and class mastery must be selected in the equipment menu, with up to 5 equipped at once. Unique equippable abilities learned through character levels also occupy these slots. Learning an ability does not automatically activate it. Most characters learn theirs at level 20 and improve it at level 35, so remember to check after leveling up.
A full Blaze Gauge costs maximum HP
Blaze Arts consume HP and increase the Blaze Gauge. You cannot use one without enough remaining HP. Entering the red zone triggers Overblaze, boosting stats and allowing higher-tier Blaze Arts. Filling the gauge completely usually lowers maximum HP for the current battle, though the Promised One has an exception.
Even ordinary characters without Blaze Arts can build up their gauge by using weapons with Curse. A full gauge carries the same maximum-HP penalty.
When you obtain a powerful purple weapon, check its Curse and the Blaze Gauge instead of focusing only on might.