

Dietrich
SSディートリヒ · Dietrich Dietrich route· Available from the startProtagonist
Build a critical-hit healing loop with Myrmidon and Shido mastery. Add Brigand or Warrior if Strength falls behind; Swordmaster is a complete Part 3 build, with The Blade competing for a limited slot.
 Commoner Lv1
 Sword
 Infantry


 Fan art →
Nine stats
| HP | Str | Mag | Spd | Dex | Def | Res | Lck | Cha | Total | |
|---|---|---|---|---|---|---|---|---|---|---|
| Growth rates | 50% | 45% | 30% | 50% | 60% | 40% | 30% | 50% | 60% | 415% |
| Overall rank63 characters total | Rank 9 | Rank 18 | Rank 25 | Rank 11 | Rank 1 | Rank 14 | Rank 26 | Rank 3 | Rank 1 | Rank 1 |
| Base statsCommoner Lv1 | 27 | 11 | 6 | 11 | 10 | 6 | 4 | 9 | 10 | 94 |
| Base stat ranking63 characters total | Rank 40 | Rank 30 | Rank 31 | Rank 24 | Rank 28 | Rank 39 | Rank 50 | Rank 23 | Rank 20 | Rank 26 |
| Lv60 expected statsResource-saving sword training | 68 | 42 | 24 | 56 | 59 | 30 | 21 | 40 | 47 | 387 |
| Expected rank62 characters total | Rank 17 | Rank 23 | Rank 24 | Rank 5 | Rank 1 | Rank 28 | Rank 30 | Rank 9 | Rank 2 | Rank 3 |
Proficiency
SwordInfantryWeakness White MagicBudding talent—
Starting skills
| Category | Skills | Effect |
|---|---|---|
| Personal skill |  Murderous Intent | Crit +5 when initiating combat |
| Level skillsLv5 |  Bestial Impulse | Crit +2 after combat (resets after combat in which a critical hit occurs) |
| Bloodmark |  Diadem of the Endless | 10% chance to restore a moderate amount of own HP when attackingHP |
| Blaze Arts |  Moving Shadow | Warp up to 3 spaces, then can attack again |
Focus on Sword and use DexSpd and healing on critical hits; stop at Swordmaster if Nezha takes The Blade slot.
First detour into Gladiator and Brigand to improve Str, then use Rogue and Ranger to improve Spd; the resource investment yields more balanced stats than a pure sword path.
Repeat the same route four times, reaching the War story each time to leave a carryover record: in the first three runs, use Gladiator → Brigand → Warrior to train HPStr, Hunter → Rogue → Sniper to train Dex, healing classes to train ResLck; on the final run, use this Hunter → Rogue → Ranger path to train Spd; in Part 3, first master Swordmaster and Shadow Seeker, then use The Eternal to learn Str +10, then return to The Blade to learn Spd+10。
Developing Dietrich: Three paths for a low-cost sword build, extra Strength, or repeated training
Original video: “That backstep scares me! Fortune's Weave character guide — Dietrich”; Bilibili creator Qiongyuan Destiny; Watch the original video.
For a low-resource route, stay with swords and combine criticals with Sacred Gem for sustain. With more investment, build Strength, collect class masteries, then catch up with higher-tier growth. Repeated training requires replaying Dietrich’s own route several times.
Choose a development path around critical-hit healing
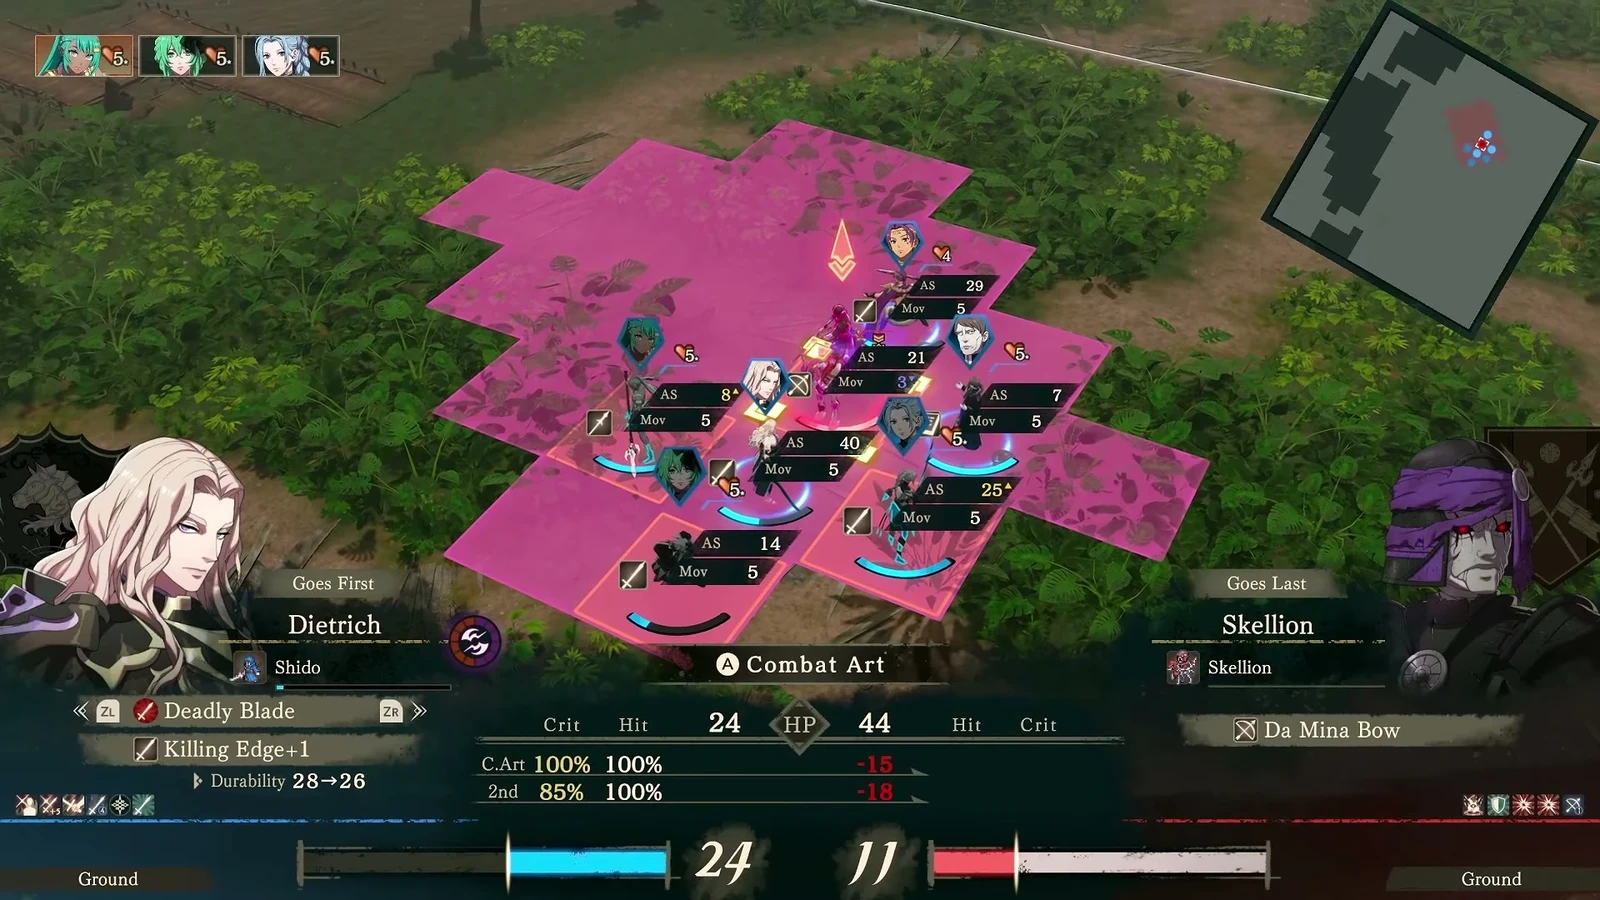
 Dietrich gains Critical from Murderous Intent when initiating, while Bestial Impulse adds 2 Critical after combat until a critical hit resets it. Early base Critical is low, requiring more combats; later Dexterity makes critical hits frequent. Triple damage gives him strong burst damage. Add
 Sacred Gem to restore one-third of damage dealt on a critical hit, connecting offense with healing.
There are three investment levels. For one playthrough with few resources, follow swords. For more training and certificates, build Strength and mastery first. To raise every stat, replay Dietrich's route with different development priorities. He is a protagonist and cannot be recruited on other routes, so the last approach requires replaying his own.
1. A low-cost sword path
Begin as Commoner, then advance through sword classes with training focused on Sword. If no other sword favorite needs it in Part 3, give him the  The Blade slot. If you prefer saving it for
 Nezha, Dietrich can remain a core unit as
 Swordmaster.
Sword growth suits his Dexterity and Speed, helping follow-ups and critical hits. This avoids spreading training across many proficiencies, but Strength can remain low, leaving high-Defense enemies alive after one combat.
Use carried items and equipped abilities for sustain
 Cleansing Blade handles Part 3 netherfiends, while
 Levin Sword extends counters to two tiles. The latter does more than break armor: if he cannot counter a ranged attack, he cannot land a critical hit and heal. Counterattack range matters for sustain too.
Answerer has weaker normal stats than Silver Sword, but its built-in Bloodletting provides an emergency high-Critical attack and saves limited silver weapons for allies. Sacred Gem is central. Add  Hexlock Shield for magical protection: +1 Defense and +5 Resistance, mainly to stop enemy mages dealing excessive damage in one hit.
Do not copy a full late-game loadout immediately. Shields add Weight, so check whether he can still follow up in this battle. Remove the shield if it prevents that. Use Silver Sword in the final slot for normal damage, or a cursed weapon to reach Overblaze faster. If carrying a cursed weapon produces unexpectedly abnormal damage against Underworld troops, remove it first.
The five equipped abilities are Bestial Impulse,  Swordfaire,
 Divine Insight,
 Ever Vigilant, and
 DexRavaging Arts. Without Divine mastery for Divine Insight, substitute
 Timely Guard. Ever Vigilant heals after a critical kill, while DexRavaging Arts adds critical damage. Choose an infantry-usable battalion that improves Strength, Dexterity, and Speed, using a lower tier if Authority is insufficient.
2. A heavily invested single-route path
Give Dietrich as much training as possible, aiming for Sword S early in Part 3 so he can change as soon as Divine eligibility unlocks. Do not stay in sword classes throughout Part 1. Rotate in this order:
- 1
- 2
- 3
- 4
- 5In Part 3, becomeSwordmaster at level 45, then switch to The Blade promptly once Divine classes unlock.
Try not to exceed level 45 in Parts 1 and 2, saving later level-ups for higher-tier classes. Dietrich's route easily overshoots, though, so do not repeatedly restart just to hold that level.
Once Strength is high, Sacred Gem supplies substantial healing, freeing Ever Vigilant's slot for  In Shadow. It grants +10 Avoid after a kill until after the next combat. Continuous kills keep renewing that protection.
3. Repeated development runs
Clearing or skipping the war story leaves an inheritance record. Repeated updates retain the higher value for each stat. For intensive development, separate four training runs rather than demanding every stat improve each time.
| Run | Development path | Main focus |
|---|---|---|
| First |  Gladiator→  Brigand→Warrior | HP and Strength; focus level-up rerolls only on these |
| Second |  Hunter→  Rogue→  Sniper | Dexterity for Hit and Critical, with bow training alongside it |
| Third | Healing classes | Resistance and Luck, plus Magic for Levin Sword |
| Fourth | Hunter→Rogue→ Ranger | Speed, Avoid, and Sword proficiency |
After every run, advance to the war story to update the record. Bring these records into Part 3 while ideally staying at or below level 45. Master Swordmaster and  Shadow Seeker first, then obtain +10 Strength from
 The Eternal, and finally return to The Blade for +10 Speed.
This requires several replays of Parts 1 and 2, concentrating the investment early. After all four directions, late-game Dietrich combines high Critical, high Speed, and critical-hit healing for sustained advances.
More guides
- Dietrich's critical-kill healing growth notesウノジ
- Recommended team and inventory for Dietrich Part IIJagaimo with Games 2nd
- Companion growth and class recommendations across the four protagonist routesBahamut player
- Dietrich's training route and recruitment requirements (Japanese Game8)Game8 Japanese guide team
- Dietrich recommended classes and recruitmentGameWith Fortune's Weave guide team
- Dietrich class and training recommendations (Game8 English)Game8 (English)
Site guides

Master Myrmidon and Shido first, then equip a Sacred Gem to heal through critical kills. Use Brigand or Warrior to patch low Strength.
Ravaging Arts from Myrmidon, Ever Vigilant from Shido, and a Sacred Gem combine critical damage with healing. You need both masteries and the healing equipment. If Strength falls behind, level as a Brigand or Warrior; for Speed and Dexterity, use Ranger. You can reclass along the way to improve stats while still ending with swords. Prepare a Cleansing Blade for Part 3.
View the route in the simulator
Class progression by stage
Part 1: Make critical hits secure kills, then solve healing
- 1Choose your beginner class for the stats you lack.The class table uses level 5 and weapon rank D as beginner planning milestones. Hunter favors Speed and Dexterity; Gladiator favors Strength. Unless pursuing extreme optimization, choose whichever you need more. Another approach masters Hunter first, then immediately switches to Gladiator to save later level-ups for Strength growth. This takes more mastery grinding and EXP control.
- 2At level 20 and Sword C, prepare Myrmidon and master Ravaging Arts.It increases critical damage. The goal is to obtain mastery, rather than spend every level in Myrmidon. If Strength is already low, use Brigand at the specialty tier, then return for Myrmidon mastery. Brigand can use swords, so no extra Spear training is needed.
- 3At level 35 and Sword B, prepare Shido and master Ever Vigilant.Healing after a critical kill combines with the Sacred Gem's critical healing to sustain consecutive fights. Without a kill or critical, the healing chain may stop. Until you obtain the gem in Part 1, keep healing and recovery items available. You must acquire the gem first; use healers and recovery items in the meantime.
If damage falls off around level 35, use Warrior for Strength. Its exam accepts Sword B, so you do not need to train a full set of axe skills from scratch. If Strength is sufficient but Speed and Dexterity lag, use Ranger once unlocked. Decide how long to stay from your current battle forecasts; there is no fixed need for ten or more levels.
Another approach separates mastery detours from growth. After level 20, master Myrmidon first, then use Brigand for Strength. Switch to Rogue for In Shadow, master Shido at level 35, then level as Ranger. This covers Strength, Avoid, Speed, and Dexterity, but costs more mastery and unlock time. On a first clear, you can visit fewer classes. Raise Sword as far as possible in Part 1 and train Infantry and Authority to their required ranks early.
Part 2: keep a class that kills reliably
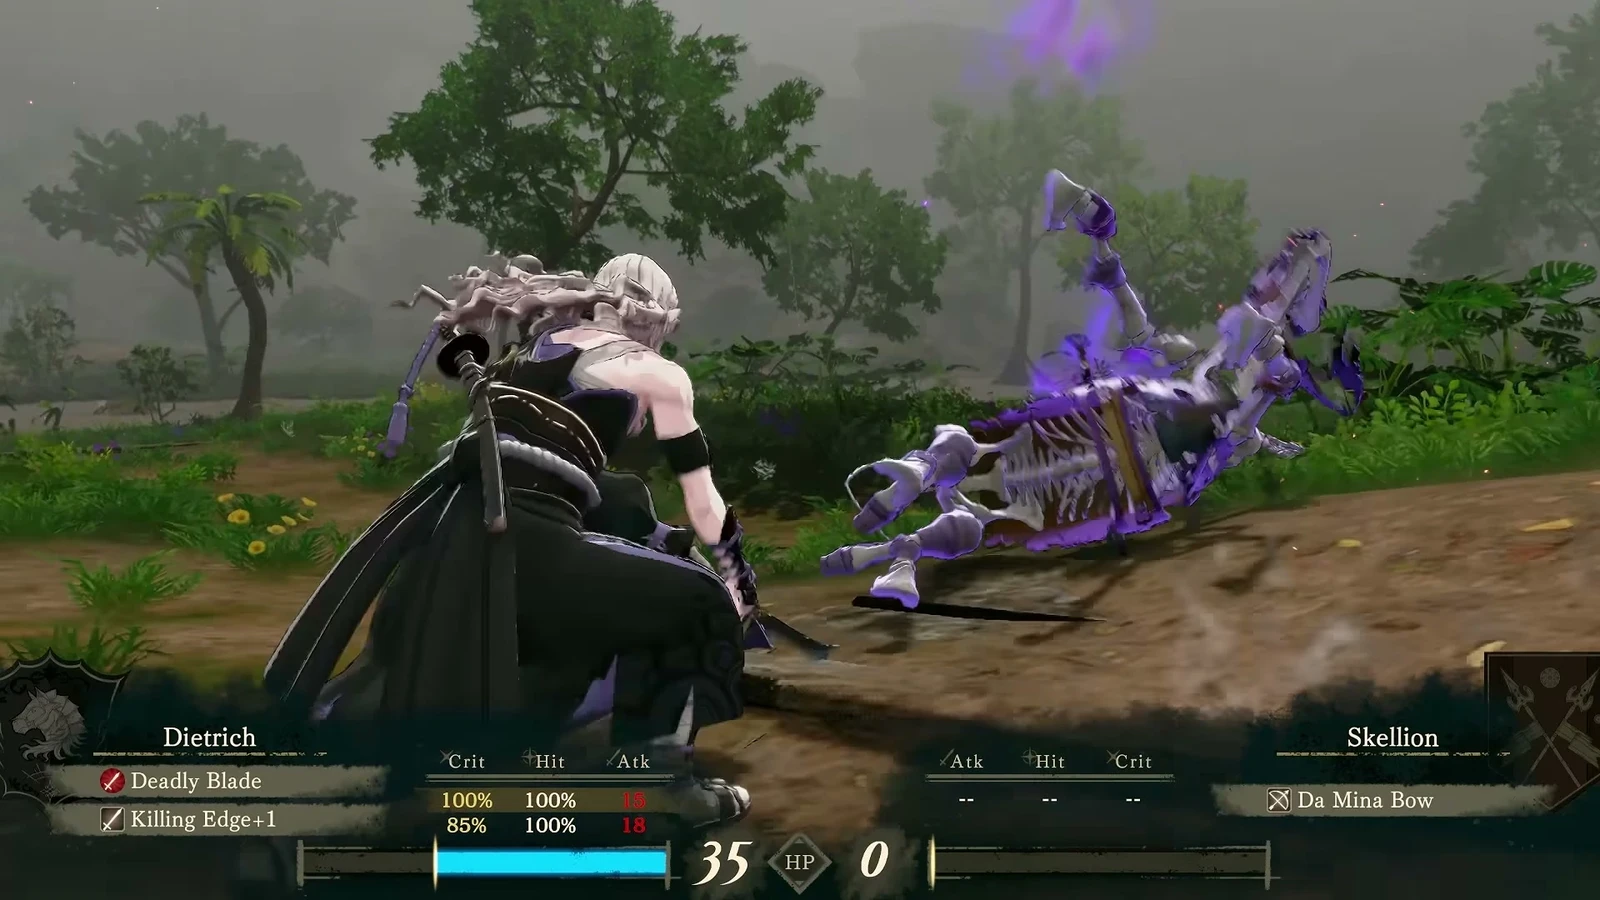
Continue with your current sword class or Strength/Speed growth class, keeping Ravaging Arts and Ever Vigilant equipped. Adjust to your current damage and survival needs. If you already kill reliably, carry on. If you can double but cannot get through Defense, improve Strength and weapons before adding more Avoid.
Carry a sword that deals enough damage and a ranged counter option. Use a Levin Sword against targets vulnerable to its magic damage; classes with spear access can also carry a forged Pilum. Counterattacks give you chances to trigger healing against archers and mages instead of taking repeated chip damage. Add shield and other equipment weight together, and preserve follow-ups early on.
Another high-investment approach trains different stats over separate runs, then brings the records into Part 3: Strength and HP, Dexterity, Resistance and Luck, and Speed. Complete the War story and update the record after every run. Merging takes each higher value; it does not add stats from multiple runs. This requires several playthroughs. You can still finish a run with poor growth.
Part 3: Choose the right weapon before a divine class slot
At level 45 and Sword A, Swordmaster is a practical final class. Complete its unlock quest involving the Temple of Mars first. Until then, use an advanced class you already have; keep fighting while you wait. Mastery grants Astra for burst damage. Keep a Cleansing Blade ready for underworld blessings in Part 3 instead of carrying only your ordinary Part 1 melee sword.
Consider Divine classes after reaching Sword S. The Blade requires its Part 3 qualification; mastering Divine Insight improves Speed. Another approach masters The Eternal for Divine Might first to improve Strength, then switches to The Blade. Each Divine class has limited slots and qualification requirements, and mastery takes time. After obtaining the skills, you can return to Swordmaster and give the slot to another main unit.
| Component | Use and trade-offs |
|---|---|
| Core skills | Ravaging Arts improves critical damage, while Ever Vigilant provides conditional healing. Equip them after mastery detours. |
| Optional Avoid | In Shadow requires a kill first. Treat the first engagement as having no bonus. |
| Bestial Impulse | One approach keeps it for critical accumulation. Another frees the slot later because frequent criticals reset that accumulation. |
| Equipment | Sacred Gem and Cleansing Blade, plus a usable ranged weapon. Consider a Hexlock Shield against mages, but still check weight and enemy damage. |
| Mounts, Battalions, and Blessings | The infantry route needs no special mount. Favor Dexterity and Defense from Battalions. |
End Moving Shadow within healing range
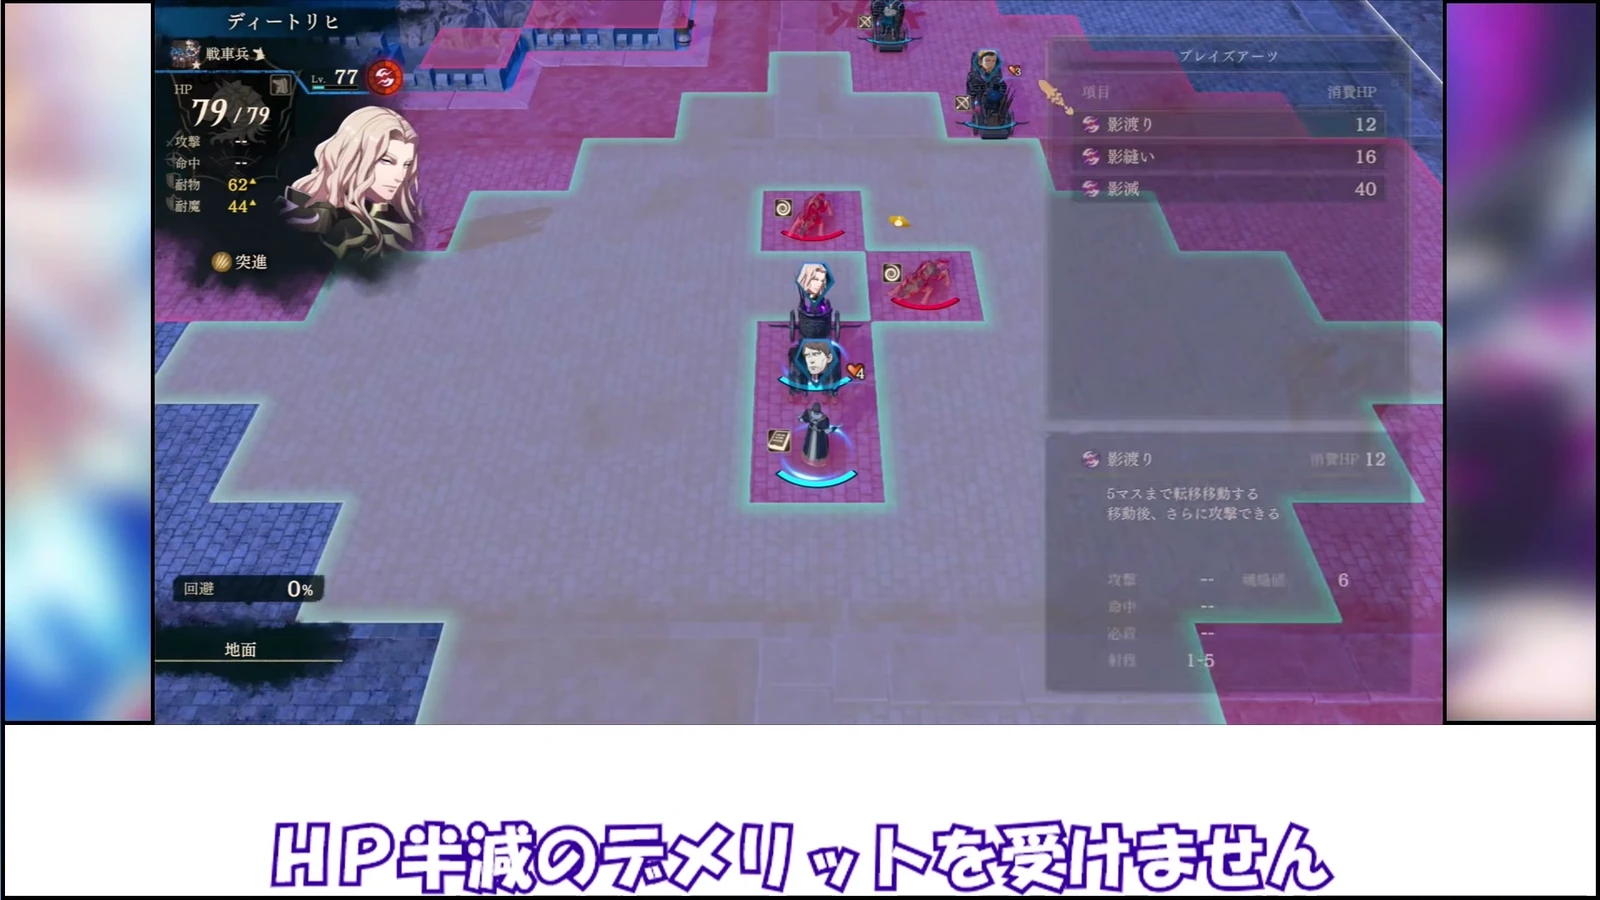
He can lead the advance, but keep him within healing range. Moving Shadow crosses obstacles, closes on threats, or escapes danger, but costs HP each time. Check the destination, remaining HP, and enemy count before committing. Until critical healing is established, keeping a healer such as Yang Jie nearby is safer than pushing one more tile.
He handles physical enemies he can counter well. Against mages and ranged enemies, check whether he can counter and survive a hit without landing a critical. Standing beside sword allies with high support can add critical rate, but both the support and class requirements must be met. The screenshot's 100 critical rate is not his permanent solo stat.
Recruitment details
Dietrich is available from the start of Part 1 on his own route. The other three routes cannot recruit him normally in Part 1. His Part 3 recruitment depends on completion records for his story and War Arc. Distinguish temporary participation from permanent recruitment. See the Dietrich recruitment page.
Position for damage taken without a critical
- Use Brigand or Warrior for missing Strength. Myrmidon and Shido can be mastery-only detours.
- Calculate survival without criticals or healing, especially against concentrated magic and ranged chip damage.
- Until Divine classes unlock, use Swordmaster or an available advanced class with suitable weapons.
- EXP control must still fit the campaign. Protagonists have mandatory deployments, so you cannot avoid all level-ups.
Comments
Commoner→Lv5Hunter→Lv20 Myrmidon→Lv35
 Shido→Lv45Swordmaster→The BladeCommonerAnswererMt 9 Hit 90 Wt 4




 Swords Lv. 1Hit +3 when wielding a sword
 Close Quarters+[Infantry] Adjacent enemies suffer Movement -2Timely Guard25% chance when attacked: protection +3
 Combat BasicsHit, Avoid +3
 Evasion[Infantry] 3% chance of granting Avo +100 when attackedMurderous IntentCrit +5 when initiating combat
 Grounder
 Cost 3 Mt 3 Hit 0Crosswise CutCost 4 Mt 5 Hit 0Flash BlowCost 5 Mt 7 Hit 0

 Hunter's RingWt 4HunterAnswererMt 9 Hit 90 Wt 4Bestial ImpulseCrit +2 after combat (resets after combat in which a critical hit occurs)Swords Lv. 1Hit +3 when wielding a swordClose Quarters+[Infantry] Adjacent enemies suffer Movement -2Timely Guard25% chance when attacked: protection +3
 Hunting BasicsDex、Spd+1Murderous IntentCrit +5 when initiating combatGrounderCost 3 Mt 3 Hit 0Crosswise CutCost 4 Mt 5 Hit 0Flash BlowCost 5 Mt 7 Hit 0Hunter's RingWt 4MyrmidonAnswererMt 9 Hit 90 Wt 4DexRavaging ArtsDamage dealt +6 on a critical hitBestial ImpulseCrit +2 after combat (resets after combat in which a critical hit occurs)In ShadowAvoid +10 after defeating an enemy (resets after 1 battles)SwordfaireHit and Avoid +10, Attack +3 when wielding a sword
 Attack BasicsStr+1Murderous IntentCrit +5 when initiating combat
 GrounderCost 3 Mt 3 Hit 0Crosswise CutCost 4 Mt 5 Hit 0Flash BlowCost 5 Mt 7 Hit 0Hunter's RingWt 4ShidoAnswererMt 9 Hit 90 Wt 4DexRavaging ArtsDamage dealt +6 on a critical hitBestial ImpulseCrit +2 after combat (resets after combat in which a critical hit occurs)In ShadowAvoid +10 after defeating an enemy (resets after 1 battles)SwordfaireHit and Avoid +10, Attack +3 when wielding a swordEver VigilantRestores a small amount of HP after defeating a foe with a critical hitHPMurderous IntentCrit +5 when initiating combat
 GrounderCost 3 Mt 3 Hit 0Crosswise CutCost 4 Mt 5 Hit 0Flash BlowCost 5 Mt 7 Hit 0Hunter's RingWt 4SwordmasterCleansing BladeMt 8 Hit 90 Wt 3Levin SwordMt 12 Hit 70 Wt 8Answerer ArisenMt 15 Hit 90 Wt 4Sacred GemWt 4Hexlock ShieldWt 4Silver SwordMt 18 Hit 95 Wt 4Bestial ImpulseCrit +2 after combat (resets after combat in which a critical hit occurs)SwordfaireHit and Avoid +10, Attack +3 when wielding a swordTimely Guard25% chance when attacked: protection +3Ever VigilantRestores a small amount of HP after defeating a foe with a critical hitHPDexRavaging ArtsDamage dealt +6 on a critical hitMurderous IntentCrit +5 when initiating combat
 The BladeCleansing BladeMt 8 Hit 90 Wt 3Levin SwordMt 12 Hit 70 Wt 8AnswererMt 9 Hit 90 Wt 4Sacred GemWt 4Hexlock ShieldWt 4Silver SwordMt 18 Hit 95 Wt 4Bestial ImpulseCrit +2 after combat (resets after combat in which a critical hit occurs)SwordfaireHit and Avoid +10, Attack +3 when wielding a swordDivine InsightSpd+10Ever VigilantRestores a small amount of HP after defeating a foe with a critical hitHPDexRavaging ArtsDamage dealt +6 on a critical hitMurderous IntentCrit +5 when initiating combat
 GrounderCost 3 Mt 3 Hit 0Crosswise CutCost 4 Mt 5 Hit 0Flash BlowCost 5 Mt 7 Hit 0
 Twin Jewel Fans计策「火计」Commoner→Lv5Hunter→Gladiator→Lv20Myrmidon→Brigand→Rogue→Lv35Shido→Ranger→Lv45Swordmaster→The BladeCommonerAnswererMt 9 Hit 90 Wt 4Swords Lv. 1Hit +3 when wielding a swordClose Quarters+[Infantry] Adjacent enemies suffer Movement -2Timely Guard25% chance when attacked: protection +3Combat BasicsHit, Avoid +3Evasion[Infantry] 3% chance of granting Avo +100 when attackedMurderous IntentCrit +5 when initiating combatGrounderCost 3 Mt 3 Hit 0Crosswise CutCost 4 Mt 5 Hit 0Flash BlowCost 5 Mt 7 Hit 0Hunter's RingWt 4HunterAnswererMt 9 Hit 90 Wt 4Bestial ImpulseCrit +2 after combat (resets after combat in which a critical hit occurs)Swords Lv. 1Hit +3 when wielding a swordClose Quarters+[Infantry] Adjacent enemies suffer Movement -2Timely Guard25% chance when attacked: protection +3Hunting BasicsDex、Spd+1Murderous IntentCrit +5 when initiating combatGrounderCost 3 Mt 3 Hit 0Crosswise CutCost 4 Mt 5 Hit 0Flash BlowCost 5 Mt 7 Hit 0Hunter's RingWt 4GladiatorAnswererMt 9 Hit 90 Wt 4Bestial ImpulseCrit +2 after combat (resets after combat in which a critical hit occurs)Swords Lv. 1Hit +3 when wielding a swordClose Quarters+[Infantry] Adjacent enemies suffer Movement -2Timely Guard25% chance when attacked: protection +3Attack BasicsStr+1Murderous IntentCrit +5 when initiating combatGrounderCost 3 Mt 3 Hit 0Crosswise CutCost 4 Mt 5 Hit 0Flash BlowCost 5 Mt 7 Hit 0Hunter's RingWt 4MyrmidonAnswererMt 9 Hit 90 Wt 4DexRavaging ArtsDamage dealt +6 on a critical hitBestial ImpulseCrit +2 after combat (resets after combat in which a critical hit occurs)In ShadowAvoid +10 after defeating an enemy (resets after 1 battles)SwordfaireHit and Avoid +10, Attack +3 when wielding a swordAttack BasicsStr+1Murderous IntentCrit +5 when initiating combatGrounderCost 3 Mt 3 Hit 0Crosswise CutCost 4 Mt 5 Hit 0Flash BlowCost 5 Mt 7 Hit 0Hunter's RingWt 4BrigandAnswererMt 9 Hit 90 Wt 4DexRavaging ArtsDamage dealt +6 on a critical hitBestial ImpulseCrit +2 after combat (resets after combat in which a critical hit occurs)In ShadowAvoid +10 after defeating an enemy (resets after 1 battles)SwordfaireHit and Avoid +10, Attack +3 when wielding a swordAttack BasicsStr+1Murderous IntentCrit +5 when initiating combat
 GrounderCost 3 Mt 3 Hit 0Crosswise CutCost 4 Mt 5 Hit 0Flash BlowCost 5 Mt 7 Hit 0Hunter's RingWt 4RogueAnswererMt 9 Hit 90 Wt 4Swords Lv. 1Hit +3 when wielding a swordClose Quarters+[Infantry] Adjacent enemies suffer Movement -2Timely Guard25% chance when attacked: protection +3Combat BasicsHit, Avoid +3Evasion[Infantry] 3% chance of granting Avo +100 when attackedMurderous IntentCrit +5 when initiating combat
 Combat Arts +1Equippable combat arts +1
 LocktouchCan open chests without a key
 SearchSlightly increases the chance of a perfect exploration result when deployedGrounderCost 3 Mt 3 Hit 0Crosswise CutCost 4 Mt 5 Hit 0Flash BlowCost 5 Mt 7 Hit 0Hunter's RingWt 4ShidoAnswererMt 9 Hit 90 Wt 4DexRavaging ArtsDamage dealt +6 on a critical hitBestial ImpulseCrit +2 after combat (resets after combat in which a critical hit occurs)In ShadowAvoid +10 after defeating an enemy (resets after 1 battles)SwordfaireHit and Avoid +10, Attack +3 when wielding a swordEver VigilantRestores a small amount of HP after defeating a foe with a critical hitHPMurderous IntentCrit +5 when initiating combatGrounderCost 3 Mt 3 Hit 0Crosswise CutCost 4 Mt 5 Hit 0Flash BlowCost 5 Mt 7 Hit 0Hunter's RingWt 4RangerAnswererMt 9 Hit 90 Wt 4Swords Lv. 1Hit +3 when wielding a swordClose Quarters+[Infantry] Adjacent enemies suffer Movement -2Timely Guard25% chance when attacked: protection +3Combat BasicsHit, Avoid +3Evasion[Infantry] 3% chance of granting Avo +100 when attackedMurderous IntentCrit +5 when initiating combat
 Combat Arts +2Equippable combat arts +2LocktouchCan open chests without a key
 Advanced SearchExploration is more likely to yield a perfect result when assigned to a squadGrounderCost 3 Mt 3 Hit 0Crosswise CutCost 4 Mt 5 Hit 0Flash BlowCost 5 Mt 7 Hit 0Hunter's RingWt 4SwordmasterCleansing BladeMt 8 Hit 90 Wt 3Levin SwordMt 12 Hit 70 Wt 8Answerer ArisenMt 15 Hit 90 Wt 4Sacred GemWt 4Hexlock ShieldWt 4Silver SwordMt 18 Hit 95 Wt 4Bestial ImpulseCrit +2 after combat (resets after combat in which a critical hit occurs)SwordfaireHit and Avoid +10, Attack +3 when wielding a swordTimely Guard25% chance when attacked: protection +3Ever VigilantRestores a small amount of HP after defeating a foe with a critical hitHPDexRavaging ArtsDamage dealt +6 on a critical hitMurderous IntentCrit +5 when initiating combatGrounderCost 3 Mt 3 Hit 0Crosswise CutCost 4 Mt 5 Hit 0Flash BlowCost 5 Mt 7 Hit 0Twin Jewel Fans计策「火计」The BladeCleansing BladeMt 8 Hit 90 Wt 3Levin SwordMt 12 Hit 70 Wt 8AnswererMt 9 Hit 90 Wt 4Sacred GemWt 4Hexlock ShieldWt 4Silver SwordMt 18 Hit 95 Wt 4Bestial ImpulseCrit +2 after combat (resets after combat in which a critical hit occurs)SwordfaireHit and Avoid +10, Attack +3 when wielding a swordDivine InsightSpd+10In ShadowAvoid +10 after defeating an enemy (resets after 1 battles)DexRavaging ArtsDamage dealt +6 on a critical hitMurderous IntentCrit +5 when initiating combatGrounderCost 3 Mt 3 Hit 0Crosswise CutCost 4 Mt 5 Hit 0Flash BlowCost 5 Mt 7 Hit 0Twin Jewel Fans计策「火计」Commoner→Lv5Hunter→Lv20Rogue→Lv35Ranger→Lv45Swordmaster→Shadow Seeker→The Eternal→The BladeCommonerAnswererMt 9 Hit 90 Wt 4Swords Lv. 1Hit +3 when wielding a swordClose Quarters+[Infantry] Adjacent enemies suffer Movement -2Timely Guard25% chance when attacked: protection +3Combat BasicsHit, Avoid +3Evasion[Infantry] 3% chance of granting Avo +100 when attackedMurderous IntentCrit +5 when initiating combatGrounderCost 3 Mt 3 Hit 0Crosswise CutCost 4 Mt 5 Hit 0Flash BlowCost 5 Mt 7 Hit 0Hunter's RingWt 4HunterAnswererMt 9 Hit 90 Wt 4Bestial ImpulseCrit +2 after combat (resets after combat in which a critical hit occurs)Swords Lv. 1Hit +3 when wielding a swordClose Quarters+[Infantry] Adjacent enemies suffer Movement -2Timely Guard25% chance when attacked: protection +3Hunting BasicsDex、Spd+1Murderous IntentCrit +5 when initiating combatGrounderCost 3 Mt 3 Hit 0Crosswise CutCost 4 Mt 5 Hit 0Flash BlowCost 5 Mt 7 Hit 0Hunter's RingWt 4RogueAnswererMt 9 Hit 90 Wt 4Swords Lv. 1Hit +3 when wielding a swordClose Quarters+[Infantry] Adjacent enemies suffer Movement -2Timely Guard25% chance when attacked: protection +3Combat BasicsHit, Avoid +3Evasion[Infantry] 3% chance of granting Avo +100 when attackedMurderous IntentCrit +5 when initiating combatCombat Arts +1Equippable combat arts +1LocktouchCan open chests without a keySearchSlightly increases the chance of a perfect exploration result when deployedGrounderCost 3 Mt 3 Hit 0Crosswise CutCost 4 Mt 5 Hit 0Flash BlowCost 5 Mt 7 Hit 0Hunter's RingWt 4RangerAnswererMt 9 Hit 90 Wt 4Swords Lv. 1Hit +3 when wielding a swordClose Quarters+[Infantry] Adjacent enemies suffer Movement -2Timely Guard25% chance when attacked: protection +3Combat BasicsHit, Avoid +3Evasion[Infantry] 3% chance of granting Avo +100 when attackedMurderous IntentCrit +5 when initiating combatCombat Arts +2Equippable combat arts +2LocktouchCan open chests without a keyAdvanced SearchExploration is more likely to yield a perfect result when assigned to a squadGrounderCost 3 Mt 3 Hit 0Crosswise CutCost 4 Mt 5 Hit 0Flash BlowCost 5 Mt 7 Hit 0Hunter's RingWt 4SwordmasterCleansing BladeMt 8 Hit 90 Wt 3Levin SwordMt 12 Hit 70 Wt 8Answerer ArisenMt 15 Hit 90 Wt 4Sacred GemWt 4Hexlock ShieldWt 4Silver SwordMt 18 Hit 95 Wt 4Bestial ImpulseCrit +2 after combat (resets after combat in which a critical hit occurs)SwordfaireHit and Avoid +10, Attack +3 when wielding a swordTimely Guard25% chance when attacked: protection +3Ever VigilantRestores a small amount of HP after defeating a foe with a critical hitHPDexRavaging ArtsDamage dealt +6 on a critical hitMurderous IntentCrit +5 when initiating combatGrounderCost 3 Mt 3 Hit 0Crosswise CutCost 4 Mt 5 Hit 0Flash BlowCost 5 Mt 7 Hit 0Twin Jewel Fans计策「火计」Shadow SeekerCleansing BladeMt 8 Hit 90 Wt 3Levin SwordMt 12 Hit 70 Wt 8Answerer ArisenMt 15 Hit 90 Wt 4Sacred GemWt 4Hexlock ShieldWt 4Silver SwordMt 18 Hit 95 Wt 4Bestial ImpulseCrit +2 after combat (resets after combat in which a critical hit occurs)SwordfaireHit and Avoid +10, Attack +3 when wielding a swordTimely Guard25% chance when attacked: protection +3Ever VigilantRestores a small amount of HP after defeating a foe with a critical hitHPDexRavaging ArtsDamage dealt +6 on a critical hitMurderous IntentCrit +5 when initiating combat
 Combat Arts +3Equippable combat arts +3LocktouchCan open chests without a key
 Master SearchGreatly increases the chance of perfect exploration results when deployedGrounderCost 3 Mt 3 Hit 0Crosswise CutCost 4 Mt 5 Hit 0Flash BlowCost 5 Mt 7 Hit 0Twin Jewel Fans计策「火计」The EternalAnswererMt 9 Hit 90 Wt 4Swords Lv. 1Hit +3 when wielding a swordClose Quarters+[Infantry] Adjacent enemies suffer Movement -2Timely Guard25% chance when attacked: protection +3Combat BasicsHit, Avoid +3Evasion[Infantry] 3% chance of granting Avo +100 when attackedMurderous IntentCrit +5 when initiating combatCombat Arts +3Equippable combat arts +3
 Axe Hit +10Hit +10 when wielding an axe
 Brawl Hit +10Hit +10 with gauntlets equippedGrounderCost 3 Mt 3 Hit 0Crosswise CutCost 4 Mt 5 Hit 0Flash BlowCost 5 Mt 7 Hit 0Hunter's RingWt 4Advanced Warriors计策「枪阵」The BladeCleansing BladeMt 8 Hit 90 Wt 3Levin SwordMt 12 Hit 70 Wt 8AnswererMt 9 Hit 90 Wt 4Sacred GemWt 4Hexlock ShieldWt 4Silver SwordMt 18 Hit 95 Wt 4Bestial ImpulseCrit +2 after combat (resets after combat in which a critical hit occurs)SwordfaireHit and Avoid +10, Attack +3 when wielding a swordDivine InsightSpd+10Ever VigilantRestores a small amount of HP after defeating a foe with a critical hitHPDexRavaging ArtsDamage dealt +6 on a critical hitMurderous IntentCrit +5 when initiating combatGrounderCost 3 Mt 3 Hit 0Crosswise CutCost 4 Mt 5 Hit 0Flash BlowCost 5 Mt 7 Hit 0Twin Jewel Fans计策「火计」
DexWidely recommendedDexVery strongDexUseful for specific strategies
 Swords Lv. 2
 Swords Lv. 3
 Swords Lv. 4
 Swords Lv. 5
 Close Quarters
 Infantry Move
 Pass Through
 Infantry Move+
 Spear
 Gale Spear
 Spears Lv. 1
 Spears Lv. 2
 Spears Lv. 3
 Spears Lv. 4
 Spears Lv. 5
 Spearfaire
 Axe
 Smash
 Axes Lv. 1
 Axes Lv. 2
 Axes Lv. 3
 Axes Lv. 4
 Axes Lv. 5
 Axefaire
 Bow
 Vital Shot
 Bows Lv. 1
 Bows Lv. 2
 Bows Lv. 3
 Bows Lv. 4
 Bows Lv. 5
 Bowfaire
 Gauntlet
 Deal Death
 Fists Lv. 1
 Fists Lv. 2
 Sharp-Edge Fist
 Fists Lv. 3
 Fists Lv. 4
 Fists Lv. 5
 Fistfaire
 Black Magic
 Blizzard
 Black Magic Lv. 1
 Black Magic Lv. 2
 Black Magic Lv. 3
 Black Magic Lv. 4
 Black Magic Lv. 5
 Black-Magic Mastery
 Riding
 Knightly Senses
 Flying
 Read the Winds
 Flitting Flier
 Airfighter
 Heavy Armor
 Armored Combat
 Build +
 Authority
 Threaten
 Lend Strength
 Threaten+
 Heal
 White Magic Lv. 1
 White Magic Lv. 2
 White Magic Lv. 3
 White Magic Lv. 4
 White Magic Lv. 5
 White-Magic Mastery
Dietrich: joins through Dietrich's story.
 Cai's storyCannot recruit
The four protagonists cannot be recruited in another protagonist’s Part I; guest or enemy appearances do not count as recruitment
Dietrich's storyCurrent route's protagonistPart I, Chapter 1, current route's protagonist
 Theodora's storyCannot recruit
The four protagonists cannot be recruited in another protagonist’s Part I; guest or enemy appearances do not count as recruitment
 Leda's storyCannot recruit
The four protagonists cannot be recruited in another protagonist’s Part I; guest or enemy appearances do not count as recruitment
 Renown level
 Bond Level with this route's protagonist. For all characters across the four routes, see Recruitment; see recruitment steps at How to recruit。
 Most effective gifts
All are most-loved gifts available at shops. Most of Dietrich's favorites are sweets. Most-loved gifts show double arrows in-game and give the largest affection increase.
Favorite6 items
Likes15 items
 Honey Pastries30G · SweetsHoney Milk100G · SweetsPastry Cookbook200G · SweetsPure-White Cervi200G · Sweets
 Board-Game Tactics200G · Board gameSpirit Board Game800G · Board gameTraining Weights300G · TrainingTraining Pillar500G · TrainingKitten Figurine100G · AnimalsCrimson Ghosh200G · Fermented drinksJoint-Relief Gloves300G · BowArrowhead Gem1500G · FashionProtection Figurine200G · MysteriesBlue-Rose Bouquet500G · FlowersHuge Fish Eyeball400G · Fish
LikesBeautiful things, sweets, his younger sisterInterestsSparring with strong opponents, meditation
Bond partners12 characters · 9 can reach A · 2 have confirmed paired endings
 A
 A
 A
 A
 A
 A
 A
 A
 A
 B
 B
 C
Letters indicate the highest available support conversation (C = support Lv2, B = support Lv3, A = support Lv4); A paired ending is confirmed,For the rules, seeBonds。
A beautiful swordfighter from Fódlan across the sea who delights in combat. Cold and trusting only himself, he wields Answerer and enters the Heroic Games to fight stronger opponents.
Details
| Title | A swordfighter from Fódlan |
|---|---|
| Affiliation | Laminu Family |
| Origin | Fódlan |
| Age | Ages 22–23 in Parts I and II; age 27 in Part III |
| Height | 192 cm |
| Birthday | 9/10 |
| Likes | Beautiful things, sweets, his younger sister |
| Interests | Sparring with strong opponents, meditation |
| Japanese voice | Satoshi HinoWikipedia (Japanese) |
| English voice actor | Xander MobusWikipedia (English) |
Relationships



In the story
A contestant who drifted ashore
A sea monster attacks Dietrich’s ship, leaving him washed ashore in Dagda. Hearing that the Heroic Games gather many powerful fighters, he enters; for him, facing strong opponents is what matters most.
Win a ship, then fight a sea monsterLight spoilers
He hopes to win a ship capable of long voyages and challenge the sea monster behind the shipwreck. Fighting alongside companions also teaches this self-reliant swordsman to depend on others.
A turning point in the finalsSpoilers
Facing Mars at the end of Part I, he could have continued pursuing victory but abandons his monster transformation, sheaths his sword, and concedes. He puts his bonds with companions above winning, reflecting the route's shift from solitude toward accepting others.
Postwar branch with EsmeraldaSpoilers
In his paired epilogue with Esmeralda, they reunite at a harbor and catch an enormous fish together at sea. The contest with nature sparks his interest, and he frequently fishes with her afterward. They live together for ten years and have two children.
Trivia
- His name comes from Old Germanic and means ruler of the people.
- In Part III, he ties his hair with a black ribbon over his left shoulder, resembling Mercedes’s hairstyle in Part I of Three Houses.