
Difficulty and modes
New players can start with Normal + Casual. Choose Hard + Casual for more tactical pressure, and Classic if you accept permanent losses. The altar only lowers difficulty; raising it or changing mode requires Descend Again.

Choose Hard + Casual if you want to plan positioning seriously while keeping fallen allies. Beginners can start with Normal + Casual.
For beginners and players focused on the story. Progress is easier, and fallen allies return after battle.
For experienced Fire Emblem players who want to plan positioning and actions carefully. It keeps tactical pressure without permanently losing characters.
For those who accept permanently losing allies or want an ironman challenge. One mistake can have lasting costs. Ironman usually adds self-imposed rewind restrictions.
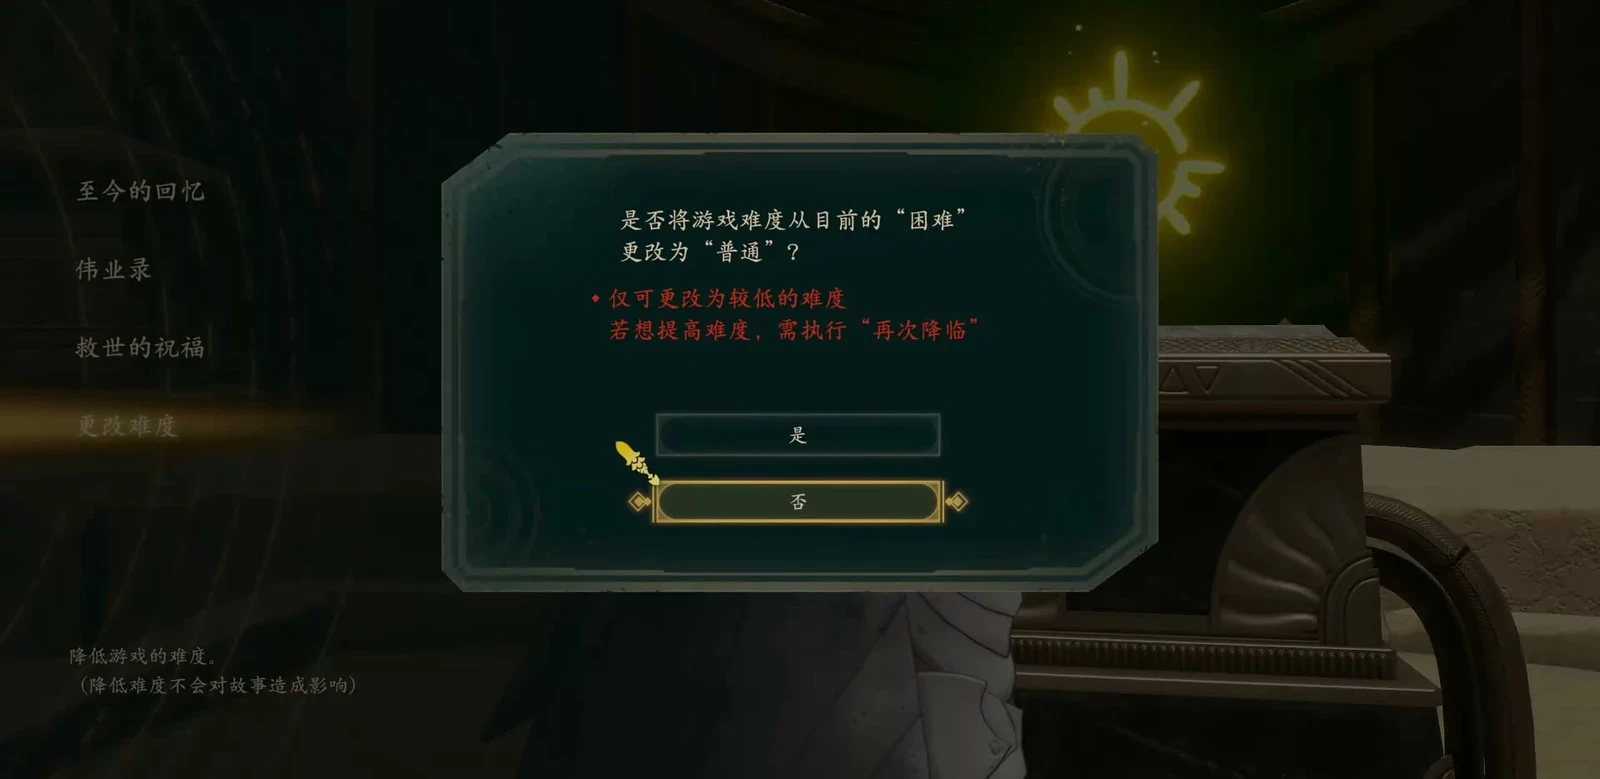
If you are unsure but willing to try the battles, start on Hard. You can lower it directly to Normal during play. Raising Normal to Hard or changing Casual/Classic requires Descend Again and replaying the prologue. Classic determines whether fallen units return, rather than selecting smarter enemies.
Combat difficulty and death mode
| Setting | Normal/Casual | Hard/Classic |
|---|---|---|
| Difficulty | Normal: weaker enemies and lower Divine Sand costs | Hard: more enemies, stronger stats, and more expensive Blessings |
| Mode | Casual: fallen units leave this battle and return afterward | Classic: fallen units are lost permanently unless you rewind the loss |
Hard + Casual and Normal + Classic are both available; these are not four successive difficulty levels. Casual still has defeat conditions, including certain important characters falling. Check each battle’s objectives before starting.
Hard increases enemy numbers and stats.
Does a Classic death affect other routes?
It does not remove every version of that character across all protagonist routes. In Classic, the fallen character loses deployment eligibility in the current progress of that route and does not automatically return after battle. They can still join on other routes where recruitable. For example, if  Yang Jie dies on one route, Cai’s route can still retain a living version. Recruit him again under that route’s conditions when you switch.
There is only one normal save slot, with separate chapter-start and suspended records for each route. Returning to a chapter record from before a death can save the character again. Death is handled by the current route and current result, while Support carries across routes.
Rewind while you are still in battle
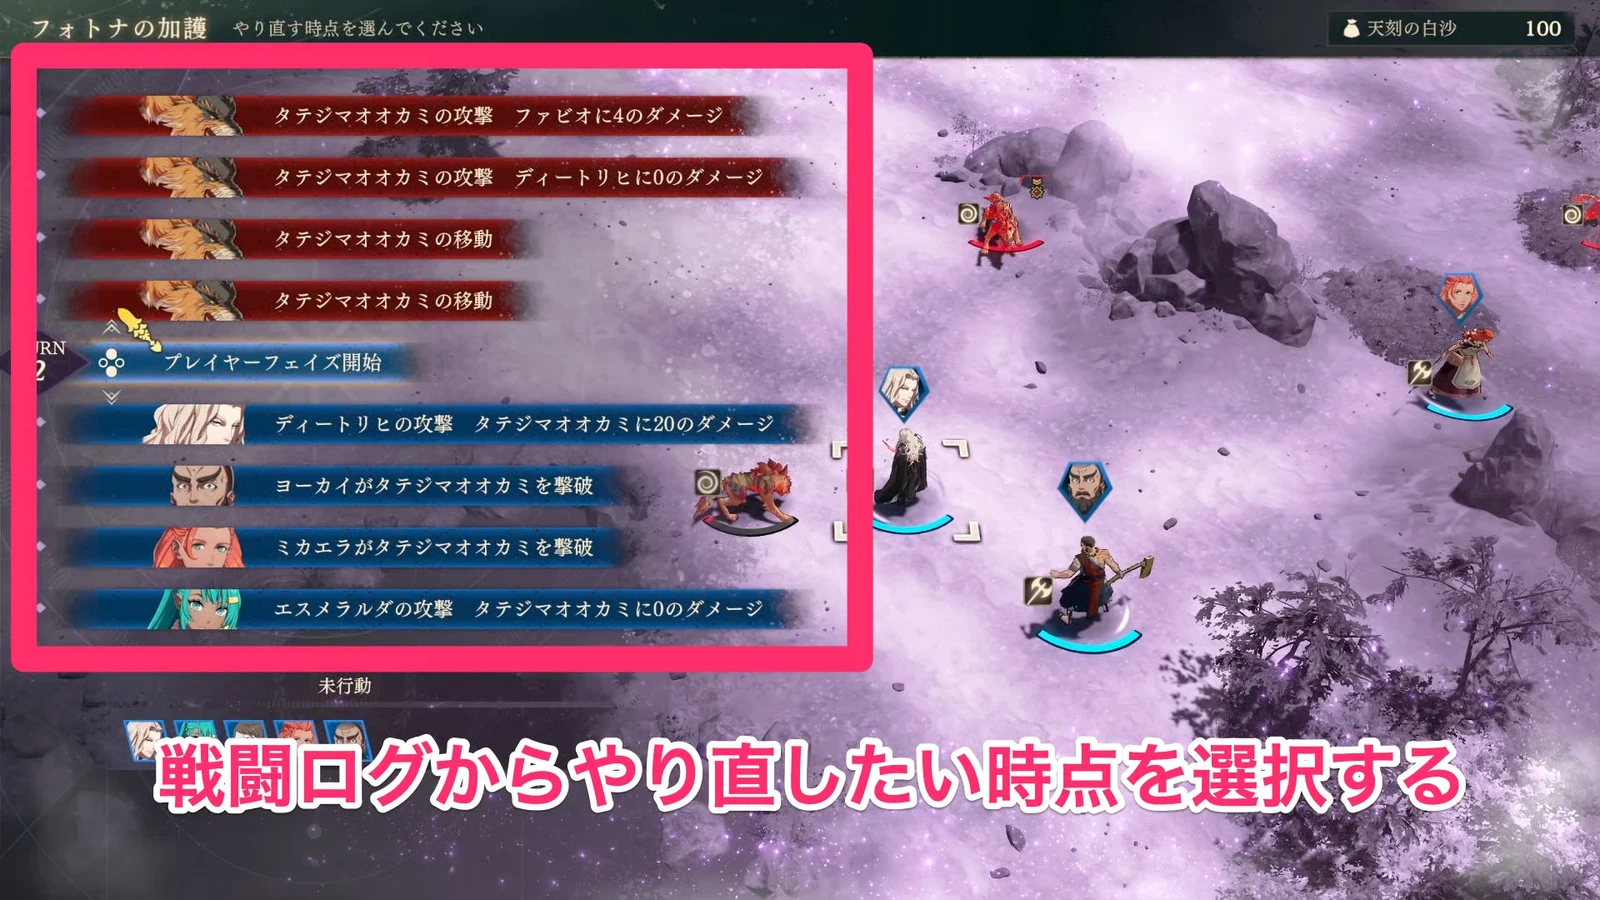
The game has an in-battle rewind: Fortuna’s Blessing. After someone falls, return to before the lethal action, then adjust movement, healing, or kill order. Classic can use it too. Rewinds cost no Divine Sand on Normal and have a base cost of 5 on Hard. Resolve losses before victory is finalized. See Fortuna’s Blessing for controls and exceptions after defeat.
After finishing the battle, you can still restart the chapter where the death occurred. Restart the current chapter from the system menu, or return to the Obelisk and choose an older record from before the death. If the character is already lost at the start of that record, go further back. This rolls back the entire stretch of progress: chapter levels, skills, money, items, Renown, new recruits, and quests. Bonds remain. To carry the rescued character into Part 2, continue from the replayed chapter through Part 1, Chapter 12 and update the clear record.
Part 2 selects a record; Part 3 brings teams together
| Progress | How deaths and team records work |
|---|---|
| Continuing the current route | Fallen units do not automatically regain deployment eligibility; rewind or replay from before the loss to keep them |
| Entering Part 2 | Loads the chosen Part 1 route’s clear record each time; a living same-name character on another route does not directly fill this team |
| Entering Part 3 | Combines results from routes whose Part 2 was completed or skipped, then recruits from available records; choose a route version if a character has several sources |
A character who dies on one Part 1 route can therefore return through another route in Part 3. Recruit that character on another route and finish with them alive to retain that version. Complete or skip the corresponding Part 2, then speak to them after entering Part 3’s second section to recruit them. You do not need to pay for Merge Causality first.
Killing someone while replaying Part 2 does not erase the character you previously obtained; that replay simply cannot refresh their training record. See Restart and inheritance rules for the full recording timing.
Story retreat can still remove deployment eligibility
An ally can remain in the story after falling but still lose deployment eligibility. Some continue appearing in scenes after defeat, even though they can no longer fight. Do not finish with that loss just because their dialogue did not sound like a final farewell. Important characters listed in the defeat conditions may instead trigger an immediate loss.
Casual lets units deploy again after the battle. An ordinary companion’s retreat does not require replaying the chapter. You must still protect characters required by the current objectives.
Why recommend Hard + Casual?
Choose Hard + Casual to enjoy the battles. Many Normal battles can be won quickly with animations skipped and little board analysis. Hard more often asks you to decide each position and action. Casual is preferred because losing a favorite on Classic removes both a unit from the battle and their future development.
Beginners can also start with Normal + Casual. This suits players new to the series who want a smooth story experience. Experienced players can consider Hard, and those accepting permanent losses can choose Classic.
Choose based on the combat pressure and death penalty you want. The name “Hard” is no reason to force a new player through it.
Serious tactical play comes down to terrain and positioning. Two Hard city-battle experiences aimed at keeping everyone alive illustrate this. In an open city surrounded by reinforcements, gather near favorable stairs. In narrow alleys with barricades, enemies are also constrained, allowing you to split forces and create local advantages. Hard suits players who enjoy studying terrain, classes, and builds; Normal suits story and character development.
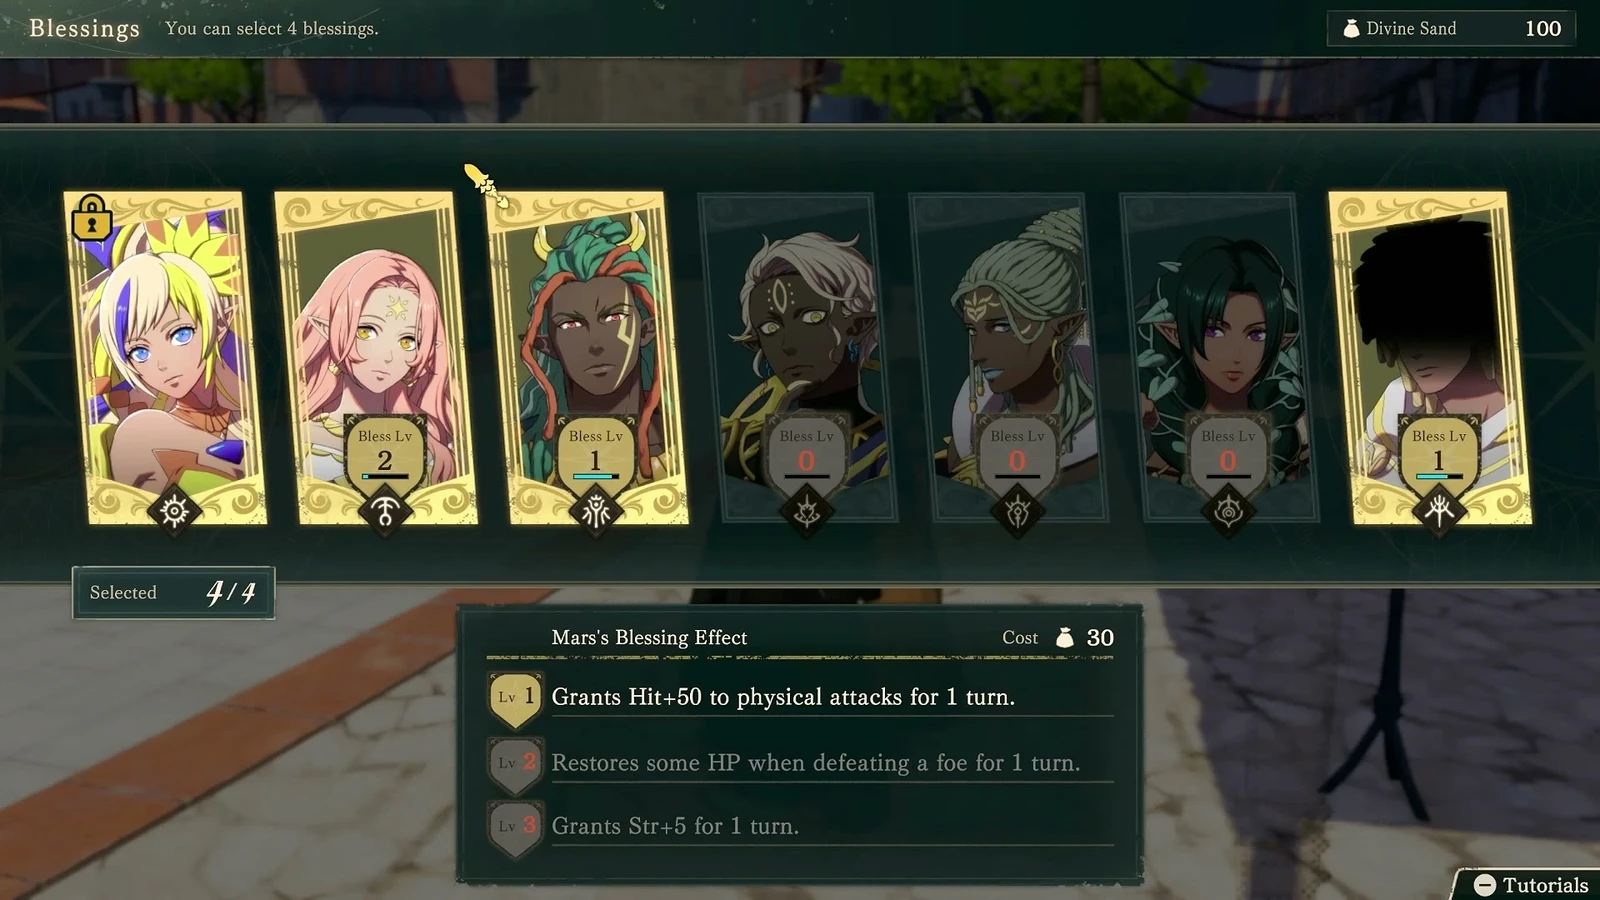
Hard shares Divine Sand between Blessings and rewinds
| Blessing | Normal cost | Hard cost |
|---|---|---|
| Fortuna | 0 | 5 |
| Aurora | 15 | 20 |
| Mars | 20 | 30 |
| Smyrnos | 20 | 30 |
| Jurah | 10 | 15 |
| Kalla | 20 | 40 |
| Credna | 10 | 20 |
These are base costs without cost-reduction Boons. Difficulty affects the price; Casual or Classic does not discount Blessings.
This assumes a Hard main battle starts with 100 Divine Sand, no Boons of Salvation cost reduction, and the base prices above.
Hard therefore adds a resource decision as well as stronger enemies: use a powerful Blessing now, or keep some Sand to recover from mistakes? Main-story battles and paralogues refill it, but free-time encounters do not refresh it every battle. See using Blessings and rewind.
Training determines pressure in the later parts
Opinions on late-game difficulty differ with training. Some find Parts 2 and 3 hardest; others finish Part 2 on Normal without much trouble because their main units are extremely strong while neglected allies are weak. Untrained characters can also feel paper-thin in Part 3. Whether Part 2 becomes a wall depends on the training gap between your main units and the rest.
Single-route Hard Classic can bring more late-game pressure. Without stat and weapon-rank advantages from training multiple cross-route versions, some players compare the late game to Maddening or beyond. That is a difficulty comparison, not evidence of a third difficulty called Maddening in this game.
Boons of Salvation and inheritance also make later routes noticeably easier. If you already bought experience or cost-reduction boons but want more combat pressure, turn off some effects. This does not roll back the characters’ training. Do not compare a second route with every bonus active directly against a first route with none.
How do you change difficulty or mode?
Lower Hard to Normal at the Altar of Causality
Use a Pale Raven to return to the Obelisk Chamber, go to the Altar of Causality on the second floor, and choose the difficulty change. This only changes Hard → Normal. It cannot raise difficulty or change Casual/Classic. Lowering difficulty does not require restarting a protagonist route.
Use Descend Again to raise difficulty or change mode
- 1Return to the Obelisk Chamber and save manually there.
- 2Return to the title from the system menu and choose Descend Again.
- 3Reselect difficulty and mode. You can also change the Promised One’s name and appearance.
- 4Finish the prologue and return to the obelisk to continue your existing four-route progress.
Replaying the prologue while skipping scenes takes an estimated 20 minutes. Four-route story progress and training remain. If the altar cannot raise difficulty, use Descend Again: the altar only lowers it, while the title option lets you reselect it.
Rewind immediately when someone falls in Classic
Rewind when someone falls; do not wait for victory. Classic does not revive them after battle. Normal’s free rewind does not become a resurrection button after results are finalized. Hard requires 5 Divine Sand to rewind. See Fortuna’s Blessing for controls.
SpoilersImportant-character defeat conditions in the later parts
 Theodora
 Bertrand
 Eshmel
The prologue’s fear-of-insects choice is independent of difficulty. Telling Fortuna you cannot stand insects changes the appearance of some insect enemies, and can be adjusted later in settings. It does not lower enemy stats or change Classic rules.