

Fix Theodora’s accuracy before building a lance-and-white-magic frontlinerMinor spoilers
Use Archer mastery for accuracy, then Guardian and Sentinel for durability and white magic, ending in The Trident.
Original video: Theodora’s classes and development plan · English video creator Jay Dunna
 Theodora suits a lance frontliner who can heal, but accuracy and Speed are worth addressing along the way. Start in
 Soldier, use intermediate
 Archer mastery for
 Crescendo, spend most advanced-class time in
 Guardian training White Magic, switch to
 Sentinel in Part 3, and finish in
 The Trident. Her HP and Strength are already high. Focus on landing attacks, reducing enemy follow-ups, and actually developing her white magic.

High HP still needs Speed and Dexterity
Her HP growth is among the highest in the roster. She has 50% Strength, 50% Charm, and 380% total personal growths. Her 30% Magic does not favor a dark-magic damage role, but her white magic list deserves investment: healing, Physic at White Magic B, Seraphim against late-game netherfiends, and Aura at S. A durable character who can also heal allies is the key value of this path.
Even 40% Speed and 40% Dexterity can fall behind in Part 3 on Hard. Her 40% Defense and 30% Resistance provide a foundation for taking hits, but cannot replace accuracy and Attack Speed. Stacking HP, Strength, and Defense works early. If you ignore Speed and Dexterity throughout, reliable follow-ups and Blaze Art accuracy become harder later.
Pick up Crescendo in an intermediate class
Armored Knight offers good HP, Strength, and Defense growths, and its mastery,  Great Counter, adds 3 Attack when the enemy initiates. I mostly used armor in this playthrough, but recommend an Archer detour instead. Crescendo grants 3 Hit per kill, up to 30 on the current map, improving normal attacks and Blaze Arts. Archer also improves Speed and Dexterity growths, so the short stay offers more than mastery alone.
The cost is that Archer only uses bows. You cannot train in the class while continuing to use lances as usual. To improve Speed while keeping lances, choose  Myrmidon. For a stronger Speed focus, you can switch to
 Rogue after Archer mastery and at least retain swords. Her base Speed is not beyond help; this detour creates more follow-up opportunities later.
If you do not want extra bow or sword training, stay in Armored Knight. That branch still improves frontline strength, but does not also solve accuracy and Speed. Crescendo needs kills to stack, too: you do not begin each map with 30 Hit.
Start training White Magic as a Guardian
Advanced  Ranger helps Speed and Dexterity. A short stay can further adjust growths, but the goal here is leveling benefits; its bow-counter mastery is not central to the lance-and-white-magic build.
 Shido also uses lances, and Ever Vigilant restores a little HP after a critical kill. Theodora does not crit often, so do not build her main sustain around it.
Spend most advanced-class time in Guardian. It combines lances, Combat Arts, and white magic, with Magic Heal +10 improving recovery. Mastery grants  Brace, giving Protection +3 after a kill until your next player phase. She gains fuller action choices: defeat an enemy and keep holding the line, or turn to healing when free.
Invest in White Magic actively instead of remembering it only in Part 3. You can buy 10 White-Magic Manuals across three towns each chapter. Check their shop stock on the world map and collect them. Cast spells in spare moments to train proficiency while continuing to use lances in major battles. Aim first for  Physic at B. A frontline body with ranged healing is far more convenient than one who must stand beside an ally to heal.
Prepare a light lance and cavalry coverage in Part 1
Use  Mahadu's Spear as the main Part 1 weapon and carry a Javelin upgraded as far as possible for ranged exchanges.
 Da Mina Spear adds accuracy to Combat Arts while Dexterity is still lacking, and Ridersbane handles cavalry. Carry several Vulneraries to leave room for recovery after pushing forward.
 Royal Resolve has a 30% chance to halve damage when attacked, offering extra survivability. Overblaze strengthens her personal ability. Still keep enough HP to survive without the damage reduction. A random activation cannot be treated as guaranteed.
Stay in Sentinel and borrow Castle Knight's Intercept
When master exams unlock in Part 3, Sentinel directly extends Guardian: an extra Combat Art slot, continued Magic Heal +10, and doubled white magic uses. Seraphim is effective against netherfiends, especially armored ones late in the game. Mastery grants  Resolute Stance, adding 5 Protection and 5 Resilience at full HP. Once injured, you cannot keep counting those 5 points.
For more durability, briefly enter  Castle Knight to learn
 Intercept, reducing damage taken by 5 when attacked. It has excellent HP, Strength, and Defense growths but lowers Speed and Resistance growths. Mainly borrow its mastery rather than staying long and becoming more vulnerable to follow-ups.
Another useful mastery comes from  Orichaldia:
 Fierce Spear prevents enemy follow-ups in the combat where you use that lance Combat Art. It is not a permanent passive; you must select the art. If you still need Speed,
 Swordmaster can continue using lances. Celestial Trooper’s Lightning Reflexes requires at least 10 more Attack Speed than the enemy when initiating. Unless Speed has grown exceptionally well in your save, do not make that branch the main plan. Keep Sentinel for most of Part 3 and insert other masteries as needed.
The Trident keeps white magic useful through the end
Choose The Trident as the divine class. It retains an extra Combat Art slot and Magic Heal +10, and triples white magic uses, giving Seraphim and Aura more room to work. Mastery grants  Divine Wall for Defense +10, turning her already high HP into more frontline durability.
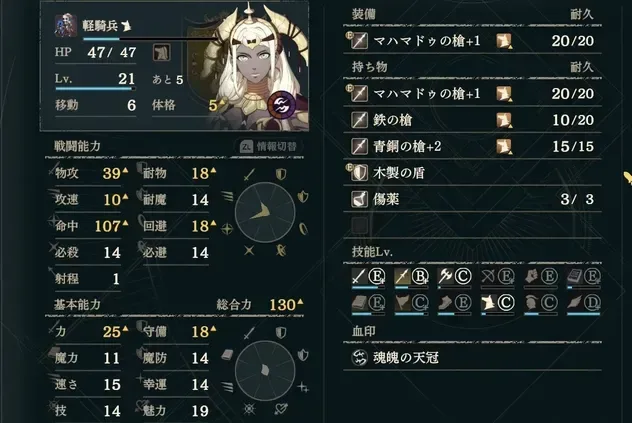
The endgame Theodora shown here has 60 Strength, 42 Speed, 47 Dexterity, 47 Defense, 37 Resistance, and 58 Charm. Strength is excellent, but Speed is still not high enough to ignore follow-ups. Charm can support Battalions. This setup emphasizes reliable attacks and durability without specifying one Battalion.
Endgame weapons have clear jobs: Da Mina Spear for Combat Art accuracy, Pilum for long throws, Halberd against armor, Mahadu’s Spear for Full Moon, and Ridersbane for cavalry. Full Moon is upgraded to +4 here, gaining 6 might. The inventory also includes a Concoction. Armored enemies and cavalry are separate effectiveness targets. Change lances for the enemy you are fighting.
Replace Direct Hit with Divine Wall first
The five equipped skills shown are:
| Skill | Reason to keep it |
|---|---|
| Crescendo | She can secure kills and turn them into Hit for more reliable later attacks. |
 Direct Hit | Blaze attacks can deal 10 extra damage, but activation is inconsistent. |
| Resolute Stance | Improves durability at full HP, so healing matters. |
| Infantry Move | Reduces infantry movement costs through difficult terrain so the frontliner can reach combat. |
 Spearfaire | Improves Hit, Avoid, and damage with her main weapon type. |
After learning Divine Wall, replace Direct Hit first. On Hard, thrown stones often cannot finish enemies directly, and Direct Hit's bonus damage needs a chance trigger. Crescendo matters for later accuracy, Resolute Stance for survival, and Infantry Move for reaching the position in time, so these deserve their slots more. Learn Divine Wall first, then replace Direct Hit in the original five-slot setup.
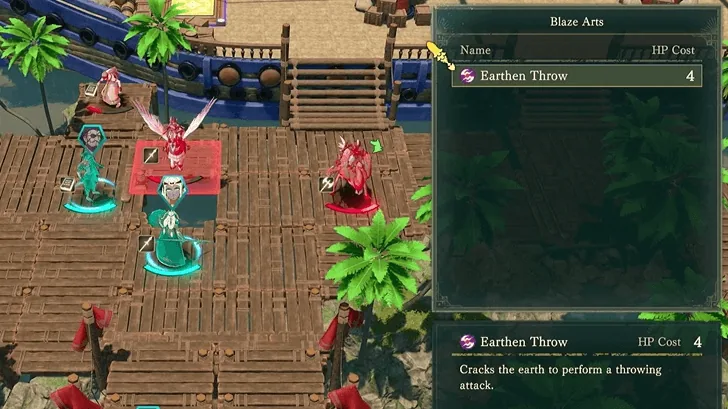
Use Combat Arts to prepare for the next hit
Choose spear arts for the next battle's enemies: upgraded Tempest Spear adds Hit; Armored Blow improves Protection after a kill but cannot follow up; Protective Storm adds Protection during the current combat; Brilliant Strike adds Resistance after a kill, useful before facing mages. Distinguish immediate effects from on-kill effects rather than counting a later defensive bonus on the opening attack.
After completing Dietrich’s Parts 1 and 2, Combat Art upgrades can improve these moves further. Keep training White Magic too. The displayed build already has 9 Seraphim uses, and manuals can keep pushing toward Aura at S. She remains most comfortable near the front: throw at distant targets, use lances against enemies ahead, and cast when allies need healing. A healer who can hold her ground gives your front line more freedom.