Check before the war story and before recording a clear
Before Part 2, finish timed events and equip what you need to carry over. Before recording a clear, separately check mounts, battalions, and character records.
Check recruitment, equipment, and supports before changing parts#
Your current stage First priority Main cost of missing it Each Part 1 chapter’s out-of-town story objective Actually visit the target node and confirm the green check before leaving Running out of turns without registering the visit may force a chapter restart Early Part 1 Check day/night events at chapter start; keep Some missed events require replaying several chapters in sequence September–October in Part 1 Track paralogue acceptance and completion separately; do not automate past fixed dates Lost recruitment prerequisites, weapons, or scenes; possible chapter restart Before Part 1 Chapter 12 ends Targeted proficiencies, weapon upgrades, recruitment, and mount bonds Most facilities are unavailable in Part 2, making last-minute preparation difficult Preparation screen on entering Part 2 Put weapons and equipment in character inventories and confirm they carry over Stored items cannot be withdrawn in Part 2 or replaced through ordinary inventory access Before the first Part 2 completion Check mount/battalion assignments and the character versions you want to keep Version binding and later item additions may require Karma Shards to retrieve Part 3 entry and opening Confirm training records, split teams, reenable Blessings, and reserve restoration materials Later training may not directly update current characters; turns are tighter
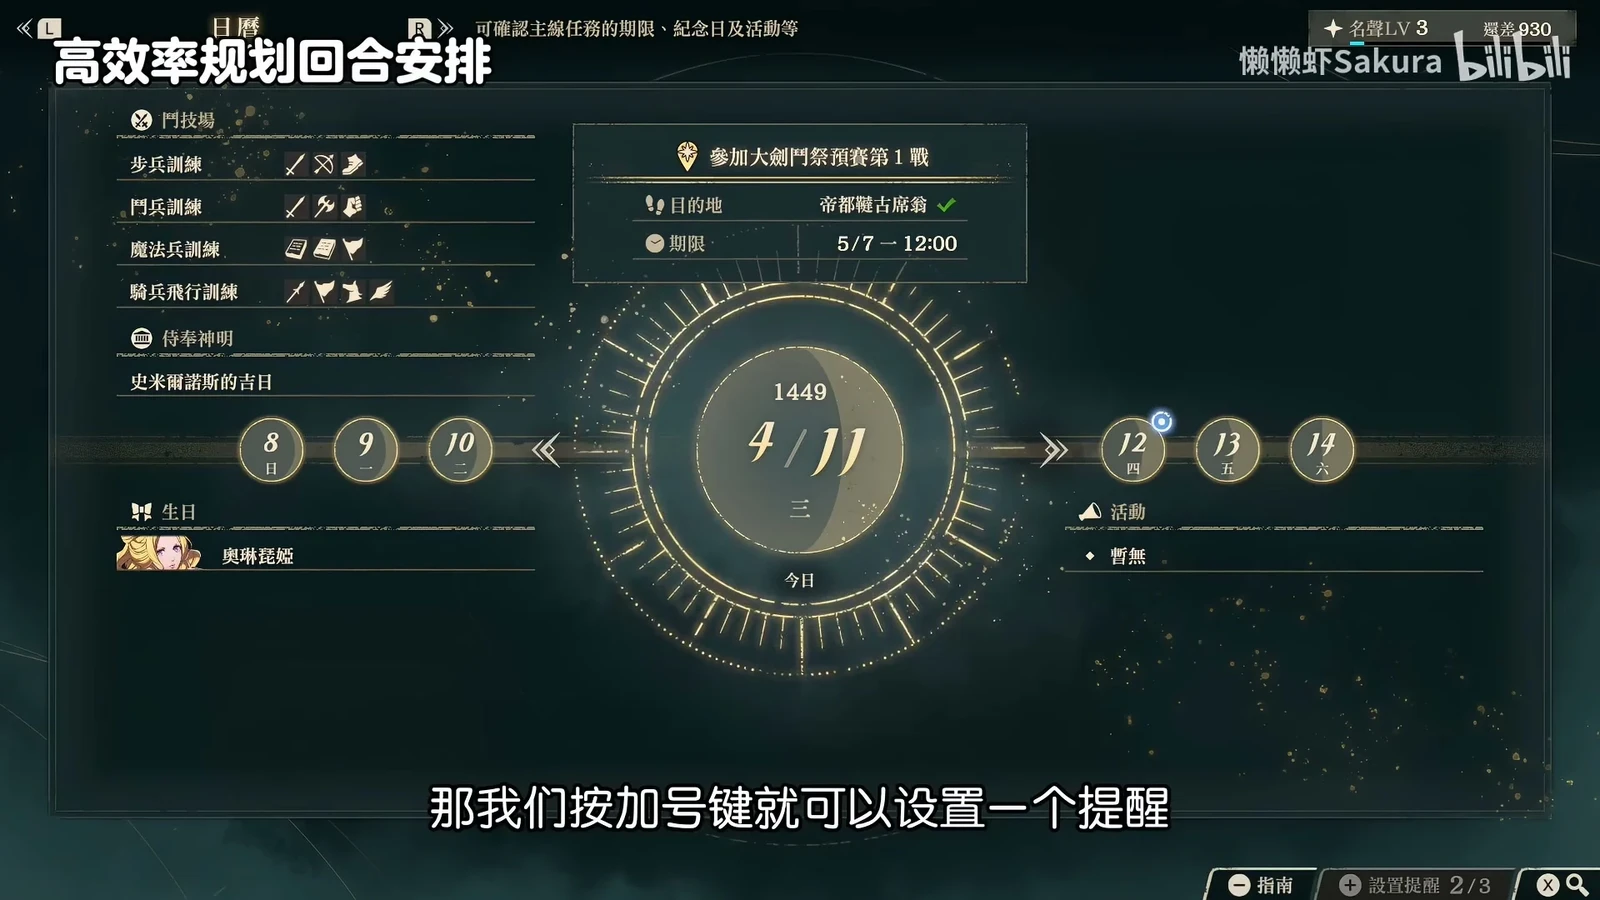
Visit Part 1’s out-of-town story objective before spending the rest of your free time. Actually reach the marked node, choose to continue moving or wait, and confirm a green check at the destination before leaving. Canceling with B does not register the visit, and merely seeing the location on the map is insufficient. Only after confirming the visit should you rely on Part 1’s automatic arrival at the deadline; it does not replace the first journey. Plan returns for spectating and weekly training separately from registering the story destination.
Check according to your goal: prerequisites for recruitment, training and equipment for combat strength, and events for full collection. Neither the Cleansing Blade nor fully training all four routes is required to clear the game. See the paralogue list for dates.
Preserve early Part 1 recruitment prerequisites#
Check events at the start of each free-time period before a long journey out of town. Track paralogues and hidden scenes separately. Focusing on one can make you forget the other and require a chapter replay. Put both on your calendar, and use reminders for spectating and festivals too. Schedule these route events first.
Time/route Check off Purpose and cost of missing it Find Increases Speak to Prerequisite for Find Passing the progression point misses this optional scene; it is not a combat requirement, but do it first if collecting scenes Find Optional outfit event with a required order; skip it if you do not want the appearance
Keep an extra record for Dietrich’s prerequisite. Fabio’s events require continuous progression. If you miss Chapter 5, continue from Chapter 5 through Chapters 6–9 and into Chapter 10. Selecting the two chapters separately does not complete it.
To collect everything safely, complete all three Fabio events in Chapters 5, 10, and 12. See the missable checklist .
The plus below the calendar sets a reminder, and blue bells beside dates mark existing reminders. Check birthdays, lucky days, and main-story deadlines on the same page. From Chapter 9, report quests before fast-forwarding#
Check when each paralogue appears, its acceptance deadline, and its battle date separately. For Dietrich, one scheduling example is to accept Leda’s paralogue from September 2, accept Theodora’s on September 3, finish the latter first, then report to Leda by September 8. That conversation advances to the September 9 battle. Automating to September 9 does not replace the conversation.
Accept both quests, allow time for travel, then return for the quest that forces the date forward. Round-trip time depends on your current date, route, and unlocked travel points. The two days in the example apply only to that trip.
Route milestones in September and October0/21 重置
Dietrich or Leda: finish Creek's “My Late Sister's Accessory” and report back after obtaining it. This is a later joining requirement; Cai and Theodora have no equivalent way to complete it for him. You must also fulfill the corresponding defeat condition in Part 2. Adding the quest to your log does not finish the chain.Dietrich, 9/17: put Bertrand's paralogue first on the day's plan. It must be handled that day and is a prerequisite for Peppe and Gaitz. Missing this one-day window affects a Dietrich-exclusive recruit. Talimun is also available that day but has a later completion deadline; keep their deadlines separate.Theodora, Chapter 10, before 9/15 at 23:59: decide whether to lend Anatolia your ship. Finish the chapter's sea exploration first. She returns on 9/28 at 18:00, affecting events in Chapters 11 and 12. If you keep the ship too long, you cannot simply wait for her return and recover those conversations.Dietrich, October: finish Orchel's paralogue before advancing through Cai's dialogue. Accept Orchel's quest on 10/18, leave town to finish it, then return to Cai, who advances the date to 10/23. Reversing this order squeezes out travel time and the other paralogue. ::: At the start of each chapter, check the paralogue table , accepted quests, and report-back status. Record acceptance and completion deadlines separately, using the quest log's dates.
Finish class, weapon, and support preparations in Chapters 10–12#
Do not leave every hidden objective until the final afternoon. Each protagonist's exclusive actions unlock route-specific classes. Dietrich's Combat Art upgrades relate to
Finish classes and events before the final chapter0/0 重置
Leda, Chapter 10: check Kalla's temple trials. Visit reception at Kalla's main temple. There are two battles with many high-Avoid enemies, so bring reliable Hit. The map has no obvious marker, and skipping dialogue can miss the trials. See Kalla's Bow and missable events .Dietrich, Chapter 10: check Fabio's nighttime event. Visit the southwest of the upper temple approach between 18:00 and 23:59.Dietrich, Chapter 12: speak to Fabio again at the chapter's start. The conversation in the eastern middle-level alley relates to Answerer+. The weapon is upgraded during the later main-story showdown, not handed over during the conversation.Actually pass the exams for the classes you need. Buying seals is not enough: train the required skills, check pass rates, and confirm class unlocks. Seals in Part 1 storage are not freely available exam funds in Part 2.Check the Support conversations you want. Review conversations in Chapter 12. Different protagonists have different conversations; maxing the number does not mean you have seen them all. See bonds for specific locks. ::: Fixing a missed class unlock differs from updating a character record. Class unlocks share immediately, so unlocking a class later does not require finishing the whole route again. However, writing new training into the Part 2 starting point still requires progressing through Part 1 Chapter 12. Do not replay everything indiscriminately for one unlock.
Prepare for consecutive battles before Part 1 ends#
Most Part 1 shops, forging, and free exploration are unavailable in Part 2, so finish preparations that need them first. Targeted proficiency training matters more than simply adding levels. Army actions can still raise levels in Part 2, but specific proficiency gaps are harder to fix.
Check What to do and why Consequence of skipping it Target class skills Train core units' required weapon, movement, and magic skills; give guidebooks to those who need them Reaching the level will not let you take the desired exam, leaving combat roles unfilled Ranged healing Check learned spells and uses so healing reaches split front lines; consider at least two healers One short-range healer struggles to cover both groups on a large map Weapon upgrades Prioritize commonly used effective weapons, Levin Swords, and counters to Underworld Boons over ordinary iron weapons You cannot visit the blacksmith on demand in Part 2, leaving damage gaps despite owning the weapons Special weapon boxes Open the ones you need, check the results, and organize your gear Boxes are not usable Part 2 weapons; placing them in inventories does not replace opening them Recruitment prerequisites Check whether targets have joined or you have only completed their paralogues You still need to recruit them formally after the paralogue Regular mounts Catch and care for mounts in Part 2 offers fewer care opportunities and less feed, limiting last-minute development Materials and gold Keep resources for restoration and later upgrades Even if unused in Part 2, keep them in storage; gathering again in Part 3 costs scarce turns
Guidebooks cannot be used in Part 2, but remain usable in Part 3 if stored. Use those your current core units need; do not waste the rest just to empty storage. You also need not certify every reserve unit in an unsuitable class merely to save seals. Include blessing development here. One plan takes Kalla to level 1, then Aurora to level 3, prioritizing reliable durability and Underworld Boon counters. Another prepares Kalla first, then Aurora, prioritizing coverage. Choose the former if you lack durability and the latter if you lack reach. After Part 1, also review newly available Boons of Salvation and blessing cost reductions; see blessings .
Put equipment on characters before entering Part 2#
At the preparation screen when War begins, give characters the weapons and equipment you need. Only weapons and equipment carried by characters enter with you. Storage cannot be accessed along the way, and special weapons left behind cannot be used. Basic supplies are provided, so do not crowd out valuable weapons with them. Uncarried inventory is not immediately deleted; it enters Part 3 according to carryover rules. Check character inventories and the carryover list. Reserve units can help carry weapons and equipment. Guidebooks, weapon boxes, and ordinary materials do not become eligible equipment just because a character holds them.
The in-game explanation before Part 2: only each unit's held weapons and equipment enter the war story. All other Part 1 items carry over after Part 2 is cleared. Prepare and recruit promptly in Part 2’s first four chapters#
Check army actions, exams, and supplies at the start of each chapter. Fit in a troop-leveling action when possible; otherwise choose Army-wide Skill Training. Skills are assigned randomly, so you cannot target a particular skill. The march manager is mainly available during the first four chapters, with even this preparation window narrowing afterward. Start checking in Chapter 1 instead of waiting until the finale.
Check each new unit’s actual role. Level boosts do not automatically fill weapon and magic proficiencies. Level alone can make an unfinished build look complete.Do not hoard combat arts throughout a chapter. Weapon durability and several supplies replenish by chapter, and licenses refill to a set amount. With another refill coming next chapter, refusing a needed kill now gains nothing extra. See durability for the rules. Decide in advance whether to skip the war story. Skipping distributes experience but loses combat skill gains, drops, and some recruits. Consider it on later routes when you no longer need those rewards. To preserve combat strength and collection progress, finish key recruitment and preparation before weighing a skip.
Part 2 completion binds mounts and battalions#
This is a separate check from entering Part 2. At War’s entrance, carry weapons for battle. Before completion, decide which mounts and battalions should be shared in Part 3. Your first Chapter 6 completion sets the supplies brought to Part 3. Equipment and assignments still in use attach to that character version. Updating a character by rerunning the same route may overwrite the old version’s assignments too. A cautious approach unassigns Cai’s animals and Theodora’s battalions before completion. You can unassign them in War Chapter 1 and skip, or unassign them before Chapter 6 ends and clear normally. See carryover rules and differences for items. Keep necessary equipment during manually played battles; the issue is binding at completion and which character version you select afterward.
Check records before clearing Part 20/0 重置
Record your route and whether this is your first Part 2 clear. Check how the animals, battalions, and character versions you want to share are assigned. Track ordinary weapons separately; animal behavior does not establish one rule for every item. Confirm that required members remain in the record and key recruitment is complete. ::: Record the clear after confirming these points.
Decide whether to update training records before Part 3#
Separate free integration from completing Part 2 again on the same route from Karma Shard merging and generating later-added items . To fix a weakness, choose the training stage to replay, finish Part 1 Chapter 12 to update War’s starting point, then enter the new War Chapter 1 and clear or skip it. Only then is that route’s completion record updated. Briefly training in an old chapter and returning to current Part 3 does not automatically apply the new training for free.
Are you trying to add stats, skills, or items? Stats take the higher value rather than adding together. Adding supplies later has Sacred Ark and shard costs; one rule does not cover everything.Is access unlocked, or are your preparations complete? Check separately. You can challenge Part 3 directly after the prologue without clearing any protagonist's route. Going straight in brings difficult battles and major spoilers. Completing all four is recommended for characters and exclusive systems, not required for access. A one-route-clear example does not establish a minimum of one route either.Which route produced the version of each character you want? Record damage output, skills, and certified classes. Choose the version you need when recruiting them back in Part 3, rather than simply taking the highest level.Have you budgeted Karma Shards? They mainly depend on Notable Deeds conditions and are not unlimited gold. Decide what you actually need to upgrade or recover before paying.Will storage exceed its cap? One two-route merge reached 841/999 and showed low-value items being deleted first. If you can still organize storage, remove unwanted low-value duplicates before merging instead of checking rare supplies afterward. There is a recorded case of skipping first, returning to Part 1 for weapons, then being charged to retrieve items. Characters merge for free, but later items may cost shards. Check for omissions before Part 2, and read carryover mechanics before acting.
The chapter replay screen shows Cai's route at the top, Part 1 Chapter 12 on the central card, and the chapter timeline below. Check the selected chapter before returning for events. Reorganize Blessings and teams at Part 3’s start#
Check that blessings are active, then split protagonists across teams. Blessings may be switched off in Part 3. Recruit companions back, check weapons, and divide the army by task. Exclusive protagonist actions are available only to the team containing that protagonist, so spread them out. Prioritize restoring waystations, temples, and major bases selling needed supplies. After donating materials, you still have to wait for completion. Once a temple is restored, enter and accept its quest; donating materials does not immediately unlock every class and sacred item. Gold, food, and minerals saved in Part 1 reduce gathering and return trips here. If your intended route is still blocked, repair the travel network before spreading teams widely. Reserve one team for city defense, intercepting attackers, clearing miasma, and breaking gates. If the target remains undefeated when Part 3's deadline arrives, you lose; finish early. Check off actual objective completion, not merely standing on the target tile once. Continue with Part 3: the Promised One's story for segment progression and boss strategies for combat obstacles.


 Dietrich’s
 Fabio event chain intact
 Cai Chapter 4 free time
 Bertrand beneath the arena
 Tialla or examine the mural before advancing the story marker
 Theodora Chapter 3
 Bonaventure before exploring the capital