

Noctula
Bノクチュラ · Noctula Cai route· Recruitable
 Theodora route· Recruitable
 Leda route· Recruitable
 Dietrich route· Recruitable
Start Gladiator into Pugilist for melee and ranged fist attacks with Avoid. Add Warrior for Strength if needed. Prepare White Magic for Part 3 War Monk, and never treat evasion as invincibility.
 Gladiator Lv7
 Axe
 Gauntlet
 Infantry


 Fan art →
Nine stats
| HP | Str | Mag | Spd | Dex | Def | Res | Lck | Cha | Total | |
|---|---|---|---|---|---|---|---|---|---|---|
| Growth rates | 50% | 45% | 20% | 45% | 40% | 40% | 20% | 35% | 30% | 325% |
| Overall rank63 characters total | Rank 9 | Rank 18 | Rank 38 | Rank 18 | Rank 39 | Rank 14 | Rank 48 | Rank 26 | Rank 40 | Rank 40 |
| Base statsGladiator Lv7 | 30 | 11 | 3 | 10 | 8 | 8 | 4 | 7 | 6 | 87 |
| Base stat ranking63 characters total | Rank 23 | Rank 30 | Rank 56 | Rank 29 | Rank 38 | Rank 24 | Rank 50 | Rank 38 | Rank 40 | Rank 43 |
| Lv60 expected statsFirst improveStrWar Monk progression | 69 | 43 | 12 | 43 | 32 | 34 | 20 | 26 | 24 | 303 |
| Expected rank62 characters total | Rank 15 | Rank 21 | Rank 52 | Rank 23 | Rank 52 | Rank 21 | Rank 36 | Rank 39 | Rank 45 | Rank 46 |
Proficiency
AxeGauntletInfantryWeakness Sword
 White Magic
 Black MagicBudding talent—
Starting skills
| Category | Skills | Effect |
|---|---|---|
| Personal skill |  Warrior’s Clarity | Avo +3 after combat (until the next player phase) |
| Level skillsLv20 |  Attuned | 10% chance to activate when using Warrior’s Clarity. Avoid +10. (Lasts until the user's next action phase) |
| Level skillsLv35 |  Attuned+ | 20% chance to activate when using Warrior’s Clarity. Avoid +10. (Lasts until the user's next action phase) |
Then switch to War Monk, using gauntlet evasion and Spd while also dealing physical damage.
Battlemaster uses its class accuracy and War Master's Strike for melee damage.
 Hand Axe
 Short Axe
The early Gladiator/Brigand stages follow this site's axe-class progression for the same character.

Noctula's training, routes, and recruitment
Original: Noctula's recommended classes, skills, and recruitment requirements; GameWith
Train  Noctula’s Strength first, then use
 War Monk’s gauntlet Avoid and Speed for melee damage. Follow Gladiator →
 Pugilist →
 Warrior → War Monk. Other options are an axe-focused
 Battlemaster, or
 Dragoon with a Wild Bau on
 Cai’s route. Her personal skill only adds 3 Avoid after combat; it cannot replace early damage and careful engagement planning.
Build firepower with Warrior before War Monk
Change from Pugilist to Warrior, then to War Monk. Focusing only on Avoid can leave her physical damage lacking. Build Strength in Warrior first so War Monk can both evade and deal damage.
War Monk grants Avoid +7 with gauntlets and has good Speed growth, complementing her existing Strength and Speed. Its main requirements are Gauntlet B and White Magic D, plus the corresponding class unlock. White Magic is a weakness, so do not overlook it just because she excels in Gauntlet. Reach White Magic D before changing to War Monk.
Starting from her initial Gladiator, train Gauntlet in Pugilist, improve Strength and Hit in Warrior, then settle into the final gauntlet role in War Monk. Pugilist mastery grants Hit-and-Run for extra Avoid in combat using an art. Warrior mastery grants  Practiced Art, adding 10 Hit when attacking with an art. Fill the relevant class experience to earn each mastery; merely entering the class does not grant it.
War Monk can only use gauntlets and white magic. It cannot retain Battlemaster’s sword and axe access.
Warrior’s Clarity only activates after combat
Her personal skill Warrior’s Clarity grants 3 Avoid after combat until the next player phase. She does not have those 3 points before her first engagement, so do not lure an entire group at once. At level 35, Attuned upgrades it: when Warrior’s Clarity activates, it has a 20% chance to grant another 10 Avoid until the next player phase. This chance is not a guaranteed bonus every turn.
Her base growths are HP 50%, Strength 45%, Magic 20%, Speed 45%, Dexterity 40%, Defense 40%, Resistance 20%, Luck 35%, and Charm 30%, totaling 325. HP, Strength, Speed, and Defense are relatively balanced, letting her serve as a physical front-line unit. Her low Resistance still requires avoiding unfavorable engagements with magic. An Avoid build improves specific battles; it does not remove the danger of high damage from magical attacks.
She excels in Axe, Gauntlet, and Infantry, and struggles with Sword, White Magic, and Black Magic. Both approaches develop axes or gauntlets. War Monk provides access to white magic, but her low Magic makes her a poor primary healer. There is also no need to specialize in her weak Sword proficiency for sword arts.
Battlemaster pushes axe firepower further
The axe route is Gladiator →  Brigand → Warrior → Battlemaster. It emphasizes HP, Strength growth, and
 War Master's Strike, following her Axe strength throughout. Axe Hit rises from +3 in Brigand to +5 in Warrior and +7 in Battlemaster, helping attacks land. The classes also increase equipped combat-art slots, but you still need to select learned arts during preparation.
Battlemaster adds 25 each to HP and Strength growth, further amplifying her foundation as a physical front-line unit. Its mastery reward, War Master's Strike, multiplies damage by 1.5, providing the offensive basis for this recommendation. Her personal ability, Warrior’s Clarity, still provides Avoid after combat, but this route does not spend every resource chasing Avoid. It relies on firepower and durability for melee combat.
Brigand mastery grants  Regroup, raising Avoid for that combat after an attack is evaded. Warrior mastery grants Practiced Art to improve art Hit. These require separate training from Pugilist mastery on the War Monk route. Master the extra classes if you want all of them.
 The Eternal is a higher-tier option. If you primarily use War Monk, the standard axe Battlemaster, or the mount branch, you do not need to
 Swap routes just for a Divine class. Divine classes also require an S-rank weapon proficiency and unlock resources.
Dragoon on Cai's route uses an animal for Strength and Dexterity
Another route changes to Dragoon at the Advanced tier on Cai’s route and equips a Wild Bau. Bond level 5 grants +2 Strength and Dexterity and +10% growth for each. This improves physical stats through a mount while retaining axe attacks, offering a different path from the two infantry gauntlet and axe routes.
Start in Gladiator, move through Brigand to Dragoon, and use the axe route’s transition. The recommended endpoint is Dragoon; stay there afterward.
Animal capture in Part 1 unlocks in Chapter 5 of Cai's route. Other protagonist routes cannot copy this setup at the same point. Once she becomes a flying mounted unit, she no longer uses gauntlets or White Magic, and must also remove infantry-only abilities and her Battalion. The mount's actual benefits depend on whether it is equipped, its bond level, and other conditions.
None of the three routes specifies class-change levels. Take exams once Renown and the corresponding weapon proficiencies are sufficient, after unlocking the class and preparing the pass. Levels only illustrate development. Being below the recommended level affects exam success, so do not treat the recommendation as an absolute class level requirement.
Gauntlet Combat Arts decide what one action accomplishes
 Mighty Fist emphasizes Hit, making it useful for melee attacks that need to connect reliably. Back Strike can
 Canto one space after combat, but its durability cost is high and Might modifier low. Consider whether that one-space movement will solve your positioning problem. Combat Combo lets a follow-up occur before the enemy's
 Counter. Its effectiveness still depends on follow-up and damage calculations; the effect text does not mean two unconditional hits before the enemy acts.
Soul Strike offers higher Might and Hit modifiers at a greater durability cost. When choosing a move, consider Hit, damage, whether it will defeat the target, and remaining durability together. You do not need to use expensive moves on every normal enemy. Axe options include  Spike,
 Enrage, and moves such as
 Crash. The first emphasizes Hit, while the latter has its own effect conditions. Use them according to your current route.
She can also learn Authority skills such as Diversion to lower adjacent enemies’ Hit, Infantry’s Melee Range to lower adjacent enemies’ Movement, and Heavy Armor skills such as Temporary Defense. There is no need to detour through armored classes just to collect them. Check separately whether each slotted skill has been learned and works with the current unit type.
White magic includes basic healing,  Nosferatu,
 Freeze, and
 Barrier. Black magic includes
 Thunder and ice spells. War Monk cannot use black magic, and White Magic is a weakness, so these spells require additional training. The War Monk route still centers on building Strength first, then using evasive gauntlet attacks.
Gauntlet arts differ greatly in durability cost: Mighty Fist costs 2, Back Strike 10, Combat Combo 7, and Soul Strike 8. The first provides higher Hit; Back Strike grants a one-step move after combat; Combat Combo changes the order of follow-ups and Counter; Soul Strike uses higher Might and Hit for a heavy blow. Keep the functions you currently need in your art slots rather than treating all three expensive arts as a fixed combo for every fight. Reliable routine attacks and costly finishing blows against key targets need different durability budgets. White Magic C grants Nosferatu, B grants Freeze, and A grants Barrier. War Monk can use white magic, but you must still reach those ranks. Her weakness in White Magic demands extra training.
Lower recruitment requirements let you train her earlier
Recruitment requires Bond Level 1 and Renown 4 for Cai, Bond Level 1 and Renown 6 for  Dietrich, Bond Level 1 and Renown 3 for
 Theodora, and Bond Level 3 and Renown 8 for
 Leda. The first three routes have low Support requirements; prepare more on Leda’s route. No additional gold or material negotiation requirements are listed.
Around level 40 at the end of Part 1, focus on Strength, Speed, Dexterity, and HP. Strength supports axes and War Master's Strike; Speed must overcome heavy weapons’ effect on follow-ups; Dexterity helps Hit; HP supports taking attacks. Magic and Charm are lower priorities for physical routes. Work around her 20% Resistance growth by avoiding unfavorable magic engagements. If growth falls well short, use Merge Causality with the same character trained on another route to take higher stats.
She likes city life, city people, and testing her fists against others. GameWith recommends Training Bracelet, Training Weights, Ceremonial Spear, Sharp Dagger, and Strategy Manuscript. Game8 also lists alternatives including History of a Master, Huge Fish Eyeball, and Protection Figurine. The two sites use different preference tiers. Choose gifts according to the source, rather than combining top-tier and ordinary likes into one uniform bonus.
More guides
- Noctula training, class paths and recruitment conditions (Game8 Japanese)ゲームエイト
- Noctula class and stat analysisAltema guide team
- Noctula discussion and Pugilist buildTurnBasedTactician and other commenters
Site guides

Start as Pugilist for Speed and Avoid, borrowing Warrior if Strength is lacking. In Part 3, choose damage or White Magic support according to the team's needs.
She can handle melee combat after becoming Pugilist at level 20. Battlemaster handles physical damage; War Monk combines brawling and White Magic. Full Avoid setups and multiroute magical brawling require more investment. She must survive even before Avoid activates.
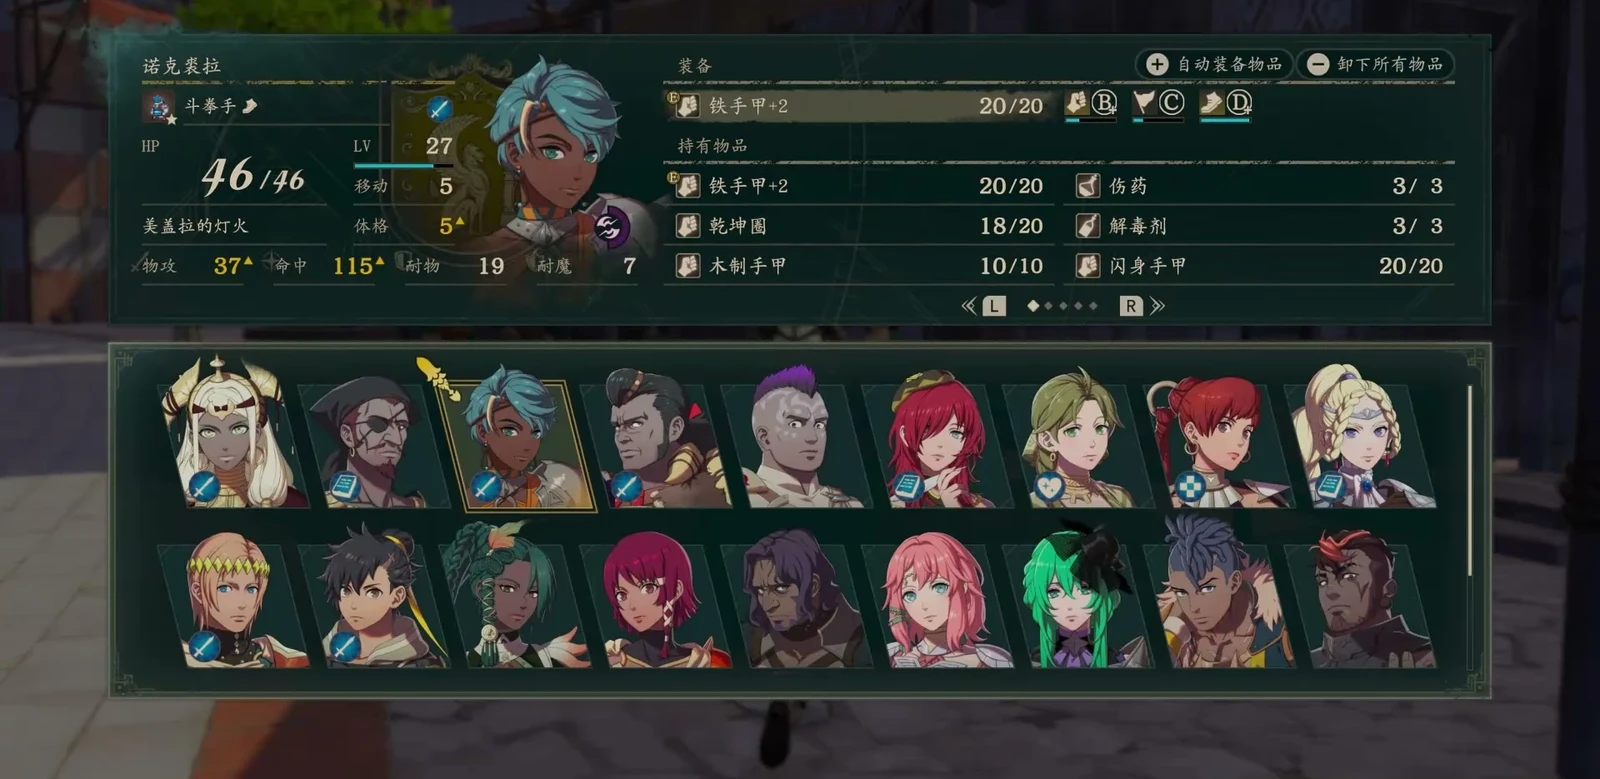
Class progression by stage
Part 1: Build a brawler who can double and switch ranges
After early recruitment, start from her existing Gladiator class and prioritize Gauntlet C. At level 20 and Renown 4, take the Pugilist exam. Compared with Brigand, it trades some Strength for Speed, Dexterity, and Defense. Bring brawling weapons that cover both close and ranged attacks rather than being forced into unsafe melee. If existing classes suffice, not everyone needs to compete for passes in the same month; prioritize the team's most urgent class gains.
Pugilist's mastery, Attack, Get Back, grants Avoid +10 in combat when using a combat art. Learn and equip it; ordinary attacks do not automatically benefit. Her Warrior’s Clarity grants post-combat Avoid, absent before the first engagement.
Use Dodge Gauntlets for Avoid and brawling arts for accuracy. If available, Dodge Gauntlets improve evasion. Also carry Hit-boosting arts and ranged brawling weapons, prioritizing a reliable strike. Use equipment already obtained; do not delay recruitment for exclusive claws.
Part 2: Borrow Warrior for Strength only when needed
Continue the brawling route. At level 35 and Renown 8, any B in Sword, Axe, or Gauntlet permits Warrior. Gauntlet B requires the least new training. Use this stage to improve Strength, then master and equip Practiced Art for Combat Art Hit +10. If Strength and art accuracy are already sufficient, Warrior is unnecessary.
Another option: switch to swords to preserve follow-ups. If brawling-class leveling leaves Attack Speed too low, focus Sword and go Brigand → Shido, entering Shido at level 35, Renown 8, and Sword B. Brawlers also need follow-ups; do not gain Strength at the cost of the second hit. This requires separate proficiency and weapon investment from Warrior.
Another option: Dragoon for a flying slot. Dragoon improves team mobility, requiring level 35, Renown 8, Flying C, Spear or Axe B, and the route-specific unlock. Change when the team needs a flier.
Part 3: physical damage or War Monk support
At level 45 with A in Sword, Axe, or Gauntlet and Segment 1 cleared, move into Battlemaster. Continue melee through Gauntlet; count War Master's Strike among available moves only after mastery.
Prepare White Magic D in advance. At level 45 with Gauntlet B and the Aurora-related quest unlock, change to War Monk. Freeze requires White Magic B, supported by a guide-based learning table. White Magic D only qualifies for the class; spells must be learned separately. Silence is listed at White Magic A, but evidence is unverified community material and research records conflict. Do not plan essential control around it being available.
Mastering The Eternal for Strength before returning to War Monk requires extra S-rank training and a divine-class slot.
Multiroute magical brawling is a separate investment. Train physical stats on one route and Magic on another. After merging, use physical brawling against mages and magical brawling against high-Defense armor. Train Strength and Magic separately, then prepare magical brawling weapons. A physical-only build cannot copy merged magical damage.
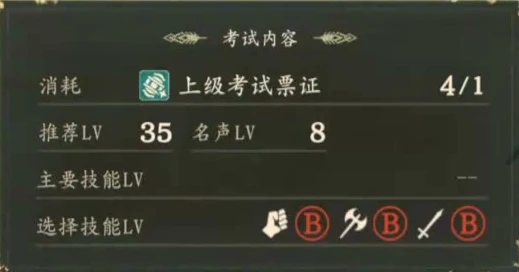
The main brawling route is infantry and needs no mount. Avoid-support partners, woods, and Dodge Gauntlets help evasion, but positioning and activation conditions still apply. Check the forecast before attacking.
Initiate against physical enemies from the flank; check mage range
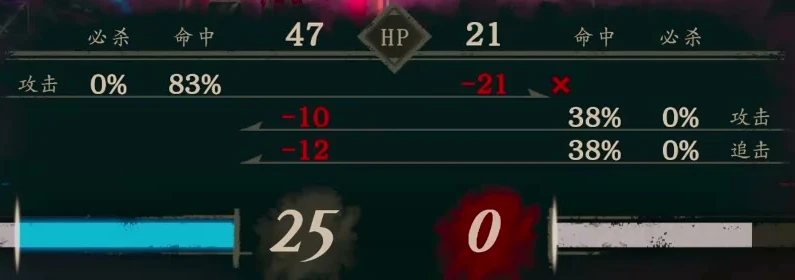
Place her on the melee force's flank and initiate against physical enemies, using woods when useful. Check actual Attack Speed for doubles and whether the art kills reliably before leaving her to take attacks. With low Resistance, even ranged attacks require checking mage range and counter damage. She must survive both the first combat and failed evasion.
She can dodge-tank or leave tanking to another evasive unit. Growth, weapons, maps, and activation all affect Avoid. Even a developed build must check enemy Hit.
Recruitment details
Theodora needs Renown 3, Cai 4, and Dietrich 6, with support 1 and a gift first. Leda needs Renown 8 and support 3. See Noctula's recruitment requirements for appearance windows.
Do not calculate opening survival with full post-combat Avoid
- Calculate the opening without post-combat Warrior’s Clarity or post-kill Avoid.
- Do not plan tanking around unverified Avoid stacking across battles or an unverified cap.
- While using Warrior for Strength, check brawling follow-ups and total damage too.
- War Monk's White Magic D only permits the class. Check separate learning requirements for Freeze and Silence.
- Improve Magic and obtain the appropriate weapon before using magical brawling against armor.
Comments
Gladiator→Lv20Pugilist→Lv35Warrior→Lv45War Monk Iron GauntletsMt 8 Hit 90 Wt 3
 Qiankun CirclesMt 10 Hit 70 Wt 4
 Dodge GauntletsMt 11 Hit 80 Wt 3
 VulneraryVulnerary
 Miracle GemWt 5
 Fists Lv. 2Hit +5 with gauntlets equipped
 Attack BasicsStr+1
 Timely Guard25% chance when attacked: protection +3
 Close Quarters[Infantry] Adjacent enemies suffer Movement -1
 DistractionAdjacent enemies suffer Hit -3Mighty FistCost 2 Mt 4 Hit 10
 Retreating FistCost 10 Mt 5 Hit 0
 Battle RushCost 7 Mt -2 Hit 0Miracle GemBackupWt 5Dodge GauntletsMt 11 Hit 80 Wt 3Iron GauntletsMt 8 Hit 90 Wt 3Qiankun CirclesMt 10 Hit 70 Wt 4VulneraryVulneraryMiracle GemWt 5Fists Lv. 2Hit +5 with gauntlets equippedAttuned10% chance to activate when using Warrior’s Clarity. Avoid +10.
(Lasts until the user's next action phase)Timely Guard25% chance when attacked: protection +3Close Quarters[Infantry] Adjacent enemies suffer Movement -1DistractionAdjacent enemies suffer Hit -3

 Mighty FistCost 2 Mt 4 Hit 10Retreating FistCost 10 Mt 5 Hit 0Battle RushCost 7 Mt -2 Hit 0Miracle GemBackupWt 5Dodge GauntletsMt 11 Hit 80 Wt 3Iron GauntletsMt 8 Hit 90 Wt 3Qiankun CirclesMt 10 Hit 70 Wt 4Vulnerary
 Da Mina GauntletsMt 11 Hit 90 Wt 4
 Hexlock ShieldWt 4
 Fists Lv. 3Hit and Avo +5 with gauntlets equippedAttuned+20% chance to activate when using Warrior’s Clarity. Avoid +10.
(Lasts until the user's next action phase)
 Attack, Get BackAvoid +10 during combat using a combat artPracticed ArtHit +10 when attacking with a combat artDistractionAdjacent enemies suffer Hit -3
 Combat Arts +2Equippable combat arts +2
 Axe Hit +5Hit +5 when wielding an axe
 Brawl Hit +5Hit +5 with gauntlets equippedMighty FistCost 2 Mt 4 Hit 10Retreating FistCost 10 Mt 5 Hit 0Battle RushCost 7 Mt -2 Hit 0Hexlock ShieldBackupWt 4Dodge GauntletsMt 11 Hit 80 Wt 3Iron GauntletsMt 8 Hit 90 Wt 3Qiankun Circles +3Mt 17 Hit 70 Wt 4VulneraryDa Mina GauntletsMt 11 Hit 90 Wt 4Hexlock ShieldWt 4
 Fists Lv. 4Hit and Avo +7 with gauntlets equippedAttuned+20% chance to activate when using Warrior’s Clarity. Avoid +10.
(Lasts until the user's next action phase)Attack, Get BackAvoid +10 during combat using a combat artPracticed ArtHit +10 when attacking with a combat artDistractionAdjacent enemies suffer Hit -3
 Combat Arts +3Equippable combat arts +3
 White-Magic SeekerWhite magic uses ×2
 Brawl Avo +7Avo +7 when wielding gauntletsMighty FistCost 2 Mt 4 Hit 10
 Strike and HealMt 0 Hit 0Battle RushCost 7 Mt -2 Hit 0
 Hexlock ShieldBackupWt 4
 Dodge GauntletsMt 11 Hit 80 Wt 3Iron GauntletsMt 8 Hit 90 Wt 3Qiankun Circles +3Mt 17 Hit 70 Wt 4VulneraryDa Mina GauntletsMt 11 Hit 90 Wt 4Hexlock ShieldWt 4Fists Lv. 4Hit and Avo +7 with gauntlets equippedAttuned+20% chance to activate when using Warrior’s Clarity. Avoid +10.
(Lasts until the user's next action phase)Attack, Get BackAvoid +10 during combat using a combat artPracticed ArtHit +10 when attacking with a combat artDistractionAdjacent enemies suffer Hit -3Combat Arts +3Equippable combat arts +3White-Magic SeekerWhite magic uses ×2Brawl Avo +7Avo +7 when wielding gauntletsMighty FistCost 2 Mt 4 Hit 10Strike and HealMt 0 Hit 0Battle RushCost 7 Mt -2 Hit 0Hexlock ShieldBackupWt 4
 Mahon Twilighters计策「骑兵扰乱计」Gladiator→Lv20Brigand→Lv35Warrior→Lv45Battlemaster
 Iron AxeMt 13 Hit 65 Wt 10
 Axes Lv. 2Hit +5 when wielding an axeAttuned10% chance to activate when using Warrior’s Clarity. Avoid +10.
(Lasts until the user's next action phase)RegroupAvoid +20 during combat in which the unit's attack is dodgedDistractionAdjacent enemies suffer Hit -3Attack BasicsStr+1
 Miracle GemBackupWt 5Iron AxeMt 13 Hit 65 Wt 10
 Axes Lv. 3Hit and Avo +5 with an axe equippedAttuned+20% chance to activate when using Warrior’s Clarity. Avoid +10.
(Lasts until the user's next action phase)Practiced ArtHit +10 when attacking with a combat artRegroupAvoid +20 during combat in which the unit's attack is dodgedDistractionAdjacent enemies suffer Hit -3Combat Arts +2Equippable combat arts +2Axe Hit +5Hit +5 when wielding an axeBrawl Hit +5Hit +5 with gauntlets equippedHexlock ShieldBackupWt 4Iron AxeMt 13 Hit 65 Wt 10
 Axes Lv. 4Hit and Avo +7 with an axe equippedAttuned+20% chance to activate when using Warrior’s Clarity. Avoid +10.
(Lasts until the user's next action phase)Practiced ArtHit +10 when attacking with a combat artRegroupAvoid +20 during combat in which the unit's attack is dodgedDistractionAdjacent enemies suffer Hit -3Combat Arts +3Equippable combat arts +3
 Axe Hit +7Hit +7 when wielding an axe
 Brawl Hit +7Hit +7 with gauntlets equippedHexlock ShieldBackupWt 4
 Advanced Warriors计策「枪阵」Iron AxeMt 13 Hit 65 Wt 10Axes Lv. 4Hit and Avo +7 with an axe equippedAttuned+20% chance to activate when using Warrior’s Clarity. Avoid +10.
(Lasts until the user's next action phase)Practiced ArtHit +10 when attacking with a combat artRegroupAvoid +20 during combat in which the unit's attack is dodgedDistractionAdjacent enemies suffer Hit -3Combat Arts +3Equippable combat arts +3Axe Hit +7Hit +7 when wielding an axeBrawl Hit +7Hit +7 with gauntlets equippedHexlock ShieldBackupWt 4
 Elite HuntersGambit: Disrupting ShotGladiator→Lv20Brigand→Lv35DragoonIron AxeMt 13 Hit 65 Wt 10Axes Lv. 2Hit +5 when wielding an axeAttuned10% chance to activate when using Warrior’s Clarity. Avoid +10.
(Lasts until the user's next action phase)RegroupAvoid +20 during combat in which the unit's attack is dodgedDistractionAdjacent enemies suffer Hit -3Attack BasicsStr+1Miracle GemBackupWt 5Iron AxeMt 13 Hit 65 Wt 10Axes Lv. 3Hit and Avo +5 with an axe equippedAttuned+20% chance to activate when using Warrior’s Clarity. Avoid +10.
(Lasts until the user's next action phase)DistractionAdjacent enemies suffer Hit -3
 Hexlock ShieldBackupWt 4
 Wild BauStr+2 Spd+1 Dex+2Iron AxeMt 13 Hit 65 Wt 10Axes Lv. 3Hit and Avo +5 with an axe equippedAttuned+20% chance to activate when using Warrior’s Clarity. Avoid +10.
(Lasts until the user's next action phase)DistractionAdjacent enemies suffer Hit -3Hexlock ShieldBackupWt 4Wild BauStr+2 Spd+1 Dex+2
Build approach and suitable stages
First improveStrWar Monk route: Pugilist Lv20; first improve StrWar Monk route: Warrior Lv35; first improve StrWar Monk progression: War Monk Lv45, Lv60
Then switch to War Monk, using gauntlet evasion and Spd while also dealing physical damage.
Axe damage Battlemaster route: Brigand Lv20; Axe damage Battlemaster route: Warrior Lv35; Axe damage Battlemaster route: Battlemaster Lv45, Lv60
Battlemaster uses its class accuracy and War Master's Strike for melee damage.
Cai Dragoon growth route: Brigand Lv20; Cai Dragoon growth route: Dragoon Lv35, Lv60
The early Gladiator/Brigand stages follow this site's axe-class progression for the same character.
DexWidely recommendedDexVery strongDexUseful for specific strategies
 Axes Lv. 1
 Axes Lv. 5
 Axefaire
 Fists Lv. 1
 Spirit Smash
 Fists Lv. 5
 Fistfaire
 Dodge
 Close Quarters+
 Infantry Move
 Spear
 Flowing Spear
 Spears Lv. 1
 Bash
 Spears Lv. 2
 Vanguard Spear
 Spears Lv. 3
 Ambush Charge
 Spears Lv. 4
 Spears Lv. 5
 Spearfaire
 Bow
 Warning Shot
 Bows Lv. 1
 Heavy Lead Arrow
 Bows Lv. 2
 Mighty Shot
 Bows Lv. 3
 Bows Lv. 4
 Bows Lv. 5
 Bowfaire
 Riding
 Knightly Senses
 Knight’s Vanguard
 Read the Winds
 Flitting Flier
 Heavy Armor
 Armored Leap
 Authority
 Rein
 Wrath Strike
 Swords Lv. 1
 Shadow Gambit
 Swords Lv. 2
 Heat Haze
 Swords Lv. 3
 Swords Lv. 4
 Swords Lv. 5
 Swordfaire
 Black Magic Lv. 1
 Blizzard
 Black Magic Lv. 2
 Thoron
 Black Magic Lv. 3
 Ice Blade
 Black Magic Lv. 4
 Black Magic Lv. 5
 Black-Magic Mastery
 White Magic Lv. 1
 White Magic Lv. 2
 White Magic Lv. 3
 Silence
 White Magic Lv. 4
 White Magic Lv. 5
 White-Magic Mastery
Noctula: recruitable in Cai's, Dietrich's, Theodora's and Leda's stories (renown 3–8).
Cai's storyRecruitable 4
 1From Chapter 3
Steps
Available from Part I, Chapter 3. Give one gift to unlock recruitment, then reach renown 4 and support 1 with Cai.
- Tip
 Protection FigurineAvailable at Niiza Port market for 200G each. Only support 1 is required on this route; check the requirements after the first gift.
Dietrich's storyRecruitable61From Chapter 4Steps
Available from Part I, Chapter 4. Give a gift to unlock recruitment, then reach Renown 6 and Bond 1 with Dietrich.
- TipProtection FigurineAvailable at Niiza Port market for 200G each. Only support 1 is required on this route; check the requirements after the first gift.
Theodora's storyRecruitableEasiest option31From Chapter 5Steps
Available from Part I, Chapter 5. Give one gift to unlock recruitment, then reach Renown 3 and support 1 with Theodora.
- TipProtection FigurineAvailable at Niiza Port market for 200G each. Only support 1 is required on this route; check the requirements after the first gift.
Leda's storyRecruitable83From Chapter 4Steps
Available from Part I, Chapter 4. Give a gift to unlock recruitment, then reach Renown 8 and Bond 3 with Leda.
- TipProtection FigurineBuy at Niiza Port Market for 200G each. Gifts or meals raise the bond with your route's protagonist; include the protagonist at the meal.
Renown level Bond Level with this route's protagonist. For all characters across the four routes, see Recruitment; see recruitment steps at How to recruit。
 Most effective gifts


All are favorites and sold in shops. Noctula mainly favors training-related gifts. Favorites display double arrows in-game and grant the most affinity.
Find where to buy these on the map→ Where to buy all 6 favorite gifts→
Favorite6 items




Likes6 items





LikesThis city and its people, brawlingInterestsSightseeing in town, training
Bond partners3 characters · 1 can reach A · 1 have confirmed paired endings
 A
 B
 B
Letters indicate the highest available support conversation (C = support Lv2, B = support Lv3, A = support Lv4); A paired ending is confirmed,For the rules, seeBonds。
A female gladiator proud of her strong, well-trained body. Born to a warlike tribe, she tires of country life and the village men and moves to the Imperial Capital Dagsion she has admired since childhood.
Details
| Title | A female gladiator who dreams of city life |
|---|---|
| Affiliation | Unaffiliated |
| Origin | A village of a warlike tribe |
| Height | 174 cm |
| Birthday | 12/17 |
| Likes | This city and its people, brawling |
| Interests | Sightseeing in town, training |
| Japanese voice | Natsuki RinkoWikipedia (Japanese) |
| English voice actor | Cassie EwuluVoice actor database |
In the story
Part I: makes a living in the capital
After leaving home, Noctula becomes a gladiator in Dagsion, a city she has long admired. She later strikes an employer she dislikes, becoming a freelance gladiator without a team.
After Part III: Individual endingSpoilers
After the war, Noctula buys a house in Dagsion, helps rebuild and enjoys city life for a while. Eventually tired of social dealings, she returns home and becomes the new chief at her siblings' recommendation; her straightforward manner unites her people.
Trivia
- Noctula's name is related to a little owl in Latin.