
Capturing and raising mounts: what to catch in Cai’s route, who should ride, and what carries into Part 3Minor spoilers
Choose mounts for your classes and skills, then have their intended riders feed them once daily. Ferghanan Horses add Strength and Defense, Black Magonius adds Magic and Speed, Charioteer doubles mount growth, and carryover needs sorting before completion.

Catch mounts by class and skill, then have the intended rider feed them once daily. The sooner you use a fully bonded mount, the sooner you gain extra growth.
| Your current goal | Preparation order |
|---|---|
Mount capture has just unlocked in  Cai’s route | Catch common species with movement skills for your main team first. Rare species still need the right skills; appearance alone is not enough. |
| Fix a physical or magical weakness | For physical horse riders, look for Ferghanan Horses on Sunset Road; for magical Caladrius units, Black Magonius at Headman's Rock; for magic-sword pegasus units, Dark Pegasus in Blackwing Valley. |
| Get a mount ready quickly | Have its intended rider feed it once daily. Reach Bond Level 3 to unlock its skill, then Level 5 to strengthen it. |
| Amplify training gains | Charioteer doubles mount growth bonuses. An ordinary fully bonded horse’s total +25 percentage points becomes +50;  Io’s Rocinan goes from +30 to +60. |
| Prepare for the merged Part 3 roster | Map carryover and mount carryover into Part 3 are separate records. Sort unequipped mounts before your first completion. Check replay captures, character updates, and mount bonds separately. |
You can start raising a mount before changing class. Plan crops around the animal's food preferences and stock ingredients for daily feeding. Even if the final class is unmounted, you can use mounts during training.
Mount Bond Levels and mounting/dismounting rules
1. Choose the rider’s class and skills before capturing
Decide who will ride, which animal type they need, and which skill you want before searching the map. Check the class’s eligible animal icons first. Bonds belong to a specific person and animal. Raising the bond with the wrong person or swapping to another animal of the same species does not transfer that relationship.
Choose mounts around class paths for physical units, armored units, mages, and archers:
| Role | Example target class | Animal type to check first | Main selection criteria |
|---|---|---|---|
| Archer in training |  Charioteer | Horse | Ferghanan Horse’s Strength/Defense spread or Rocinan’s total growth; choose skills for damage, accuracy, or retreat. |
| Mounted frontliner |  Bardinger,  Cataphract | Horse | Canto to clear space after attacking; common horses’ movement bonuses also work early. |
| Physical ornius rider |  Armored Ornius Rider | Ornius | Red Meganius adds Strength; Meganius adds Defense. Check movement skills. |
| Magical ornius rider |  Caladrius | Ornius | Black Magonius adds Magic and Speed. Look for Canto, or a magic critical skill for a crit build. |
| Female flier |  Wing Soldier | Pegasus | Falicorn for Canto, or a common pegasus for extra movement. Consider Dark Pegasus for magic swords. |
| Dragon rider |  Dragoon | Bau | Use Wild Bau in Part 1; add late species such as Black Bau in Part 3. |
First meet the class's mount-type restrictions. Caladrius, Troubadour, and other classes also need unlocking. After catching Black Magonius, a mage still needs the appropriate class qualification.
2. Find the location and use matching bait in Cai’s route
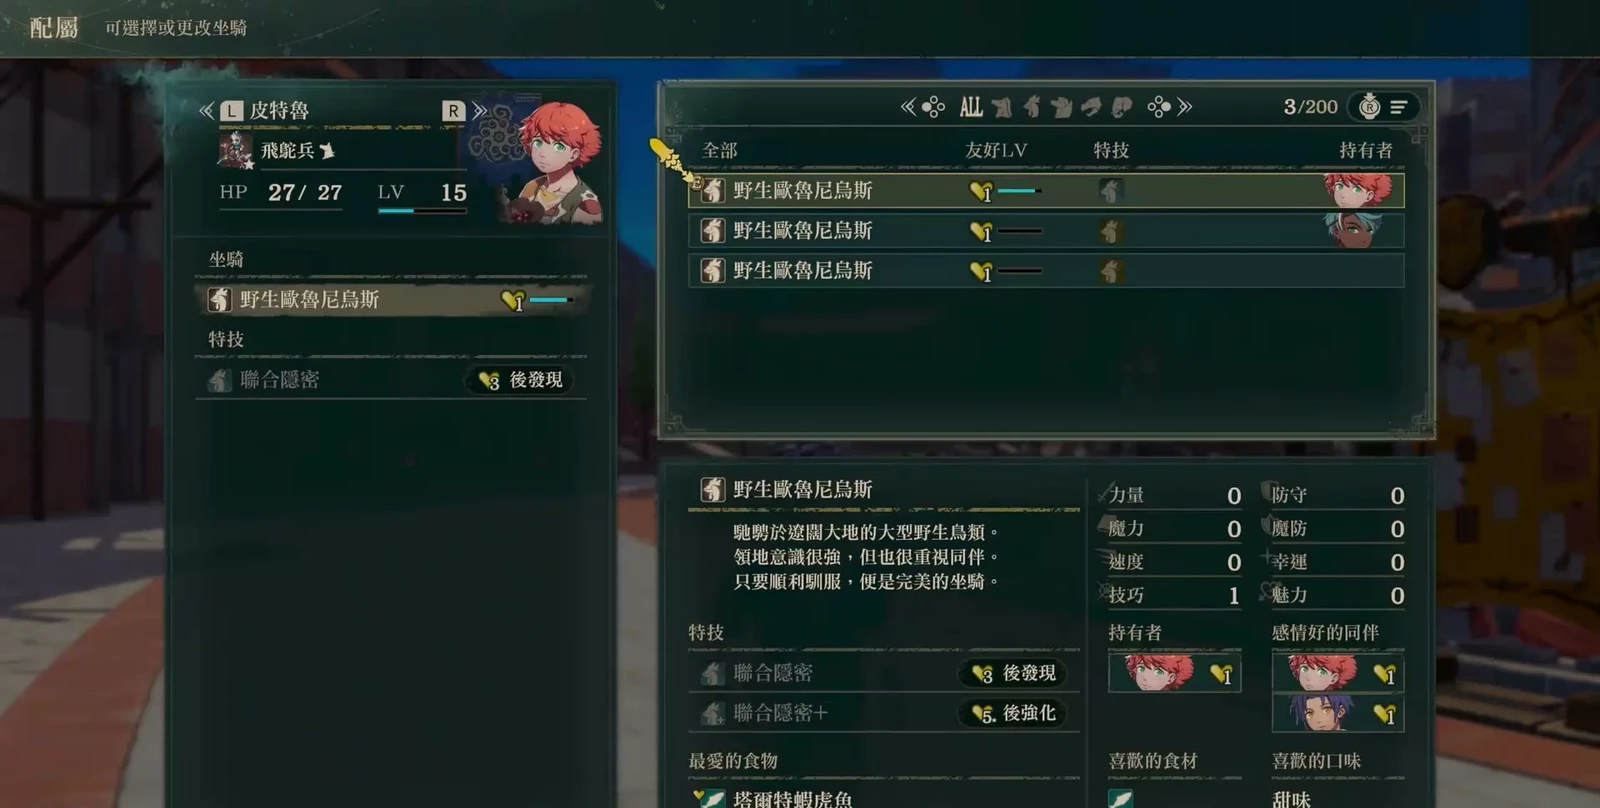
Capturing starts after the stable tutorials in Chapter 5. Go to an animal-icon tile, place bait, let turns pass until the gauge fills, then return and select capture. A yellow question mark in the map’s appearance information means a rare animal can appear there. Ordinary ingredients can produce one too, while one- and two-star ingredients improve your chances.
Catch a few mounts your main team can use immediately, then add rares along the way. In Cai’s route, plan around these locations:
| Location | Possible animals | Bait type | Purpose of the trip |
|---|---|---|---|
| Sunny Ridge | Wild Horse | Vegetables | Look for a movement skill first. Horse riders can start bonding without waiting for a Ferghanan Horse. |
| Sunset Road | Wild Horse; rare Ferghanan Horse | Vegetables | Add Strength; suitable for mounted frontliners and archers. |
| Oleance Plains | Wild Horse; rare Monoceros | Vegetables | For horse riders who want post-combat recovery. |
| Elissa Ridge, Mount Ouranos | Wild Ornius; Mount Ouranos also has Meganius | Fish | Fill ornius slots first, then choose Speed/Dexterity or Defense. |
| Axion Valley | Meganius; rare Red Meganius | Fish | Red Meganius supports physical growth; the common species favors Defense. |
| Pharo Forest | Wild Ornius; rare White Ornius | Fish | Movement or recovery. Story presentation does not make White Ornius a stronger damage option. |
| Headman's Rock | Magonius; rare Black Magonius | Fish | Magic, or Magic plus Speed; a target for Caladrius. |
| Blackwing Valley | Wild Pegasus; rare Dark Pegasus | Vegetables | Unlocked by a side quest, for magic-sword pegasus builds; |
| Giant Bird’s Neck, Pegasus Rock | Wild Pegasus; rare Falicorn | Vegetables | Speed and Flying Canto. |
| Dragonroar Cape | Wild Bau | Meat | Prepare dragon riders in Part 1; rare dragons cannot be caught at this stage. |
Headman's Rock is a good early destination for magical mounts, but level 35 enemies block the way. Prepare ways to handle them before setting out.
- 1Check the tile's animal candidates on the map first. Do not bring premium fish to a horse site.
- 2Save manually. Use vegetables for horses and pegasi, fish for ornius, and meat for Bau.
- 3Return when the gauge is full and select capture. You can explore nearby while waiting.
- 4After a successful capture, inspect the individual's skill at the stable.
Treat baiting and feeding separately. Once you choose the right ingredient category, higher-grade materials make rare mounts more likely. Ferghanan Horses prefer spicy vegetables, but other flavors also work as bait. Raising bonds in the next section requires closer attention to each animal's favorites.
3. Select the rare species first, then its skill
Reloading and repeating identical actions may keep producing the same result. Change exploration, movement, or waiting steps before retrying. Remember what you did and adjust slightly each time. No fixed turn count, success rate, or guaranteed method has been established.
First change your actions to alter what appears. Save once the map icon confirms your target rare species, then try for its skill. Selecting species and skills separately avoids starting every attempt from scratch.
If you do not yet have a usable rare icon, try this alternative:
- Save before baiting. Place bait, wait, and check what appears and whether you can catch it.
- If unsatisfied, return to the title screen and reload. This time, spend 1 extra turn before placing bait.
- If still unsatisfied, spend 2 turns first next time, comparing each attempt.
- Check skills after catching. Real time spent retrying is a cost too; do not spend all your free action on captures.
The reusable principle is change your actions and compare results. Record the ingredient, turns waited before baiting, exploration before capture, final animal, and skill together. Change only one factor each round to see which action affected the result. The random-number formula remains unclear.
After catching a mount, check its individual skill before deciding whether to keep raising it.
4. Stats and growth at maximum bond
Separate Bond Level 5’s immediate stat bonuses from its growth bonuses. A growth bonus of 10 adds 10 percentage points; it does not instantly add 10 stat points. Nor does one animal have every possible skill at once. See mount rules for Bond Levels 1–4.
Horses for mobility, Strength, Defense, and Speed
Prioritize movement skills on Wild Horses to extend engagement range; Dodge has narrower uses. Choose Ferghanan Horses for durable cavalry and prioritize Canto. If you need Speed and Canto or movement skills, consider Black Horses, which become capturable in Part 3.
| Mount | Immediate stats | Growth bonus | Acquisition/use |
|---|---|---|---|
| Wild Horse | Spd 1, Dex 3, Def 1 | HP 5, Spd 5, Dex 5, Def 5, Res 5 | Common sites such as Sunny Ridge; look for Paired Run, which gives Movement +2 at max level. |
| Monoceros | Spd 1, Dex 1, Lck 3 | HP 5, Spd 5, Dex 5, Res 10 | Rare in Aureans Plains; Paired Healing favors sustain, Paired Miracle favors Luck. |
| Ferghanan Horse | Str 2, Dex 1, Def 2 | HP 5, Str 5, Dex 5, Def 10 | Rare on Sunset Road; Canto or combat-art damage/accuracy. |
| Rocinan | Spd 1, Dex 3, Def 2 | HP 5, Spd 5, Dex 5, Def 10, Res 5 | Comes with Io; Paired Run, total growth 30. |
| Black Horse | Str 1, Spd 3, Dex 1 | HP 5, Str 5, Spd 10, Dex 5 | Rare at Deimos Plateau and Sand Path in Part 3; Canto or Paired Run. |
Ferghanan Horse gives 2 Defense at maximum bond.
Choose this when you need to clear a firing position or retreat from enemy range. It primarily solves positioning needs.
Ranged archers who already attack from safety can choose a Ferghanan Horse with Paired Fierce Arts or Paired Arts-Focus. Choose these when damage often falls just short or combat-art accuracy is unreliable.
Choose according to whether you lack damage, accuracy, or room to retreat.
Ornius for physical and magical improvements
Choose Red Meganius for physical offense and Black Magonius for magic. Common Meganius has more Defense and can carry a Build skill, helping units whose heavy weapons hurt Attack Speed. Red Meganius shifts more of that allocation to Strength. The magical options also differ: choose common Magonius when Speed is sufficient and you want Magic; choose Black Magonius when you need Speed and retreat options. A rare animal is not automatically a replacement.
| Mount | Immediate stats | Growth bonus | Acquisition/use |
|---|---|---|---|
| Wild Ornius | Spd 2, Dex 3 | Spd 10, Dex 15 | Elissa Ridge, Leaping Path, Mount Ouranos, and Pharo Forest; movement or Avoid on favorable terrain. |
| White Ornius | Spd 1, Dex 1, Res 3 | Spd 5, Dex 5, Res 15 | Rare in Pharo Forest; post-combat recovery, poison removal, and similar uses. Check the individual animal. |
| Meganius | Str 1, Dex 1, Def 3 | Str 5, Dex 5, Def 15 | Axion Valley, Mount Ouranos, and Leaping Path; Paired Bulk gives Build +4 at max level, or choose Paired Run. |
| Red Meganius | Str 3, Dex 1, Def 1 | Str 15, Dex 5, Def 5 | Rare in Axion Valley; physical damage, movement, or reduced critical damage taken. |
| Magonius | Mag 3, Dex 2 | Mag 15, Dex 10 | Check Headman's Rock first in Cai’s route; Paired Run or magic accuracy. |
| Black Magonius | Mag 2, Spd 2, Dex 1 | Mag 10, Spd 10, Dex 5 | Rare at Headman's Rock; Canto or Paired Magic-Sight, giving magic critical +10 at max level. |
White Ornius has two evaluations. If offense and mobility come first, its Resistance and healing do little for those needs. If the team lacks recovery, consider it alongside Monoceros. Common ornius also suit units needing Speed and Dexterity. Raise other species first for offense and mobility; raise White Ornius when healing is lacking. Paired Magic-Sight requires equipped magic. A magic sword dealing magical damage does not by itself qualify for this magic critical bonus.
Pegasi for Canto and magical roles
Common pegasi and Falicorn offer dependable Speed, movement, and Canto. Do not deliberately enter bow range for an anti-bow Avoid skill. Dark Pegasus's chance-based evasion is unreliable too, so consider Paired Streak instead. Choose Dark Pegasus to improve Magic or use a magic sword; pegasus classes still have weapon and magic restrictions.
| Mount | Immediate stats | Growth bonus | Acquisition/use |
|---|---|---|---|
| Wild Pegasus | Spd 3, Res 2 | Spd 15, Res 10 | Blackwing Valley, Giant Bird’s Neck, and Pegasus Rock; Paired Streak or bonus attacks against magic enemies. |
| Falicorn | Str 1, Spd 3, Dex 1 | Str 5, Spd 15, Dex 5 | Rare at Giant Bird’s Neck and Pegasus Rock; prioritize individuals with Flying Canto or Paired Streak. |
| Dark Pegasus | Mag 3, Spd 2 | Mag 15, Spd 10 | Rare in Blackwing Valley; magic-sword roles, checking Paired Streak first. |
| Bucephalus | Str 1, Spd 3, Res 2 | Str 5, Spd 15, Res 10 | Comes with  Alexandra; Paired Streak, total growth 30. |
| Red Falicorn | Str 2, Spd 2, Dex 1 | Str 10, Spd 10, Dex 5 | Rare at Gale Coast in Part 3; Paired Streak, with follow-up damage also recorded. |
Dark Pegasus has conflicting taste records: one capture table lists spicy, while the other project and guide tables list bitter. Check this animal's stable panel when feeding it. Do not keep changing bait flavors over this disagreement. Red Falicorn's Paired Stormwind adds +4 damage only on follow-ups.
Use common dragons before late rare species
Wild Bau provides Strength, Dexterity, and a little Speed; prioritize movement skills. Red and Black Bau favor Strength and Speed respectively. Rare dragons are not Cai Part 1 capture targets. Raise a usable common dragon first, then replace it with the rare individual you need in Part 3.
| Mount | Immediate stats | Growth bonus | Acquisition/use |
|---|---|---|---|
| Wild Bau | Str 2, Spd 1, Dex 2 | Str 10, Spd 5, Dex 10 | Check Dragonroar Cape first in Cai’s route; Paired Streak or combat-art attack bonuses. |
| Red Bau | Str 3, Dex 2 | Str 15, Dex 10 | Rare at Ashiro Fortress in Part 3; Look for movement or combat-art accuracy. |
| Black Bau | Str 2, Spd 3 | Str 10, Spd 15 | Rare on Warrior’s Road and in Sidum Valley in Part 3; Check for Flying Canto first. |
| Saramis War Elephant | Str 5, Dex 5, Def 5, Lck 5 | HP 5, Str 5, Dex 5, Def 5, Lck 5 | Receive 2 from the Part 3 side quest “The Elephant Rider's Bond”; not captured in the wild. |
Black Bau skill lists differ: one practical guide lists Paired Streak and Canto; two tables list Paired Resilience and Flying Canto; another lists only Paired Resilience. Canto has multiple records. Whether Movement +2 is in its skill pool remains unclear; inspect the captured individual's skill.
A Part 3 quest is recorded as awarding two elephants. Repeated quest resets in one sample yielded only movement skills, but this does not prove the pool contains only one skill permanently. Elephant immediate stats and growth are distributed differently, so the “stats times 5” shortcut does not apply. HP here is only a growth bonus.
5. Have the intended rider feed preferred food daily
After catching the right skill, start care with the future rider immediately. Prioritize favorite food; otherwise match category and taste with high-rarity ingredients. Delicacies have also shown good results. Stable care and battle both raise bonds. One newly caught mount reached Level 5 in 9 in-game days.
Horses are easier to maintain because you can grow vegetables, while fish and meat require buying or exploration. Rotate crops in three fields near the town at the lower right of the starting map, working backward from your regular animals' panels to the materials you need. The exact town name is unclear; look in that direction.
Use this rhythm:
- Capture day: check the skill, favorite food, and taste, and choose the rider. Units can feed at the stable before reaching their target class.
- Each in-game day: return to the lower Imperial Capital stable and have the intended rider feed the animal. If full, wait for the next daily reset. Daily does not mean weekly.
- While traveling: deploy the rider equipped with the animal to build bond, combining nearby planting and shopping. Do not miss timed quests for a distant feeding trip.
- At Level 3: confirm the skill unlock and start using movement, recovery, or other benefits. At Level 5, check the “+” version and reassess range and positioning.
- Short on ingredients: check substitutes matching category and taste. Grow vegetables for horses as needed, or save before buying and retry ingredient crates.
Feeding resets after midnight, at 0:00 in-game. Favorite food takes roughly ten feedings, and battles speed it up. Do not wait 24 real-world hours.
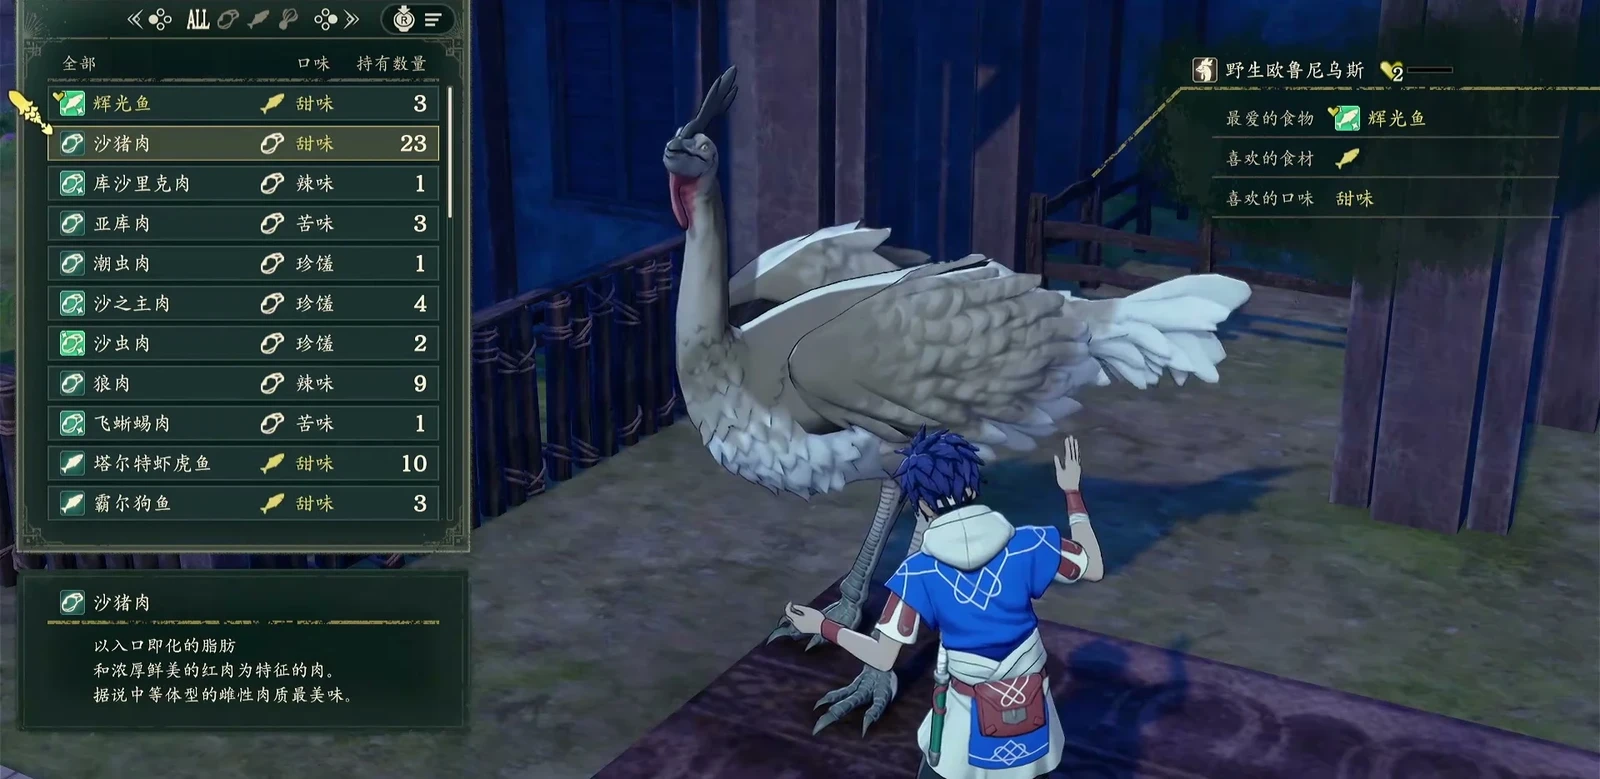
Separate the animal from the bond. Give an animal raised by Cai to Mu, and Mu must build a new relationship. The chapter-restart method that preserves character Support cannot simply be applied to mount bonds. Name animals by “rider + purpose” to reduce feeding mistakes with multiple animals of one species.
6. Assign mounts around team roles
You can retain Peter and train Mu as another Charioteer. Physical, armored, and magical units have separate jobs; assign animals to fill their gaps. Earlier mount growth eases core-unit training. A Mu + Charioteer + Rocinan example exists. Apply your chosen classes as follows:
| Character/role | Practical plan | Reasoning and limits |
|---|---|---|
 Peter | For Charioteer training, raise a Ferghanan Horse; choose Canto or combat-art damage/accuracy. | Keep Peter and consider two Charioteers. A Forest Knight + Ferghanan Horse path also exists; do not merge the two class paths. |
 Mu | For Charioteer, consider moving Rocinan from Io and rebuilding its bond early. | A level 35 Mu example exists; calculate her personal growth skill, class modifier, and mount bonus separately rather than making its total universal. |
| Cai | For magical Caladrius, choose Black Magonius; consider common Magonius if Magic is lacking but Speed is sufficient. | Choose by Magic/Speed needs, not because every Cai path needs Black Magonius. Hybrid Strength/Magic is another option. |
 Olympia | For Caladrius crit builds, seek Black Magonius with Paired Magic-Sight; for dependable retreat, seek Canto. | She suits stacked magic critical bonuses. General magic units may prioritize Canto according to role. |
Healers such as  Tialla and  Ultand | If committed to Troubadour, raise Monoceros for sustain, or a Paired Run horse if range matters more. | Troubadour suits magic and healing; assign Monoceros according to the team’s sustain needs. |
| Alexandra and other female fliers | Check her starting Bucephalus. Raise Falicorn for post-combat retreat rather than ignoring skills for 5 more total growth points. | Special mounts can change riders in Cai’s route but need new bonds; consider Falicorn for Canto/movement. |
Set the role before comparing animals. If Olympia becomes a Troubadour, choose a horse instead of still assigning Black Magonius from the Caladrius table. Wing Soldier is female-only, so Cai cannot use Dark Pegasus. For restrictions, unlock quests, and growth calculations, see character build pages and mount mechanics.
7. Charioteer doubles only mount growth
The unit must equip a horse and build its bond to use the doubling. Charioteer’s own level-based growth modifier begins at level 35. Doubled mount growth is the main reason to choose it earlier. Calculate class and mount growth separately.
For example, a fully bonded Ferghanan Horse adds HP 5, Strength 5, Dexterity 5, and Defense 10 to growth. On Charioteer, the mount contributes HP 10, Strength 10, Dexterity 10, and Defense 20: 50 percentage points total. Rocinan's total of 30 becomes 60 on Charioteer. Applying the multiplier above gives these totals. Character growth, class growth, and personal skills are not also multiplied by 2.
Rocinan is a horse, so Charioteer can equip it. Alexandra’s Bucephalus also totals 30, but is a pegasus and cannot give Charioteer 60. Transferred special animals still need new bonds.
8. Separate map progress from inventory across routes
Cai's captured and raised animals mainly serve his route and later Part 3. Do not plan to send a new horse straight to another Part 1 route. Complete one Part 1 and start another protagonist from Chapter 1 to carry over explored maps. You still need to pass checkpoints again and handle carriage requirements. Separate shared Part 1 progress from levels and items later carried into Part 3. The precise sharing rules for animal storage and mount bonds remain unclear.
You can also open routes with another protagonist before playing Cai: less travel leaves more time to catch animals and grow vegetables. If you started with Cai, follow the earlier plan without restarting.
Starting mounts on other protagonists’ routes
Other routes lack Cai's capture and stable system, but Io and Alexandra still join with special mounts. They have initial bonds that can keep growing through battle. On Dietrich's route, Io can train Bow and change to Charioteer to benefit from Rocinan's growth. Io uses the Rocinan he brought with him; a Ferghanan Horse in Cai's storage cannot be transferred across routes at this point.
Separate preparation into three stages:
| Stage | What to do | Do not assume |
|---|---|---|
| Cai Part 1 | Catch species, select skills, and build core-unit bonds; prepare animals for reassignment in Part 3. | Maximum bond immediately applies to anyone on any route. |
 Dietrich/  Theodora/  Leda Part 1 | Recruit Io or Alexandra under this route’s conditions, check their mounts, and build bonds in battle. | Ordinary automatically supplied animals have special-mount stat growth. |
| Part 2 to Part 3 | Care is available in Part 2, but capturing is not. Check ownership before completion, then storage, characters, and the Sacred Ark in Part 3. | Opening maps automatically shares animals, or missing rares can be caught in Part 2 at the last minute. |
Assign mounts before War Arc completion
Before your first War Arc completion, check mounts you intend to share. Set the Part 3 roster and skills, then unequip animals meant for other characters and leave them in storage. If skipping Part 2 might bypass management, sort them before the Part 1 Chapter 12 main battle as a precaution.
A more detailed record says mounts lock at Part 2 completion. Character updates also update mounts to their latest state. Unequipped animals on the first completion can be withdrawn in Part 3; later completions’ unequipped animals require fragments to redeem. Both records distinguish the first storage pool from animals attached to characters, but field-update priority remains incomplete.
Finish in this order:
- List Part 3 characters and classes. Catch only animals and skills you need rather than blindly farming collection totals.
- Decide which animals stay with current riders and which need reassignment to characters from other records; prioritize storing the latter as advised above.
- If skipping Part 2, sort them before Part 1 Chapter 12. If playing Part 2 manually, recheck before completion.
- In Part 3, inspect actual storage and selected characters’ equipment before the Sacred Ark. Do not assume mounts and bonds take the highest value per field like character stats.