
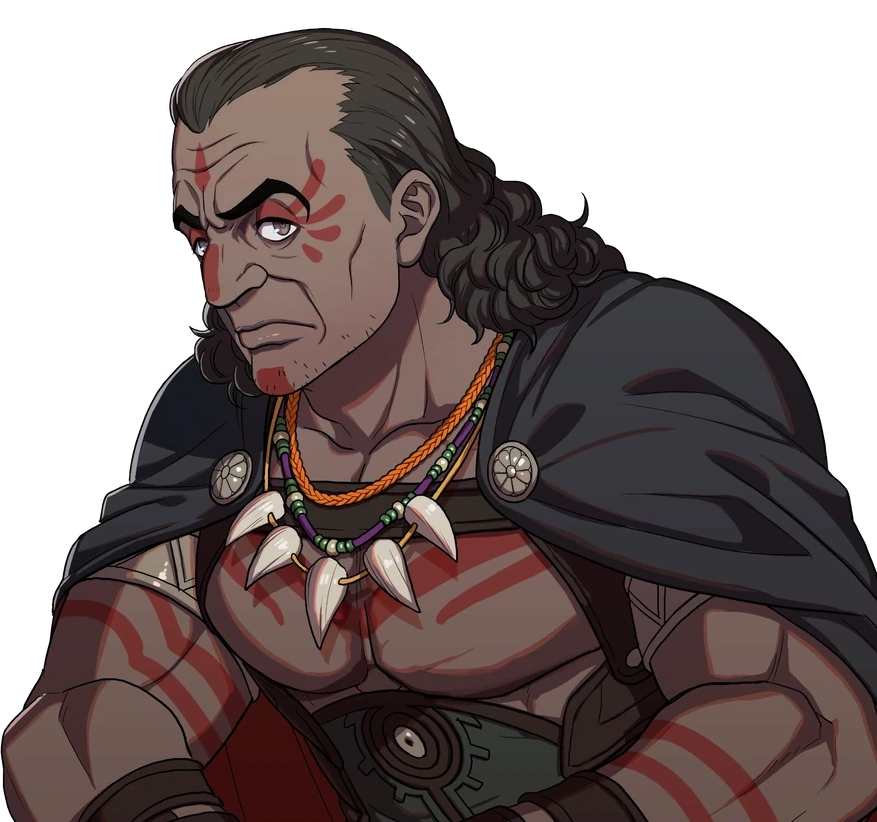
Kiroc
Bキロイカ · Kiroc Dietrich route· Recruitable
 Leda route· Recruitable
 Cai route· Recruitable
 Theodora route· Recruitable
Default to bows, adding Brigand or Warrior if Strength lags. Use Tyranny to finish enemies already poisoned by allies instead of spending extra actions setting up ordinary enemies.
 Hunter Lv11
 Bow
 Fan art →
Nine stats
| HP | Str | Mag | Spd | Dex | Def | Res | Lck | Cha | Total | |
|---|---|---|---|---|---|---|---|---|---|---|
| Growth rates | 55% | 40% | 15% | 55% | 50% | 30% | 15% | 30% | 25% | 315% |
| Overall rank63 characters total | Rank 4 | Rank 29 | Rank 52 | Rank 5 | Rank 8 | Rank 39 | Rank 58 | Rank 36 | Rank 56 | Rank 52 |
| Base statsHunter Lv11 | 31 | 11 | 4 | 15 | 14 | 8 | 5 | 9 | 5 | 102 |
| Base stat ranking63 characters total | Rank 20 | Rank 30 | Rank 46 | Rank 13 | Rank 15 | Rank 24 | Rank 40 | Rank 23 | Rank 50 | Rank 20 |
| Lv60 expected statsForest bow rider into The Calamity | 66 | 35 | 11 | 55 | 49 | 27 | 13 | 26 | 19 | 301 |
| Expected rank62 characters total | Rank 20 | Rank 35 | Rank 53 | Rank 7 | Rank 13 | Rank 34 | Rank 53 | Rank 39 | Rank 59 | Rank 47 |
Proficiency
BowWeakness—Budding talent—Starting skills
Reach Riding D and stay in Forest Knight until before the third section of Part 3.
 Venin Edgeor
 Venin BowPoison yourself to activate Tyranny; use Forest Knight if Ranger is not unlocked.
Xianyun SS’s “Dietrich Route Character Recommendations”: use Warrior or Battlemaster for regular battles to improve Str, using Bow Adept for key battles. This route goes directly from Hunter at recruitment to Brigand at level 20, Warrior at level 35, and Bow Adept for deployment at level 45, following the original Warrior branch. Gladiator is an earlier option for Strength; a recruited Hunter need not go back and repeat it.
Kiroc’s mounted bow follow-ups and status-based damage boosts
For  Kiroc, prioritize Hunter →
 Archer →
 Forest Knight →
 Bow Knight, then move into
 The Calamity. His Speed and Dexterity support accurate follow-up attacks, and Bow Knight’s mobility makes it easier to attack from a safe distance. His Strength is only average and his Resistance is very low. High HP does not mean he can stand in front of mages and take their attacks.
Train Riding before reaching Bow Knight
Start Hunter, enter Archer at level 20, Forest Knight at 35, and prepare Bow Knight from 45. Recommended Renown for Beginner, Specialty, and Advanced tiers is 1, 4, and 8 respectively. Kiroc already joins as Hunter; after late recruitment, continue from his current level and certifications.
Bow is his only strong proficiency, so staying with bows keeps his training focused. Master Archer for  Crescendo first, and also fill Forest Knight’s class experience to obtain Hunter’s Eye. Being able to enter the next class and having earned mastery are separate things. Forest Knight also requires Riding D, which you can obtain through the training grounds or
 Riding Manual. Bow Knight has 7 Movement. Its mastery combat art,
 Hunter's Cross, grants Might +8, Hit +20, and Crit +10, making shots after moving more reliable.
Bow Knight opens in segment 3 of the Promised One’s story. Even with sufficient level and proficiencies, you must wait for that story condition. Keep Forest Knight until then, and later prepare The Calamity according to Divine certification, earning  Divine Will through mastery. Divine certification needs separate preparation; level 45 does not unlock it automatically.
A Ferghanan Horse improves both offense and defense
On Cai’s route, he can ride a Ferghanan Horse as a Forest Knight. Friendship Lv5 grants Strength +2 and Defense +2, plus another 10 percentage points of Defense growth. Kiroc’s Strength is only average, so this helps both his damage and his margin for taking a few hits.
Animal capture begins in Chapter 5 of Cai’s route. Before a rare specimen appears, you can use a wild specimen of the same species. At friendship Lv5, both give a total growth increase of 25 percentage points. Build friendship early so he can benefit as soon as he becomes a Forest Knight. If you switch horses, check the rider’s friendship with that individual again, rather than looking only at the species name.
Follow-ups and accuracy still need Strength
Around level 40, prioritize Strength, Speed, Dexterity, and HP. His personal growth rates are 55% Speed, 50% Dexterity, and 55% HP. Speed enables bow follow-ups, Dexterity supports Hit and critical rate, and HP gives him room for a few mistakes. His 40% Strength growth is not high enough to ignore. His actual damage depends on how well Strength has grown; a follow-up does not guarantee a kill.
You can stay on this route if Magic, Resistance, Luck, or Charm falls below expectations. Magic and Charm are not key stats for a physical archer, while Luck mainly affects critical rate and Dodge. His Resistance growth is only 15%. Use range and positioning to avoid magical attacks rather than relying on high HP to trade hits repeatedly. If his Strength grows poorly, Merge Causality with a Kiroc trained on another route can compensate by taking the higher value for each stat.
His overall assessment is A: he participates in many Part 1 battles, combining Speed, Dexterity, and mounted bow mobility for reliable ranged follow-ups. The cost is usually being unable to counter on enemy phase, so he cannot replace a melee unit across the entire frontline. Total personal growth is 315%, but low Resistance and ordinary Strength still need attention.
Buy three Pure Waters in advance
| Route | Appearance chapter | Bond | Renown |
|---|---|---|---|
 Cai | Part 1, Chapter 6 | 3 | 8 |
 Dietrich | Part 1, Chapter 6 | 1 | 4 |
 Theodora | Part 1, Chapter 7 | 3 | 10 |
 Leda | Part 1, Chapter 5 | 1 | 4 |
All four routes require medium-difficulty negotiations. Hand over three  Pure Water to complete them. You can buy Pure Water at the item shop in the imperial capital, Dagsion, so stock up before heading out. Dietrich’s and Leda’s routes have lower bond and Renown requirements. If you want to secure an archer slot early, meet those requirements first.
Tyranny requires a status condition
 Tyranny grants Attack +3 and Crit +10 in combat only when the enemy has a status condition. It does not activate just because an enemy has lost HP, unlike Peppe’s condition against injured enemies. The level-35 skill
 Menace+ has a 20% chance in combat to halve the enemy’s Dodge; it is not a guaranteed effect each time.
| Infantry skill | Condition and effect |
|---|---|
 Infantry Move | Reduces terrain movement costs by 1 while infantry, to a minimum of 1. |
 Steady Shot+ | Hit +10 while infantry with a bow or magic equipped. |
 Positioning | Avoid +10 in combat on favorable terrain while infantry. |
All three skills require infantry status. You cannot simply add all their effects to a mounted Bow Knight’s stats. To use infantry accuracy boosts and favorable terrain bonuses, you need a plan for fighting on foot. The mounted bow route instead provides mobility and mounted capabilities.
Fix Haphazard’s accuracy first
| Combat art | Durability | Might / Hit / Crit | Effect |
|---|---|---|---|
 Sunder | 2 | +4/0/+10 | Range 1. |
 Chop | 4 | +8/-30/0 | Range 1; high Might but low accuracy. |
 Flash Blow | 5 | +7/0/0 | Range 1; a (Dexterity / 2)% chance to grant an additional Attack +5. |
 Vital Shot | 2 | +4/0/+5 | Range 2; higher critical rate. |
 Breakaway Shot | 10 | -5/0/0 | Range 2; can move 1 space after combat. |
 Sneaky Shot | 4 | +5/0/0 | Range 2; on favorable terrain, grants Attack +5 and Hit and Crit +10. |
 Haphazard | 10 | 0/-50/0 | Range 2; attacks four times consecutively, each dealing 90% damage. |
High Dexterity and bow-class Hit bonuses help, but Haphazard itself has Hit −50; do not simply add all four hits’ damage. Check the forecast and use more reliable Vital Shot when needed. On favorable terrain, consider Sneaky Shot to use its extra Attack and Hit. Sword arts are another option in sword/bow classes, but the equipped class must support those weapons.
Coffee, alcohol, and Pale Raven conversations
He likes the sea, ships, obedient subordinates, and taking everything in a raid. He has many favorite gifts, so keeping a few in reserve can save trips to shops while raising his bond for recruitment.
- Favorites:
 Common Coffee,
 Mature Ghosh,
 Flexible Fishing Rod,
 Rare Spices,
 Arrowhead Gem,
 Crimson Ghosh,
 Volcano Ghosh.
- Likes:
 Joint-Relief Gloves,
 Blue Shosh,
 Mature Shosh,
 Rustic Ghosh,
 Select Coffee,
 Sharp Fishhook,
 Southern Coffee,
 Training Pillar,
 Training Weights,
 Young Ghosh,
 Young Shosh.
- Somewhat likes:
 Saraminian Sweets,
 Simple Pastries,
 Garum.
Choose Pale Raven responses based on the topic:
| Conversation topic | Response |
|---|---|
| Tells you to peck his enemies’ eyes out if you meet them | Threaten |
| Invites you to join his pirate crew | Nod nervously |
| Says he would faint if he saw a ghost | Tilt your head |
| Plans to hunt only for treasure after reforming his crew and asks you to join | Sing energetically |
| Misses his subordinates and hopes they return | Nod |
| Calls the religious order more dangerous than pirates | Nod |
| Claims to be a legendary pirate’s heir and to own his hideout | Spread your wings |
More guides
- Kiroc’s Ranger playthrough recordHiiro
- Kiroc’s poison sword-and-bow routeGameWith Fortune’s Weave guide team
Site guides

Take Archer into Sniper and Bow Adept, patching Strength only if needed. Finish enemies already afflicted by allies; do not spend an extra action setting up ordinary foes.
Allies must apply poison or another confirmed status before Tyranny grants Attack +3 and Critical +10. You can use this whenever the party has the support, without waiting for Part 3. Spending an action to afflict an ordinary enemy may be less efficient than simply killing it.
Class progression by stage
The levels below are exam thresholds. Train onward from his current class and proficiencies instead of chasing levels by story part alone. Prepare licenses, Renown, and class unlocks too.
Part 1: follow bows and patch Strength if needed
The standard bow route: if he is still a Hunter, train Bow C. At level 20 and Renown 4, take Archer and master Crescendo for better accuracy after kills. At level 35, Renown 8, and Bow B, take  Sniper and master Marksmanship for Hit while using a bow. This route does not require high Sword and Axe ranks first.
Another approach develops Strength in Part 1 first: Gladiator → Brigand → Warrior. Gladiator needs level 5, Renown 1, and D in Sword, Axe, or Gauntlet. Brigand needs level 20, Renown 4, and Sword or Axe C. Warrior needs level 35, Renown 8, and B in Sword, Axe, or Gauntlet. His Speed and Dexterity are sufficient, so stacking more Speed may not fix low damage. Use this chain if Strength is lacking; otherwise keep bow classes.
If you plan to return to bows, keep training Bow during the Strength detour. A high-investment version also aims for Sword S, Bow S, and Authority B for later class changes. Meet Warrior requirements first, then allocate remaining training time.
Prepare a Venin Bow or have an ally apply status with a Venin Edge or Venin Bow first. Tyranny requires an actual status condition. Peppe's damaged-enemy trigger does not apply to it.
Part 2: level as Warrior and fight in a bow class
Keep Sniper for the bow route and train Bow to A. If Strength is low, level as Warrior between major battles and switch back to bows for combat. Check his actual Strength before deployment.
Alternative: Brigand into swords and bows. Use Brigand for a Strength foundation, then  Ranger, requiring level 35, Renown 8, Sword or Bow B, and its unlock. Rogue → Ranger without Archer does not create Crescendo. Learning it takes additional mastery time.
Chariot is a separate build. One Dietrich team pairs him with Io as two chariots, charging from front and back to finish targets one charge cannot kill, then returns to normal classes in the War story. Chariot requires level 20, Renown 4, Bow C, and Riding D. He does not need to remain in it permanently.
Part 3: fix accuracy for the four-hit bow art
Default to  Bow Adept at level 45 and Bow A after its unlock. A Strength plan can keep leveling in
 Battlemaster and use Bow Adept in actual battles. Battlemaster needs level 45, Sword, Axe, or Gauntlet A and its unlock. If the team needs sword/bow tools more, choose
 Shadow Seeker at level 45 and Sword or Bow A. It is not the same equipment set as a pure bow endpoint.
An advanced option combines status with a four-hit bow art. Have Talimun or another ally inflict a status first, then use Tyranny for damage. The four-hit art has a large accuracy penalty, so use Mars's Blessing, Crescendo, and infantry-only Steady Shot for Hit. Once Haphazard is learned, preview it against a low-Avoid enemy before committing.
Crescendo requires Archer mastery and kills on the current map to build stacks. Steady Shot is infantry-only; replace it while mounted.
Finish afflicted enemies from the backline
Let allies already carrying Venin Bows or status tools act first, then finish from behind. Halvin can poison, or Leda can apply status before his attack. Use actions the team already needs instead of adding a separate poison action for every enemy.
If a main attacker already kills in one hit, skip the Tyranny detour. Status preparation is more likely to pay off on bosses and durable targets that already need several units. His other skill, Coercion, lowers Dodge, not ordinary Avoid, so it does not improve normal accuracy. Low Resistance favors rear-line offense; seemingly sufficient HP is no reason to take mage attacks.
Recruitment details
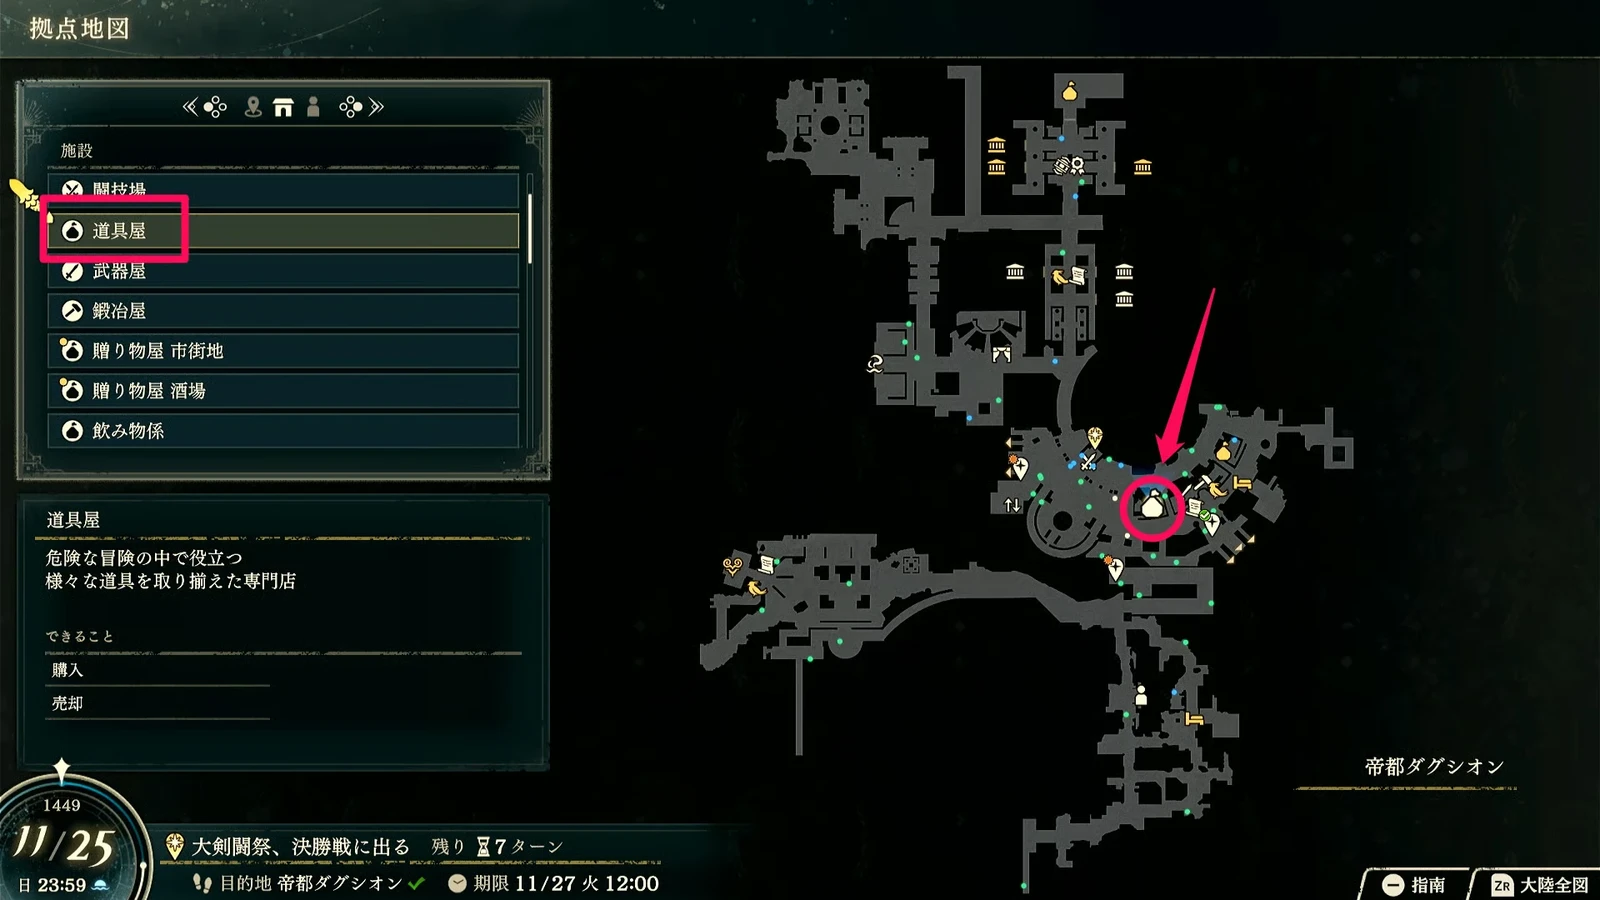
Dietrich and Leda have lower thresholds: Renown 4, support 1, and 3 Pure Water. Cai needs Renown 8, support 3, and 8 Pure Water; Theodora needs Renown 10, support 3, and 8 Pure Water. Prepare the amount for your route. See the recruitment page for appearance dates and negotiation.
Low HP is not status; Coercion does not improve ordinary accuracy
- Treating lost HP as a status. Tyranny requires an actual status condition, not merely a wounded enemy.
- Counting every debuff as a status. Do not count ordinary stat penalties or movement restrictions toward Tyranny yet.
- Using Coercion to improve ordinary accuracy. It affects Dodge.
- Assuming Crescendo without mastering Archer. Reclassing, mastery, and equipping are separate steps.
- Judging a four-hit art only by total damage. Check the Hit penalty, current stacks, and infantry requirements.
- Spending an extra status action on an ordinary enemy. Kill directly when you can.
Comments
Hunter→Lv20Archer→Lv35Forest Knight→Lv45Bow Knight→The CalamityVenin Bow Mt 3 Hit 75 Wt 4
 Iron BowMt 9 Hit 75 Wt 6
 LongbowMt 12 Hit 60 Wt 13Venin EdgeMt 3 Hit 90 Wt 3
 Vulnerary
 Venom Hunter GemWt 15
 Bows Lv. 1Hit +3 when a bow is equipped
 Steady Shot[Infantry] Hit +5 when a bow or magic is equipped
 Hunting BasicsDex、Spd+1
 Swords Lv. 1Hit +3 when wielding a sword
 Attack BasicsStr+1Vital ShotCost 2 Mt 4 Hit 0Breakaway ShotCost 10 Mt 5 Hit 0SunderCost 2 Mt 4 Hit 0
 DeadeyeCost 5 Mt 0 Hit 30Venom Hunter GemBackupWt 15
 Venin BowMt 3 Hit 75 Wt 4
 Bows Lv. 2Hit +5 when a bow is equippedSteady Shot[Infantry] Hit +5 when a bow or magic is equippedHunting BasicsDex、Spd+1CrescendoHit +3 when defeating an enemy (up to +30) (lasts until the end of the battle)Attack BasicsStr+1Vital ShotCost 2 Mt 4 Hit 0Breakaway ShotCost 10 Mt 5 Hit 0Sneaky ShotCost 4 Mt 5 Hit 0DeadeyeCost 5 Mt 0 Hit 30Venom Hunter GemBackupWt 15
 Venin Bow +2Mt 7 Hit 75 Wt 4Iron Bow +2Mt 13 Hit 75 Wt 6LongbowMt 12 Hit 60 Wt 13Venin EdgeMt 3 Hit 90 Wt 3VulneraryVenom Hunter GemWt 15
 Bows Lv. 3Hit and Avoid +5 when wielding a bowMenace+20% chance in combat to halve the enemy's DodgeCrescendoHit +3 when defeating an enemy (up to +30) (lasts until the end of the battle)
 Hunter's EyeAttack +3 on follow-up attacks when a bow is equipped
 MarksmanshipHit +15 when a bow is equippedVital ShotCost 2 Mt 4 Hit 0Sneaky ShotCost 4 Mt 5 Hit 0
 Haphazard+Cost 7 Mt 0 Hit -50DeadeyeCost 5 Mt 0 Hit 30Venom Hunter GemBackupWt 15
 Ferghanan HorseStr+2 Dex+1 Def+2
 Venin Bow +2Mt 7 Hit 75 Wt 4
 Silver BowMt 18 Hit 75 Wt 5LongbowMt 12 Hit 60 Wt 13
 Cleansing BladeMt 8 Hit 90 Wt 3VulneraryVenom Hunter GemWt 15
 Bows Lv. 4Hit and Avoid +7 when wielding a bowMenace+20% chance in combat to halve the enemy's DodgeCrescendoHit +3 when defeating an enemy (up to +30) (lasts until the end of the battle)Hunter's EyeAttack +3 on follow-up attacks when a bow is equippedMarksmanshipHit +15 when a bow is equippedVital ShotCost 2 Mt 4 Hit 0Sneaky ShotCost 4 Mt 5 Hit 0Haphazard+Cost 7 Mt 0 Hit -50DeadeyeCost 5 Mt 0 Hit 30Venom Hunter GemBackupWt 15Ferghanan HorseStr+2 Dex+1 Def+2Venin Bow +2Mt 7 Hit 75 Wt 4Silver Bow +3Mt 23 Hit 75 Wt 5LongbowMt 12 Hit 60 Wt 13Cleansing BladeMt 8 Hit 90 Wt 3VulneraryVenom Hunter GemWt 15
 Bows Lv. 5Hit and Avoid +10 when wielding a bowMenace+20% chance in combat to halve the enemy's DodgeCrescendoHit +3 when defeating an enemy (up to +30) (lasts until the end of the battle)Hunter's EyeAttack +3 on follow-up attacks when a bow is equippedDivine WillLck+10Sneaky ShotCost 4 Mt 5 Hit 0Haphazard+Cost 7 Mt 0 Hit -50Hunter's CrossMt 8 Hit 20DeadeyeCost 5 Mt 0 Hit 30Venom Hunter GemBackupWt 15
 Elite HuntersGambit: Disrupting ShotVenin Bow +2Mt 7 Hit 75 Wt 4Silver Bow +3Mt 23 Hit 75 Wt 5LongbowMt 12 Hit 60 Wt 13Cleansing BladeMt 8 Hit 90 Wt 3VulneraryVenom Hunter GemWt 15Bows Lv. 5Hit and Avoid +10 when wielding a bowMenace+20% chance in combat to halve the enemy's DodgeCrescendoHit +3 when defeating an enemy (up to +30) (lasts until the end of the battle)Hunter's EyeAttack +3 on follow-up attacks when a bow is equippedDivine WillLck+10Sneaky ShotCost 4 Mt 5 Hit 0Haphazard+Cost 7 Mt 0 Hit -50Hunter's CrossMt 8 Hit 20DeadeyeCost 5 Mt 0 Hit 30Venom Hunter GemBackupWt 15Elite HuntersGambit: Disrupting ShotHunter→Lv20
 Rogue→Lv35Ranger→Lv45Shadow SeekerVenin BowMt 3 Hit 75 Wt 4Iron BowMt 9 Hit 75 Wt 6LongbowMt 12 Hit 60 Wt 13Venin EdgeMt 3 Hit 90 Wt 3VulneraryVenom Hunter GemWt 15Bows Lv. 1Hit +3 when a bow is equippedSteady Shot[Infantry] Hit +5 when a bow or magic is equippedHunting BasicsDex、Spd+1Swords Lv. 1Hit +3 when wielding a swordAttack BasicsStr+1Vital ShotCost 2 Mt 4 Hit 0Breakaway ShotCost 10 Mt 5 Hit 0SunderCost 2 Mt 4 Hit 0DeadeyeCost 5 Mt 0 Hit 30Venom Hunter GemBackupWt 15Venin BowMt 3 Hit 75 Wt 4Iron BowMt 9 Hit 75 Wt 6LongbowMt 12 Hit 60 Wt 13Venin EdgeMt 3 Hit 90 Wt 3VulneraryVenom Hunter GemWt 15Bows Lv. 2Hit +5 when a bow is equippedSteady Shot[Infantry] Hit +5 when a bow or magic is equippedHunting BasicsDex、Spd+1CrescendoHit +3 when defeating an enemy (up to +30) (lasts until the end of the battle)
 In ShadowAvoid +10 after defeating an enemy (resets after 1 battles)Vital ShotCost 2 Mt 4 Hit 0Breakaway ShotCost 10 Mt 5 Hit 0Sneaky ShotCost 4 Mt 5 Hit 0DeadeyeCost 5 Mt 0 Hit 30Venom Hunter GemBackupWt 15
 Venin Bow +2Mt 7 Hit 75 Wt 4Iron Bow +2Mt 13 Hit 75 Wt 6LongbowMt 12 Hit 60 Wt 13Venin EdgeMt 3 Hit 90 Wt 3VulneraryVenom Hunter GemWt 15Bows Lv. 3Hit and Avoid +5 when wielding a bowMenace+20% chance in combat to halve the enemy's DodgeSteady Shot+[Infantry] Hit +10 when wielding a bow or magicCrescendoHit +3 when defeating an enemy (up to +30) (lasts until the end of the battle)Infantry Move[Infantry] Terrain movement cost -1 (minimum 1)Vital ShotCost 2 Mt 4 Hit 0Sneaky ShotCost 4 Mt 5 Hit 0Haphazard+Cost 7 Mt 0 Hit -50DeadeyeCost 5 Mt 0 Hit 30Venom Hunter GemBackupWt 15
 Adept ArchersGambit: Disrupting ShotVenin Bow +2Mt 7 Hit 75 Wt 4Silver BowMt 18 Hit 75 Wt 5LongbowMt 12 Hit 60 Wt 13Cleansing BladeMt 8 Hit 90 Wt 3VulneraryVenom Hunter GemWt 15Bows Lv. 4Hit and Avoid +7 when wielding a bowMenace+20% chance in combat to halve the enemy's DodgeSteady Shot+[Infantry] Hit +10 when wielding a bow or magicCrescendoHit +3 when defeating an enemy (up to +30) (lasts until the end of the battle)Infantry Move[Infantry] Terrain movement cost -1 (minimum 1)Vital ShotCost 2 Mt 4 Hit 0Sneaky ShotCost 4 Mt 5 Hit 0Haphazard+Cost 7 Mt 0 Hit -50DeadeyeCost 5 Mt 0 Hit 30Venom Hunter GemBackupWt 15Elite HuntersGambit: Disrupting ShotVenin Bow +2Mt 7 Hit 75 Wt 4Silver BowMt 18 Hit 75 Wt 5LongbowMt 12 Hit 60 Wt 13Cleansing BladeMt 8 Hit 90 Wt 3VulneraryVenom Hunter GemWt 15Bows Lv. 4Hit and Avoid +7 when wielding a bowMenace+20% chance in combat to halve the enemy's DodgeSteady Shot+[Infantry] Hit +10 when wielding a bow or magicCrescendoHit +3 when defeating an enemy (up to +30) (lasts until the end of the battle)Infantry Move[Infantry] Terrain movement cost -1 (minimum 1)Vital ShotCost 2 Mt 4 Hit 0Sneaky ShotCost 4 Mt 5 Hit 0Haphazard+Cost 7 Mt 0 Hit -50DeadeyeCost 5 Mt 0 Hit 30Venom Hunter GemBackupWt 15Elite HuntersGambit: Disrupting ShotHunter→Lv20
 Brigand→Lv35
 Warrior→Lv45Bow AdeptVenin BowMt 3 Hit 75 Wt 4Iron BowMt 9 Hit 75 Wt 6LongbowMt 12 Hit 60 Wt 13Venin EdgeMt 3 Hit 90 Wt 3VulneraryVenom Hunter GemWt 15Bows Lv. 1Hit +3 when a bow is equippedSteady Shot[Infantry] Hit +5 when a bow or magic is equippedHunting BasicsDex、Spd+1Swords Lv. 1Hit +3 when wielding a swordAttack BasicsStr+1Vital ShotCost 2 Mt 4 Hit 0Breakaway ShotCost 10 Mt 5 Hit 0SunderCost 2 Mt 4 Hit 0DeadeyeCost 5 Mt 0 Hit 30Venom Hunter GemBackupWt 15BrigandVenin EdgeMt 3 Hit 90 Wt 3Swords Lv. 1Hit +3 when wielding a swordHunting BasicsDex、Spd+1Attack BasicsStr+1DeadeyeCost 5 Mt 0 Hit 30Venom Hunter GemBackupWt 15WarriorVenin EdgeMt 3 Hit 90 Wt 3Swords Lv. 1Hit +3 when wielding a swordMenace+20% chance in combat to halve the enemy's DodgeHunting BasicsDex、Spd+1Attack BasicsStr+1Infantry Move[Infantry] Terrain movement cost -1 (minimum 1)DeadeyeCost 5 Mt 0 Hit 30Venom Hunter GemBackupWt 15Adept ArchersGambit: Disrupting ShotVenin Bow +2Mt 7 Hit 75 Wt 4Bows Lv. 4Hit and Avoid +7 when wielding a bowMenace+20% chance in combat to halve the enemy's DodgeSteady Shot+[Infantry] Hit +10 when wielding a bow or magicCrescendoHit +3 when defeating an enemy (up to +30) (lasts until the end of the battle)MarksmanshipHit +15 when a bow is equippedVital ShotCost 2 Mt 4 Hit 0Sneaky ShotCost 4 Mt 5 Hit 0Haphazard+Cost 7 Mt 0 Hit -50DeadeyeCost 5 Mt 0 Hit 30Venom Hunter GemBackupWt 15Elite HuntersGambit: Disrupting ShotVenin Bow +2Mt 7 Hit 75 Wt 4Bows Lv. 4Hit and Avoid +7 when wielding a bowMenace+20% chance in combat to halve the enemy's DodgeSteady Shot+[Infantry] Hit +10 when wielding a bow or magicCrescendoHit +3 when defeating an enemy (up to +30) (lasts until the end of the battle)MarksmanshipHit +15 when a bow is equippedVital ShotCost 2 Mt 4 Hit 0Sneaky ShotCost 4 Mt 5 Hit 0Haphazard+Cost 7 Mt 0 Hit -50DeadeyeCost 5 Mt 0 Hit 30Venom Hunter GemBackupWt 15Elite HuntersGambit: Disrupting Shot
Build approach and suitable stages
Forest bow rider into The Calamity: Archer Lv20; Forest bow rider into The Calamity: Forest Knight Lv35; Forest bow rider into The Calamity: Bow Knight Lv45; Forest bow rider into The Calamity: The Calamity Lv45, Lv60
Reach Riding D and stay in Forest Knight until before the third section of Part 3.
Sword/bow status-effect Shadow Seeker: Rogue Lv20; Sword/bow status-effect Shadow Seeker: Ranger Lv35; Sword/bow status-effect Shadow Seeker: Shadow Seeker Lv45, Lv60
Venin EdgeorVenin BowPoison yourself to activate Tyranny; use Forest Knight if Ranger is not unlocked.
Boost StrThen Bow Adept: Brigand Lv20; boost Str before Bow Adept: Warrior Lv35; improve Str before Bow Adept: Bow Adept Lv45, Lv60
Xianyun SS’s “Dietrich Route Character Recommendations”: use Warrior or Battlemaster for regular battles to improve Str, using Bow Adept for key battles. This route goes directly from Hunter at recruitment to Brigand at level 20, Warrior at level 35, and Bow Adept for deployment at level 45, following the original Warrior branch. Gladiator is an earlier option for Strength; a recruited Hunter need not go back and repeat it.
DexWidely recommendedDexVery strongDexUseful for specific strategies
 Bowfaire
 Sword
 Swords Lv. 2
 Swords Lv. 3
 Furious Strike
 Swords Lv. 4
 Swords Lv. 5
 Swordfaire
 Spear
 Gale Spear
 Spears Lv. 1
 Focused Throw
 Spears Lv. 2
 Double Throw
 Spears Lv. 3
 Yawning Throw
 Spears Lv. 4
 Spears Lv. 5
 Spearfaire
 Axe
 Smash
 Axes Lv. 1
 Hurl
 Axes Lv. 2
 Power Throw
 Axes Lv. 3
 Axes Lv. 4
 Axes Lv. 5
 Axefaire
 Gauntlet
 Deal Death
 Fists Lv. 1
 Fists Lv. 2
 Fists Lv. 3
 Fists Lv. 4
 Fists Lv. 5
 Fistfaire
 Black Magic
 Thunder
 Black Magic Lv. 1
 Blizzard
 Black Magic Lv. 2
 Thoron
 Black Magic Lv. 3
 Ice Blade
 Black Magic Lv. 4
 Black Magic Lv. 5
 Black-Magic Mastery
 White Magic
 Heal
 Laia
 White Magic Lv. 1
 Nosferatu
 White Magic Lv. 2
 Torch
 White Magic Lv. 3
 Berserk
 White Magic Lv. 4
 White Magic Lv. 5
 White-Magic Mastery
 Infantry
 Knightly Senses
 Flying
 Read the Winds
 Heavy Armor
 Timely Guard
 Spearblock
 Heavy Break
 Bld
 Authority
 Threaten
 Lend Dexterity
 Threaten+
Kiroc: recruitable on the Cai, Dietrich, Theodora, and Leda routes (renown 4–10).
 Cai's storyRecruitable
Steps
Available from Part I, Chapter 6, 5/1. Give a gift to unlock recruitment, then reach Renown 8 and Bond 3 with Cai. Give Pure Water×8。
- NegotiatePure Water×8
- TipYoung GhoshAvailable from the Gift Merchant at the Lower City Tavern, Imperial Capital Dagsion, for 50G each. Gifts or dining raise bonds with this route's protagonist; the protagonist must join the meal. The capital's Item Shop stocksPure WaterSold at 500G per bottle; this route requires 8 bottles, costing 4000G in total.
 Dietrich's storyRecruitable
Steps
Available from Part I, Chapter 6, 5/1. Give a gift to unlock recruitment, then reach Renown 4 and Bond 1 with Dietrich. Give Pure Water×3。
- NegotiatePure Water×3
- TipYoung GhoshBuy from the gift merchant in Imperial Capital Dagsion's lower tavern for 50G each. This route requires only 1 support; check the conditions immediately after the first gift. The capital item shop has Pure WaterSold at 500G per bottle; this route requires 3 bottles, costing 1500G in total.
 Theodora's storyRecruitable
Steps
Available from Part I, Chapter 7, 5/1. First give one gift to unlock recruitment, then reach renown 10 and support 3 with Theodora. Hand over Pure Water×8。
- NegotiatePure Water×8
- TipYoung GhoshAvailable from the Gift Merchant at the Lower City Tavern, Imperial Capital Dagsion, for 50G each. Gifts or dining raise bonds with this route's protagonist; the protagonist must join the meal. The capital's Item Shop stocksPure WaterSold at 500G per bottle; this route requires 8 bottles, costing 4000G in total.
 Leda's storyRecruitableEasiest option
Steps
Encounter from Part I, Chapter 5, 5/1. Give a gift to unlock recruitment, then reach Renown 4 and bond 1 with Leda. Hand over Pure Water×3。
- NegotiatePure Water×3
- TipYoung GhoshBuy from the gift merchant in Imperial Capital Dagsion's lower tavern for 50G each. This route requires only 1 support; check the conditions immediately after the first gift. The capital item shop has Pure WaterSold at 500G per bottle; this route requires 3 bottles, costing 1500G in total.
 Renown level
 Bond Level with this route's protagonist. For all characters across the four routes, see Recruitment; see recruitment steps at How to recruit。
 Most effective gifts
All are most-loved gifts available at shops. Most of Kiroc's favorites are fashion items and Teff (coffee). Most-loved gifts show double arrows in-game and give the largest affection increase.
Find where to buy these on the map→ Where to buy all 9 favorite gifts→
Favorite9 items



Likes13 items
Young Ghosh50G · Fermented drinksRustic Ghosh100G · Fermented drinksYoung Shosh100G · Fermented drinksMature Shosh150G · Fermented drinks Light Shosh100G · Fermented drinksMature Ghosh100G · Fermented drinksBlue Shosh150G · Fermented drinksTraining Weights300G · TrainingTraining Pillar500G · Training
 Rare Southern Seeds50G · FarmworkJoint-Relief Gloves300G · Bow
 Skin BalmFashionSharp Fishhook100G · Fishing
LikesStealing, the sea, ships, obedient underlingsInterestsSailing and piracy
Bond partners2 characters · 0 can reach A
 B
 C
Letters indicate the highest available support conversation (C = support Lv2, B = support Lv3, A = support Lv4); A paired ending is confirmed,For the rules, seeBonds。
The cruel and infamous former leader of the Blackbird Pirates, nicknamed “Strange Bird.” Before arriving in Dagsion, he apparently had a dispute with Talimun, head of the Vandal Trading Company, and still bears a grudge.
Details
| Title | Former leader of the Blackbird Pirates |
|---|---|
| Affiliation | Blackbird Pirates |
| Origin | Seaside village |
| Height | 190 cm |
| Birthday | 3/31 |
| Likes | Stealing, the sea, ships, obedient underlings |
| Interests | Sailing and piracy |
| Japanese voice | Shunsuke TodoOfficial materials |
| English voice actor | Jalen AskinsVoice actor database |
Relationships

In the story
Part I: A pirate who lost ship and crew
Originally from an ordinary seaside village, Kiroc turns to piracy and forms the Blackbird Pirates. By the Heroic Games, he has lost his ship and crew and still resents Talimun.
After Part III: Individual endingSpoilers
After the war, Kiroc returns to sea, regathers his followers and resumes piracy, frequently clashing with the Vandal Trading Company. His fear of ghosts keeps him from the front line; the imperial navy eventually attacks his base, killing him and defeating his crew.
Trivia
- Kiroc is terrified of ghosts and may even faint at the sight of one.